Adaptive Card Customizer
Implementation
Tables
Information
- In the Adaptive Card template table (DT450 Adaptive Card template), Adaptive Card templates are stored and for each template a Jython class is specified which implements an API for generating the Adaptive Cards and treats different interaction options. A module ID in the table references a module, supporting the Jython class during generation.
- In the Adaptive Card table (DT451 Adaptive Cards), the generated classes are saved. A pre-insert event calls the appropriate Jython class for generating the card during the creation of a record. The generated card is stored in a column in the Adaptive Card table and can thus simply be read out by the Python code, e.g. to send an e-mail which contains the card.
- With different Jython classes you can implement different expansion stages of the feature and adapt it to individual requirements.
Modules
Information
Generate Card (Python)
- To generate a card from Python, you have to create a new record in DT451 Adaptive Cards which contains the corresponding template, parameter, and recipient values. After the record has been saved, the JSON code of the card can be read from the Generated cards column and be sent via the mail API.
- Via the Python ID you can call a template and generate a new card:
 template = adaptivecards.get_template_from_python_id(python_id)
template.create_new_card(recipient, parameter)Refresh card
- In order for the cards to be refreshed when they are opened by the user, you have to store the URL of a web interface which returns the new JSON. This is automatically inserted in each card by the framework.
- The web interface with the “ac_refresh” Python ID is responsible for refreshing. The URL for this web interface is automatically read out in the card generation and inserted in the JSON. If the corresponding URL is then opened, the responsible Jython class will be created and an
update()- method is called which returns the new card. The saved JSON of the last generation will be loaded and compared with the return value of theupdate()method. If the objects are identical, no new card will be sent. If the card has changed, the new version will be sent. The stored card is updated in the Adaptive Card table. - The default behavior of the
update()method is to open the module stored on the template and to pass on the following parameters to theon_web_load()method:
{'target': AdaptiveCardTarget.LOAD_DATA,
'card_parameter': <Parameter der im System für die Karte hinterlegt ist>,
'card': <UUID der Karte>}
Note
- The Archived flag on the card controls this behavior. If a card has been archived and a refresh request is received, the last status of the card will be used, the auto-refresh will be removed, and the card will be sent one last time.
Card Interactions
Information
- In order to interact with the PLANTA project system from a card, the URL of the web interface with “ac_action” Python ID must be stored on the buttons. If it is activated, the URL and the API key of this web interface will automatically be inserted in the generated card data in order for the buttons to be able to reference them. If the URL is opened, the web interface will generate the responsible Jython class and the
action(body)method will be called which then returns the new card. - If the "ac_action” web interface is activated, the following object will automatically be inserted in the data of each card:
  "action": {
    "apikey": "<API key of the web interface>",
    "url": "<URL of the web interface>"
  }
- The default behavior of the
action()method is to open the module stored on the template and to pass on the following parameters to theon_web_load()-method:
{'target': AdaptiveCardTarget.EXECUTE_ACTION,
  'card_parameter': <Parameter der im System für die Karte hinterlegt ist>,
  'body': <Body des Web-Request>,
'card': <UUID of the card>}- An
ActionSetelement must be used in the Adaptive Card and it must contain anAction.Httpelement for calling the web interface. For the configuration, please refer to the example. - Caution: In the online designer, these elements are no longer supported! If you copy a template which contains such elements and make changes, all
ActionSetobjects are simply removed.
Example JSON for a button on a card:
{
  "type": "ActionSet",
  "id": "${uuid}f",
  "actions": [
    {
      "type": "Action.Http",
      "id": "${uuid}",
      "title": "${$root.strings.assignment.button}",
      "url": "${$root.action.url}",
      "method": "POST",
      "body": "{\"uuid\": \"${uuid}\"}",
      "headers": [
        {
          "name": "Apikey",
          "value": "${$root.action.apikey}"
        }
      ]
    }
  ]
}
Note
- Each ActionSet/Action requires its own UUID
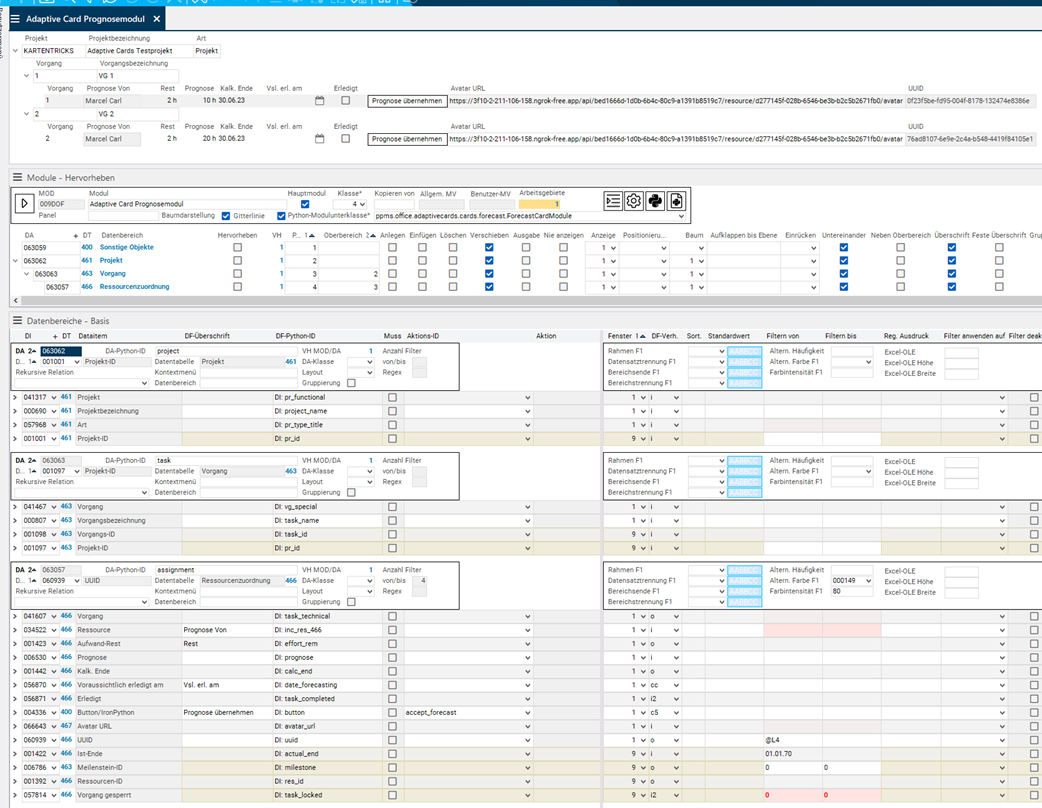
- In the body, the customizer can decide for him/herself which cards he/she requires and how he treats them in his implementation. The forecast card retrieves, e.g., the UUID of the record for which the forecast is to be adopted. The process phase card retrieves the comment and the required action (approval/return/abortion).
Show Resource Avatars
Information
- The avatar of a resource can be retrieved from the web interface using the “avatar” Python ID.
- In DT467 Resource, there is DI066643 Avatar URL which returns the URL of the avatar of a resource. The DI is simply stored in the corresponding module so that the value can be read. Subsequently it will be referenced in the Adaptive Card template via templating.
JSON example:
{
    "type": "Image",
    "url": "${data.resource[0].avatar_url}",
    "style": "Person",
    "size": "Small"
}Show cards in PLANTA project
Information
- Cards can be displayed in PLANTA project.
- For this purpose, you have to insert a button DI (DI004336), select DF behavior = “ac” and store the following data field configuration:
{
    "CardTemplate": "<Python ID wo das Template hinterlegt ist>",
    "CardData": "<Python ID wo die Daten hinterlegt sind>"

}- For already formatted cards, both parameters can simply be set to the field which contains the generated card.
Adaptive Card Designer
Information
- The Adaptive Card Designer can be displayed in PLANTA project. It is already preconfigured for Outlook and Adaptive Card version 1.3. Via the configuration, a particular card can be loaded in the Designer in the system.
- For this purpose, you have to insert a button DI (DI004336), select DF behavior = “ad” and store the following data field configuration:
{
    "TemplateDf": "<Python ID wo das Template hinterlegt ist>",
    "SampleDataDf": "<Python ID wo die Beispieldaten hinterlegt sind>",
    "StretchToFill": true/false
}Details
- Parameters:
TemplateDf: Python ID of the field which contains the template which is to be loaded in the editor. Changes made to the template are also written back into this data field.SampleDataDf: Python ID of the data field which contains the sample data to be loaded in the editor. Changes are also written back into this data field.StretchToFill: If activated, the Designer Control fills the entire module and other content is ignored.- If the template and the sample data fields are set to input and the module allows saving, the changes from the Designer are also written back in the fields.
- The data fields must be in the same data area as the Designer.
- Via the context menu you can use additional features of the Designer.
Jython Class
Information
- The Jython class is instanced during the generation of a 451 record. With the card template, it receives the record, and thus also the reference to the record in DT450.
- In PLANTA standard, we currently use the same Jython class for all Adaptive Cards:
customizing.adaptivecards.BaseAdaptiveCardHandler. - If necessary, the customer customizer can create a subclass of the
BaseAdaptiveCardHandlerfor implementing an individual business logic on this layer. - Important methods:
new()is called by the pre-insert event on the Adaptive Card table.update()is called by the refresh web interface.action()is called by the action web interface.
- In any case, the stored PLANTA project module is opened in a clientless session and expects that a data dictionary is returned which is used to fill the card template and to generate a new card.
Data exchange via Clientless Sessions
Information
- On the Adaptive Card template, a module ID is stored. This module is then opened in a clientless session by the Jython class to read out the data for the adaptive card or to trigger an action.
- Via the Python Ids of the records and data fields, a JSON-compatible structure can be read out.
- In the module, you can then use all options for filtering and editing data required for the Adaptive Card which are provided by the customizing, e.g. grouping, fulfillment, and virtual fields.
- The texts required for Adaptive Cards can be stored as headings on the data fields and are thus translatable (PLANTA standard). If you require the cards to be in one language only (customer individual), you can work with hard-coded strings in the card template.
- Of course, the modules must be assigned to a translation-relevant work area in order to be translated.
Call of the Module Subclass
When the stored module of an Adaptive Card is called, the following dictionary is handed over:
{
    'target': <AdaptiveCardTarget>,
    'card_parameter': <Content of DI 066535 “Parameter”>,
    'card': <UUID of the card as string>,
    ‘body’: <Contains the body of the request>
}- The "target" is either “load_data” or “execute_action”, depending on whether the card is generated/refreshed, or whether an action is triggered.
- The “card_parameter” contains the configured parameter for the card.
- The “card” contains the UUID of the card as a string.
- The “body” attribute is only handed over for “execute_action” and contains the handed-over body of the web request. The exact content of the body can be defined in the Adaptive Card template.
AdaptiveCardExtractorModule
- The
ppms.office.adaptivecards.AdaptiveCardExtractorModulemodule subclass implements the default read-out of the data. - In the
on_web_load(), theget_json_data()method is called, which reads out the data of the module. Here you can insert a business logic in an individual subclass either before or after loading. - When the module customizing is run, a dictionary with 2 keys is built:
- strings: contains the DF headings of all fields which are not in window 9
- data: contains the data of all data areas which have a Python ID and for which Never show = N.
- Blank data areas are ignored.
- A child data area is inserted in its parent data area. Here, the key is the Python ID of the data area. All data is handed over in the form of lists.
- In the data field configuration, individual fields can then be configured as follows:
- use-df-heading: instead of the Python ID, the DF heading is used as a key
- get-tech-value: the technical value is read out instead of the text
Example (with abbreviated JSON):
{
  "data": {
    "project": [
      {
        "pr_type_title": "Projekt",
        "pr_id": "000004",
        "project_name": "Adaptive Cards Testprojekt",
        "pr_functional": "KARTENTRICKS",
        "task": [
          {
            "task_name": "VG 1",
            "assignment": [
              {
                "task_technical": "1",
                "effort_rem": "10 h",
                "calc_end": "28.06.23",
                "date_forecasting": "",
                "uuid": "0f23f5be-fd95-004f-8178-132474e8386e",
                "prognose_tech": 4,
                "button": "Adopt forecast",
                "avatar_url": "https://3f10-2-211-106-158.ngrok-free.app/api/bed1666d-1d0b-6b4c-80c9-a1391b8519c7/resource/d277145f-028b-6546-be3b-b2c5b2671fb0/avatar",
                "effort_rem_tech": 10,
                "inc_res_466": "Marcel Carl",
                "task_completed": "N",
                "prognose": "4 h"
              }
            ],
            "pr_id": "000004",
            "task_id": "1",
            "vg_special": "1"
          }
        ]
      }
    ]
  }
}Change the Parameters of a Card
Information
- Under
ppms.adaptivecardsyou will find theset_card_parameter(card_id, parameter)function which serves to change the parameter of a card. In the parameter you can save additional information to improve the UX of the card.
Archive Card
Information
- Under
ppms.adaptivecards, there is theset_card_archive_status(card_id, archived)function which serves to archive or dearchive a card. - If, e.g. an action in the subclass is processed which is “carried out” by the card, this function must be called in the subclass in order to archive the card.
Example:
   def on_web_load(self, parameters):
        card_id = parameters.get('card', '')
        # … busines logic goes here
adaptivecards.set_card_archive_status(card_id=card_id, archived=True)Templating
Information
- After the template and the data have been read out, they are sent to the templating service of the web client which answers with the generated card.
- The templating allows you to build cards in a flexible way. Instead of hard-coding all values, a data object can be referenced in the template, and options like if/else clauses can be used for the context-independent display of data/texts.
Templating example:
- The forecast card can visualize a flexible number of forecasts.
- In the data there is a list in the “project” object which contains “task” objects, each of which maps a forecast.
- The forecast values can be found in the “assignment” object, which is a list with length 1 below each “task” object.
- In the template, there is a container for the forecasts which is repeated for each “task” object with the following attribute: “$data”: “${data.project[0].task}”
- The templating SDK then repeats the elements for each individual “task” object and fills it with the values from the respective iteration.
- With ${$root.<path>} it is possible to break out of the $data context.
(Shortened excerpt from the template JSON)

Header
Information
- On the template of an Adaptive Card you can configure via DI066646 Footer whether a footer is to be inserted automatically when a card is generated.
- The header is stored in the global “adaptive_card_header” setting. Here, a valid JSON object must be stored which is inserted as the first element in the body of the card.
Footer
Information
- On the template of an Adaptive Card you can configure via DI066647 Footer whether a footer is to be inserted automatically when a card is generated.
- The footer is generated in the Jython code. In the course of this, the standard class generates the following footer:
- The current time is fetched.
- If the card is archived, text constant 002465 is used. For pending cards, 002464 is used.
- If the text constant does not exist in the language of the recipient, German will be used.
- The format parameters in the text constant are dissolved with time.strftime().
- Example: %d.%m.%Y - %H:%M = 29.06.2023 - 15:33
- A TextBlock element stored in the class is filled with text and is inserted as the last element in the body of the card
Caution: Since the footer is changed each minute, a new card is sent each time respectively! The refreshing of the Outlook interface is visible. For a smooth UX, the footer should therefore be deactivated.
Adaptive Cards in PLANTA Standard
Send forecast
Information
- In the standard, the function in the time recording can be found behind the button with the letter icon. In the module you can send a forecast for a project. By doing so, all corresponding records are inserted with a set forecast value in a template in the Send Info.
- If Adaptive Cards are activated, an e-mail with an Adaptive Card is sent to the project manager instead of opening Send Info. In the card, the records can be adopted.
- The card shows the Remaining effort, Forecast, Calc. end, and Prob. completed on fields.
- During the creation of the card, the UUIDs of the 466er records relevant at that time are stored on the card as parameters. The corresponding module filters on the UUIDS to determine the data for this card. If there are no pending forecasts left, the card will be archived. If the user clicks on the Adopt button in the e-mail, the corresponding button is triggered in the module and the forecast is adopted.
The card saves the following in the parameter:
- UUID of the resource assignments which had a forecast value at the time of creation
- Status of the forecast (new / adopted / withdrawn)
- The old/new value (is only refreshed if the user clicks on the Apply button)
The corresponding module which is opened in a client session to retrieve the values and trigger the button looks as follows:
API
adaptivecards.cards.forecast.create_forecast_card(recipient, assignment_uuids): Creates the new “Adopt forecast” button. Returns the created card as a JSON string or None if the card could not be created.
Caution
- In the Send Forecasts module, DI065078 is customized as Remaining. This field is a value range which is not recalculated when the remaining effort is changed via the Adaptive Card.
Edit Submitted Process Phase
Information
- If a process phase is submitted when using a process model in PLANTA project, the user who is responsible for the approval receives an Adaptive Card in Outlook.
- The person responsible can write a comment on the card and either approve the process phase, return it to the creator, or cancel the project. If you click on one of the buttons, a clientless session is opened on the PLANTA server and carries out this exact action for the user.
- By unfolding the card you can view process steps of the phase.
API
adaptivecards.cards.processmodel.create_release_process_phase_card(recipient, project_id, phase_id):Creates a new “Edit submitted process phase” card. Returns the created card as a JSON string or None if the card could not be created.
Workflow Example: Show Resource with Avatar in Adaptive Card
Objective
- An Adaptive Card is to be created which shows the name of a resource and the corresponding avatar.
Procedure
- Customize module
- Module subclass:
ppms.office.adaptivecards.AdaptiveCardExtractorModule - Insert data area with DI001275 Resource and DI066643 Avatar URL and DDI001218 Resource ID.
- Allocate “resource” Python ID for the data area.
- Module subclass:
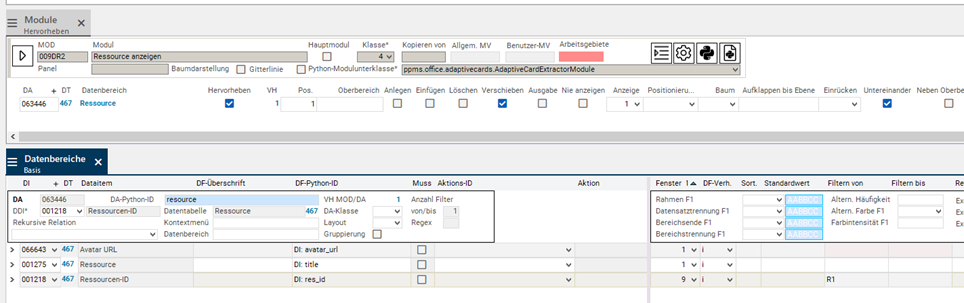
- Create adaptive card template and store the ID of the previously created module.
![]()
- Edit template. Either put the card together yourself or copy the following example.
- What is important is that “${data.resource[0].avatar_url}” is set as URL for the avatar and “${data.resource[0].title}” is set as name.
{
  "type": "AdaptiveCard",
  "hideOriginalBody": true,
  "$schema": "http://adaptivecards.io/schemas/adaptive-card.json",
  "version": "1.1",
  "verticalContentAlignment": "Center",
  "body": [
    {
      "type": "ColumnSet",
      "columns": [
        {
          "type": "Column",
          "items": [
            {
              "type": "Image",
              "style": "Person",
              "url": "${data.resource[0].avatar_url}",
              "size": "Small"
            }
          ],
          "width": "auto"
        },
        {
          "type": "Column",
          "items": [
            {
              "type": "TextBlock",
              "text": "${data.resource[0].title}",
              "weight": "Bolder",
              "wrap": true,
              "size": "Default"
            }
          ],
          "width": "auto"
        }
      ]
    }
  ]
}- Click on Generate card and save the new card.
- In order for the template to receive a valid preview for the future, the data can be copied back into the template as sample data.