Adjust Columns
Video Tutorial
Column Options in Modules
Sorting in Modules
Objective
- To change the sort sequence and sort direction in modules
Information
- With the help of a sort direction, you can specify whether the data is to be sorted in ascending or descending order.
- The sort direction is then visualized by a triangle that points up or down.
- With the help of a sort sequence, you can specify by which column sorting should be performed first, second etc.
- The sort sequence is visualized by numbers in column headings.
Procedure
- Sorting in a column which has not been sorted yet:
- Mouseover on the column heading; two triangles appear which can be used to select the sort direction.
- After you have clicked on the required triangle, the data will be sorted in ascending or descending order.
- Afterwards, the triangle will still be displayed in the column heading and the sort sequence will be visualized by a 1.
- Sorting in a column which has already been sorted:
- In the column heading you will see a triangle that visualizes the current sort direction. If you click on the triangle, the sort direction changes.
- The last column for which sorting was performed receives sort sequence 1. This means if a column already has a sort number unequal 1, it is changed additionally when it is clicked on.
- In the column heading you will see a triangle that visualizes the current sort direction. If you click on the triangle, the sort direction changes.
Details
- If a column contains several equal records, you can additionally sort by another column (see the example below).
- You can sort by a maximum of five columns.
- For most modules, sort sequence and direction are defined by default by a customizer. If you change the default sort settings, you can reset them via the Data → Sort menu item.
Examples
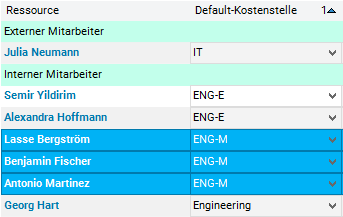
- In the following example, the data is sorted by default cost center. To do so,
- click on the sort arrow (pointing up for sorting in ascending order) in the heading of the Default cost center column. The column receives sort sequence 1.
- Since there are several records with the same default cost center, the data should additionally be sorted by resource in ascending order.
- Click on the sort arrow (pointing up for sorting in ascending order) in the heading of the Resource column. The column receives sort sequence 1, the Default cost center column receives sort sort sequence 2.
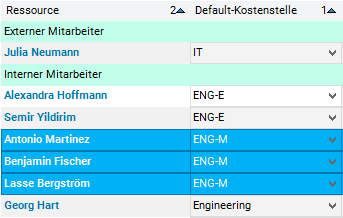
- To change the sort sequence, click on the sort triangle in the Default cost center column heading. As a result, 1 is displayed in the Default cost center column and 2 in the Resource column. If this is done, the sort direction in the Default cost center column is automatically changed to descending order.
- To reset the sort direction (back to ascending order), click on the arrow in the Default cost center column once more.
Change Column Width (Data Field Width)
Objective
- To change
- the column width in data areas with a horizontal layout (areas in tabular form)
- the field width in data areas with a vertical layout
Procedure
- Position the mouse cursor on the right separator of the required column (in vertical layout on the right margin of the required data field). The mouse pointer then changes its shape.
- You can now expand or reduce the respective column by dragging the mouse to the right or the left.
Note
- The default column width (field width) can be preset by a customizer.
- Moving of data fields in forms is only allowed for users with customizer rights.
- It is also possible to change the column width in the page break preview.
Optimize Column Width Automatically
Objective
- To optimize the column width in data areas with horizontal layout (areas in table form).
Procedure
- Position the mouse cursor on the column separator in the heading or between the data fields. The mouse pointer then changes its shape.
- By double-clicking, the column width will be optimized.
- If one of the entries is wider than the column heading, optimization will be carried out in relation to this data field entry.
- If the column heading is longer than the column entries, the column width will be optimized in relation to the column heading.
Unhide/Hide Columns (Data Fields)
Objective
- To unhide or hide
- columns in data areas with a horizontal layout (areas in table form)
- fields in data areas with a vertical layout
Information
- Unhiding and hiding columns (data fields), means moving columns between visible (F1, F2, F3) and invisible (F9) data windows. Which fields are in the visible and invisible data windows when opening the module, is defined by the customizer.
Procedure
- Right-click on the heading of the required column (data field).
- If there is no column heading in the module, right-click on the column separator.
- A context menu is opened, showing all displayed columns of the current window (checked) and all hidden columns of the current module.
- in order to hide a visible column (data field),
- remove the checkmark at the respective entry in the context menu.
- in order to unhide a hidden column,
- set a checkmark next to the respective entry in the context menu.
- The new column will be inserted to the left of the column from which the context menu was opened.
- set a checkmark next to the respective entry in the context menu.
Tip
- You can unhide/hide several columns at the same time.
- Press the CTRL key and remove or set checkmarks for the required column titles one by one. Click in the module. The context menu is then closed and the changes are visible.
- By clicking on the first and last title to be removed while holding down the SHIFT key, all entries in between will equally be checked or unchecked. Click in the module. The context menu is then closed and the changes are visible.
- If titles with and without checkmarks are available between the first and the last title you have clicked on, the checkmarking will be inverted.
Note
- Special case: Bar fields are window-independent
- They can be displayed and hidden in any window (except in a Gantt chart) via the context menu,
- but they (the corresponding bars) will only visible in Gantt charts.
- A customizer defines per data area
- which fields will be displayed or hidden when a module is opened (Window parameter).
- which fields can be displayed or hidden (parameter DF options) by a user.
- Fields for which the DF options parameter is deactivated are not available in the context menu for the unhide/hide procedure. As a result there may be headings that do not contain a context menu at all.
- In modules, the last field of a window cannot be hidden.
- Displaying and hiding data fields in forms is only allowed for users with customizer rights.
Move Columns
Objective
- To move columns in data areas with a horizontal layout.
Procedure
- Click on the required column heading.
- By left-clicking move the column to the required position and release the mouse button. As a result,
- the outline of the heading of the column to be moved will be dashed at the position of the cursor.
- the column separator will be highlighted in black (bold) at the position at which the column will be inserted when you release the mouse button.
Note
- You can move columns between two windows within a module.
- Moving of data fields in forms is only allowed for users with customizer rights.
Save Changes Made to Columns
Information
- Users cannot save their changes directly in the appropriate module.
- They can, however, create a module variant in order to keep individual adjustments.
- This module variant can be defined as a favorite, so that the respective module will always be opened with the user-specific module variant instead of the base module variant.
Note
- Changes which were not saved in the form of a module variant will be reset when the module is closed.