Tutorial: Plan a Portfolio
Introduction
Objective
- To learn how to use PLANTA portfolio and its functions on the basis of typical use cases. The following workflow helps users, like portfolio managers, to learn how to employ and use PLANTA portfolio optimally.
Note
- All exercises are based on the PLANTA demo data. This data must be installed beforehand.
- Master data, such as calendar, resources, users, hourly rates, etc. is already set up in the demo data. This tutorial does not cover the definition of master data (for information on this subject, see Master Data Entry). It is merely about how to integrate a new proposal in a portfolio addition to already existing ideas, proposals, and projects ones and showing the impact of this integration.
- The screen shots used in this tutorial are mere examples of functions and may differ from the actual layout in the program.
Portfolio Definition
Information
- Planning objects of the following type can be part of a portfolio:
- Ideas
- Proposals
- Projects
- Programs
Details
- Ideas are rough project suggestions.
- Proposals are selected and substantiated ideas.
- Ideas and proposals are the precursor of projects and therefore the planning phases for projects.
- Projects are selected and approved proposals that are already running and are not usually modified later on.
- Programs are bundled projects (packets).
Idea and Proposal Management
Information
- From the abundance of the developed project ideas and proposals you have to single out those that are most promising for the company. This is achieved by filtering the ideas and proposals.
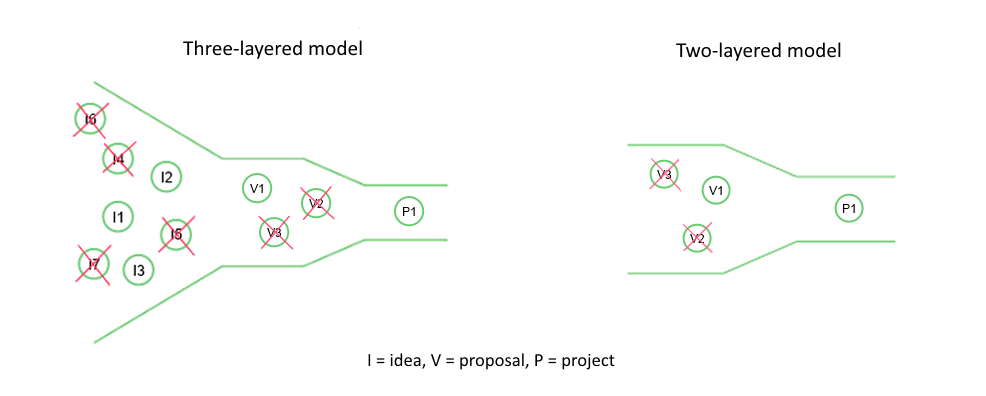
- Two models are distinguished:
- Three-layered model: Ideas Projects
- In the three-layered model, rough project ideas are collected that are then substantiated to proposals which are eventually converted to promising projects.
- Two-layered model: Proposals Projects
- The procedure of the two-layered model is basically the same as that of the three-layered model. In contrast to the three-layered model, however, this model starts with the collection of proposals. The proposals are analyzed and those that are not promising are discarded. The remaining proposals become projects.
- Three-layered model: Ideas Projects
- In practice, the two-layered model is mainly used. This tutorial is therefore based on the two-layered model.
Portfolio Master Data
Information
- Portfolio master data form the basis for the creation and administration of portfolios.
- Evaluation criteria and risk checklists are some of the most important portfolio master data.
- The evaluation of criteria and risks is of fundamental importance for the planning of ideas, proposals, and projects.
- Project applicants who want to get a project on the way check upfront whether the ideas and proposals are consistent with the strategic objectives of the company.
Objective Evaluation Criteria
Information
- With the help of objective evaluation criteria, project applicants estimate the expected gross profit of ideas, proposals, and projects in the company.
- Every employee can request projects, however, this is often done by the project managers.
Create and Weight Objective Evaluation Criteria
Information
- Objective evaluation criteria are created for each company area.
- Criteria can be categorized within areas.
Procedure
- Log in to the system with the user of the portfolio manager, here R70.
- Open Portfolio Master Data in the user menu via Portfolio Management → Administration.
- The Objective Evaluation Criteria module is focused.
Select an area
- Insert an empty line by clicking on the Insert area button.
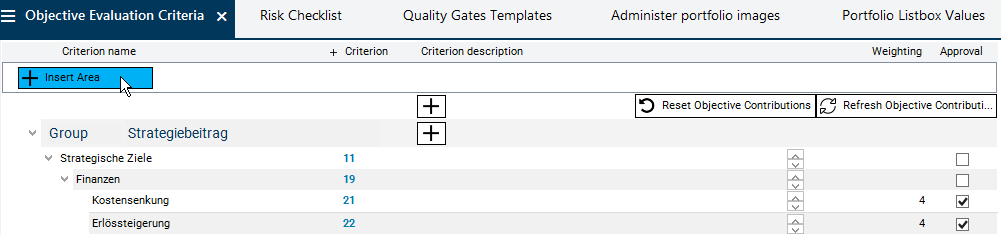
- Select the required area from the listbox in the Area field and save.
Select a group
- Insert an empty line at area level by clicking on the
 Insert group button.

- Select the required group from the listbox in the Group field and save.
Insert evaluation criterion
- Insert an empty line by clicking on the Insert evaluation criterion button on area level.

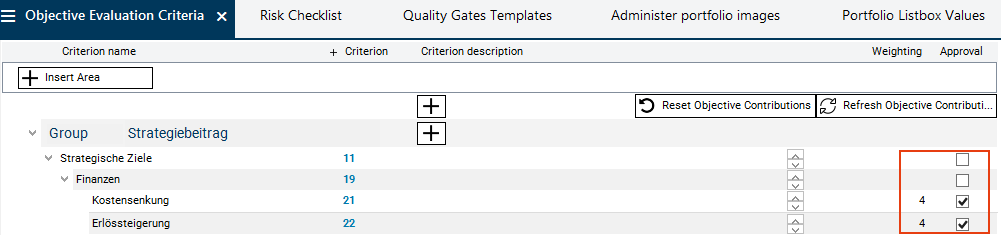
- Enter a criterion name and save.
- You can release the evaluation criterion by activating the checkbox in the Approval field.
- Only the released objectives are considered when the objective contribution is evaluated.
Note
- In this module, areas and groups are only selected in order to be used to outline objective evaluation criteria. The areas are created in the Portfolio Listbox Values module.
Risk Checklists
Information
- With the help of risk checklists, project managers can evaluate the risks of projects, ideas, or proposals.
- Individual checklist items are formulated in the form of queries.
Create and Edit Risk Checklist
Information
- Checklists are created for each area.
- Queries can be categorized within areas.
Procedure
- In order to create and edit the risk checklists, proceed in the same way as shown in Create and Weight Evaluation Criteria. The creation is done in the Risk Checklist module.
Note
- In this module you can only select areas and categories and use them to structure risk queries. The areas are created in the Portfolio Listbox Values module.
Quality Gates
Information
- Quality gates are so called controlling elements which serve as a bridge between portfolio management and project management.
- Quality gates, having a functionality similar to gates or master milestones, serve to make the project implementation phase more transparent by means of date bound "section checks".
Create Quality Gate Templates
Information
- In the Quality Gate Templates module, templates are created which can be selected for individual portfolios and which then apply to all planning objects of these portfolios.
Procedure
- Logged in as portfolio manager (here: R70), open Portfolio Master Data in the user menu via Portfolio Management → Administration.
- Activate the Quality Gate Templates module.
- Click on the Create template button in the module header.

- Allocate a name, in this case "QG Template 3".
- As a result, the ID of the template is generated automatically.

- Right-click on the template record and select Insert → Quality gate in the context menu to create the new quality gate record.
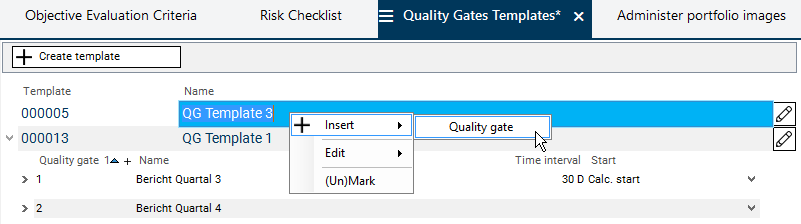
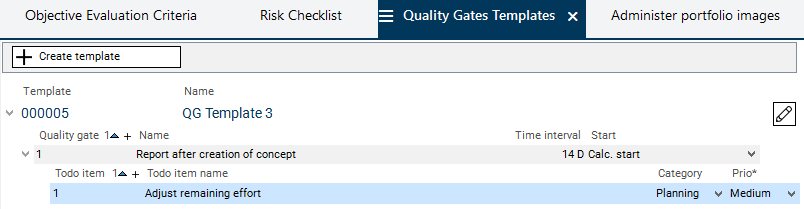
- Enter a quality gate name in the Name field, here "Report after creation of concept".
- Define the position of the quality gate in the template by the value in the Quality gate field.
- Define the reference points for the calculation of the quality gate date:
- Select the project start type from which to start calculating the quality gate end date in the Start field ("Calculated start").
- Determine the time interval between the project start and the quality gate date by entering the required number of days in the Time interval field ("14 d").
- As a result, the scheduling of the quality gates is dynamical and dependent on the dates of the respective project as soon as the quality gates have been included in the project. If required, the portfolio manager can subsequently change the calculated dates. Please refer to the Quality Gate Templates module description for further details on the scheduling of quality gates.

- Right click on the quality gate record and in the context menu, select the option Insert → Todo item to create a new todo item record for the quality gate.
- Allocate the Todo item name, here: "Adjust all remaining effort".
- Enter a position number in the Todo item field, here: "1".
- Select the entry Medium in the Priority field for the newly created todo item.
- The field is a mandatory field and defines the importance of the todo item for the achievement of the quality gate.
- Assign the todo item to the Planning category.
- The dates of the todo items correspond to the dates of the quality gates and are calculated when applying the template to a particular project. The portfolio manager can change them manually afterwards.
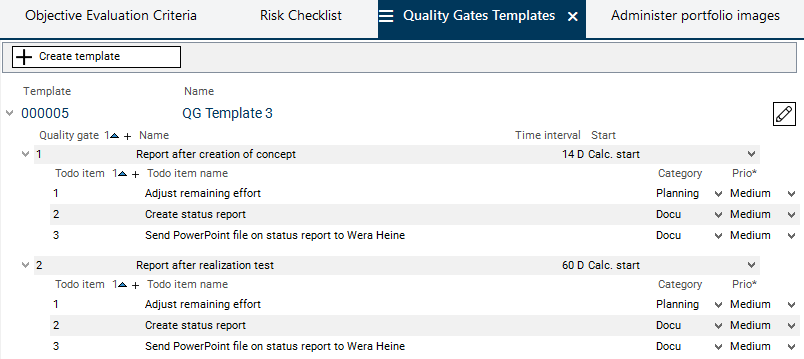
- Create further quality gates and todo items as follows:
New Proposal
Information
- Below, the proposal creation is described up to the project application based on the two-layered model.
- Portfolio manager Wera Heine creates a proposal for the implementation of PM software in her company.
- Project manager Ronja Koch takes on the further planning of the proposal.
- The planning of the proposal is to be process-oriented.
Create New Proposal
Task
- Portfolio manager Wera Heine wants to define the core specifications for her proposal and select the first stakeholders.
Procedure
- Wera Heine logs on to the system with her R70 user.
- In the user menu, she clicks on Portfolio Management → Create Planning Objects → New proposal.
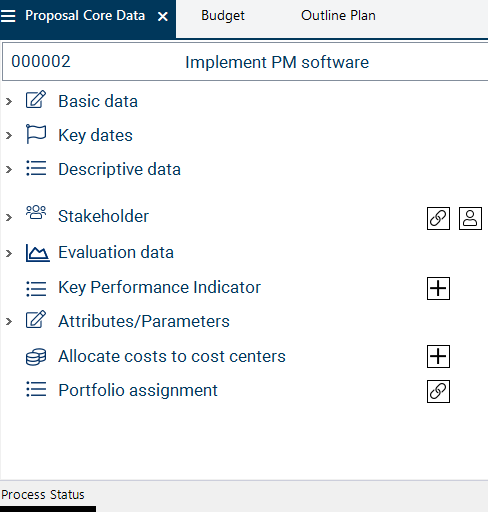
- The Proposal panel with the focused Proposal Core Data module is opened.
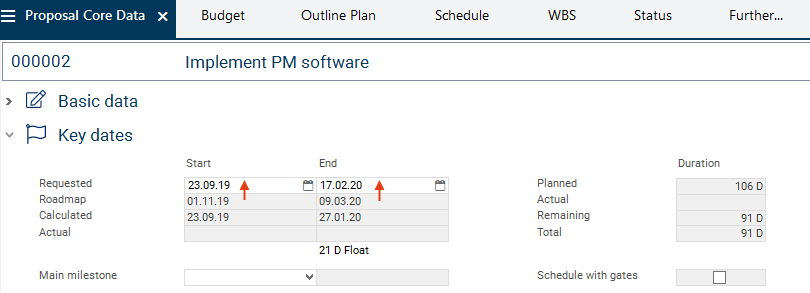
- The ID for the new proposal is generated automatically and is visible in the module header.
- The newly created proposal is saved automatically.
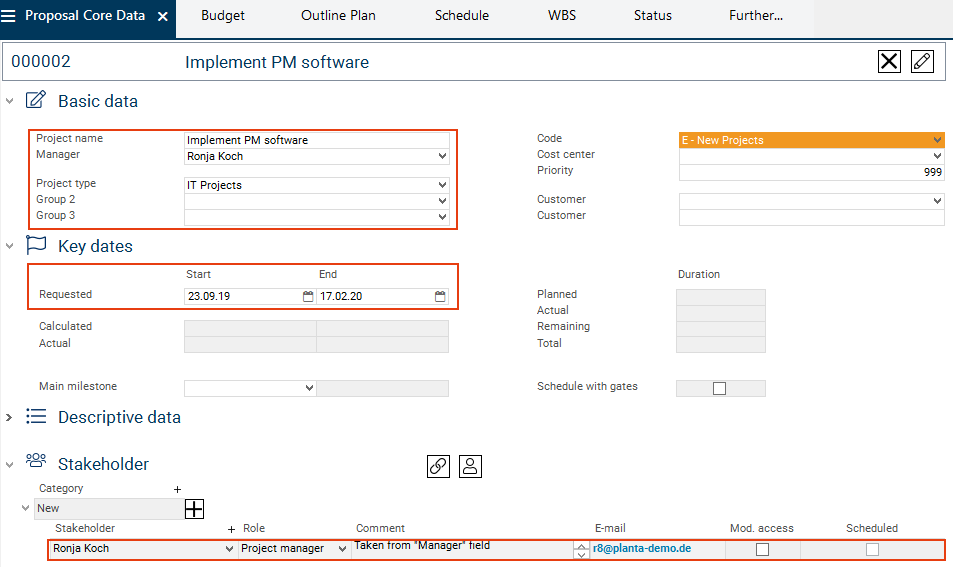
- Enter the proposal name for the new project in the field next to the ID in the module header, e.g.: "Implement PM software".
- Here, the -Please enter a name- dialog will be displayed by default.
- Wera Heine makes further entries:
- Manager: Ronja Koch,
- Project type: IT projects,
- Requested start: 09/09/2019
- Requested end: 02/03/2020
- Save.
- Since the creator of a project is automatically set as project manager and as stakeholder of the project at the same time, the following query is displayed when another manager is selected: Do you want to delete the current stakeholder assignment of the manager or do you want to assign the new manager additionally?
- Select the Replace existing manager stakeholder option.
- As a result, the new manager is set as a stakeholder in the Stakeholder area and Wera Heine is deleted as a stakeholder.
- Result:
- In the Stakeholder area, Wera Heine clicks on the
 Assign stakeholder button.
 - The To which category do you want to assign stakeholders? message is displayed.
- Wera Heine selects the Core team option.
- The module Assign Stakeholders to Planning Object is opened for the selected category.
- Wera Heine selects herself as a stakeholder and clicks on the Assign selected objects button.
- If necessary, click on the Refresh/Reset button to display the new record in the Proposal Core Data.
- Were Heine assigns the Project office role to herself and saves.
- Result:

Details
- As a result, the main persons responsible are assigned to the proposal, i.e. the persons who are supposed to elaborate it and turn it into a project. Stakeholders who do not yet play any role in this phase are added when the proposal is approved and turned into a project.
Process Models
Information
- PLANTA portfolio enables you to plan and control ideas, proposals, and projects in a process-oriented way. For this purpose, PLANTA provides several process model templates.
Task
- Wera Heine wants to select an appropriate process model for her proposal and create the proposal according to this model.
Procedure
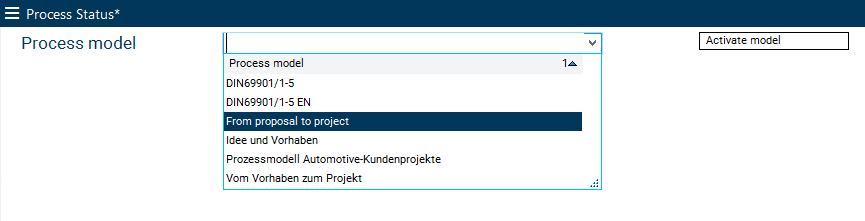
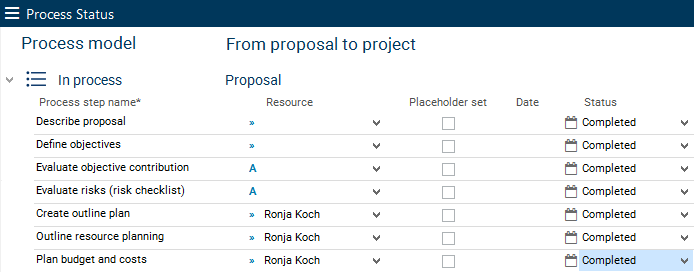
- She clicks on the Process Status module tab at the lower left margin of the display in the panel of the newly created proposal.
- From the listbox, Wera Heine selects the From proposal to project process model.
- She clicks on the Activate model button.
- The process model is copied along with the associated process steps.
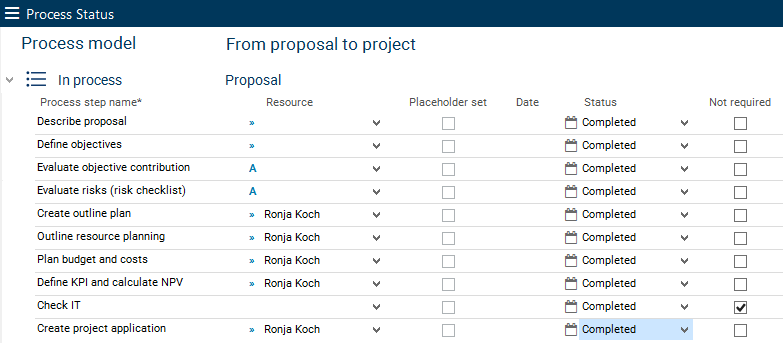
Process Steps
Information
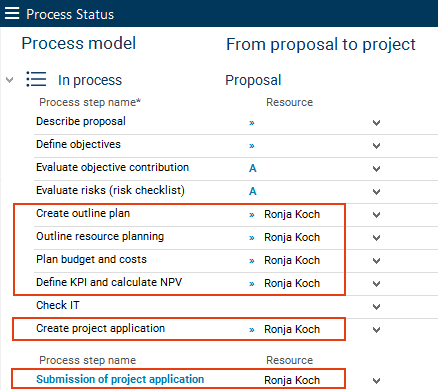
- The Process Status module lists all process steps that must be completed before submitting the project application of the Implement PM software proposal.
- You can assign a resource from the listbox to each process step.
- You can select a status from the listbox for each process step.
- For process steps the completion of which is not necessary for the project, the Not required checkbox must be selected. The Status of such a process step automatically changes to "completed".
Procedure
- The Check IT process step is not required, therefore Wera Heine selects the Not required checkbox for this step.
- From the Create outline plan process step on, project manager Ronja Koch is to assume the remainder of the proposal planning. Wera Heine therefore assigns the entry Ronja Koch from the Resource listbox to all steps starting from Create outline plan.
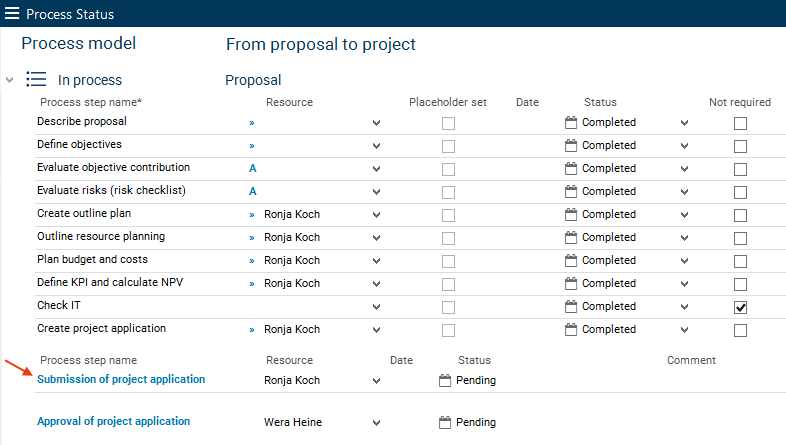
- For the separate process step Submission of project application she also selects Ronja Koch as a resource from the listbox.
- For the approval of the proposal and for turning the proposal into a project, Wera Heine is to be in charge again. Consequently, for the Approval of project application process step she selects Wera Heine from the listbox.
- She saves.

Details
- By clicking on the arrow symbol (>>) or on the action symbol (A) in the line of a process step you can switch to the particular data field or trigger an action that is required for completing the process step.
- Alternatively you can select the Execute Process Step Action or Focus task context menu entries in the record of a process step.
- Example: When clicking on the arrows or selecting Focus task command in the context menu of the Describe proposal process step, the view switches to the focused Description field in the Core Data module of the planning object.
- The corresponding fields and the actions initiated can be defined in the Process Model Templates module.
Note
- For a successful project application, all process steps must be processed by the end, i.e. no process step can have Status = "Pending".
Process Steps 1 and 2: Describe proposal and define objectives
Task
- Wera Heine wants to describe her proposal in more detail and define the objectives of the proposal in the course of this.
Procedure
- In the Proposal Core Data module, Wera Heine makes the required entries in the input fields in the Descriptive data area.
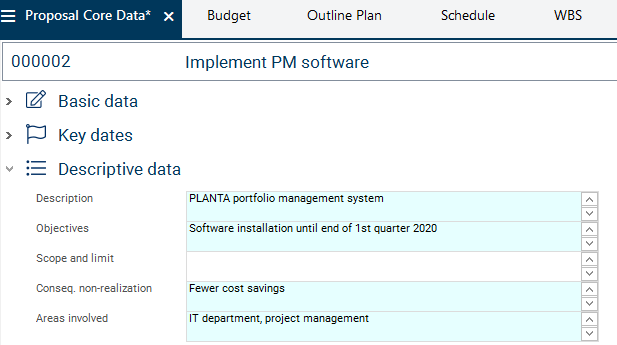
- After she has made all entries, she manually sets the status of the Describe proposal and Define objectives process steps in the Process Status module to "completed".

Process Step 3: Evaluate objective contribution
Information
- The planned proposal must be consistent with the company goals and make a sufficient contribution to the achievement of these goals.
Task
- Wera Heine therefore first wants to evaluate the proposal's contribution to achieving the company goals.
Procedure
- In the Proposal Core Data module, select an area from the listbox in the Area field under Evaluation data (here: Company "2").
- In PLANTA portfolio, objective evaluation criteria are defined and weighted for different company areas.

- In the Evaluation data area, Wera Heine clicks on the Evaluate button next to the Objective Contribution field.

- All evaluation criteria and their weighting numbers which are assigned to the selected area are displayed grouped.
- Three criteria groups are now displayed:
- Kosteneinsparung ("Cost savings")
- Marktorientierung ("Market orientation")
- Wirtschaftlichkeit ("Profitability")
- In each group, Wera Heine can now evaluate individual criteria and their contribution.
- She selects her estimates in a range from 0% to 100% from the respective listbox entries.
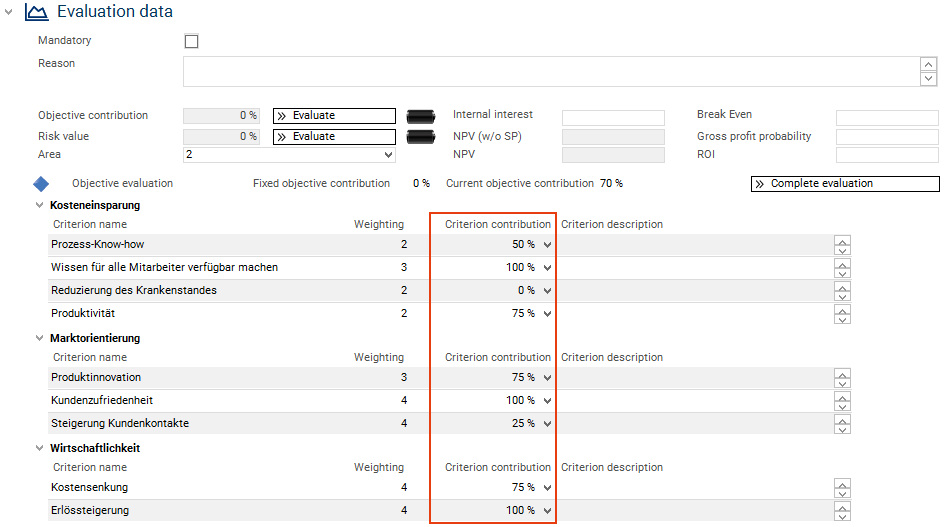
- Wera Heine clicks on the Complete evaluation button in the Objective evaluation area.
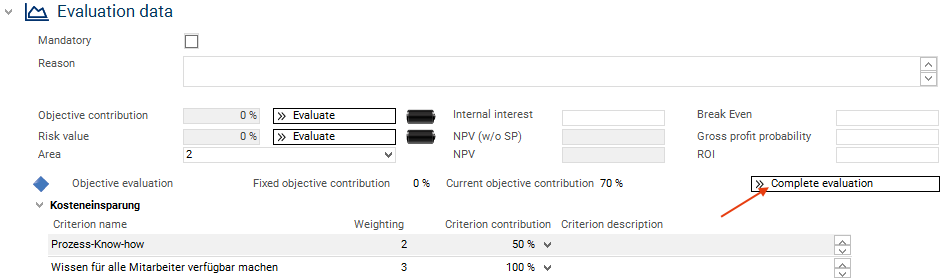
- Subsequently, she clicks on the Refresh/Reset button in the toolbar.
- The entire objective contribution of this project is calculated from the values in the Criterion contribution field and the Weighting specifications of all criteria and is displayed in the Objective contribution field.

Edit process step
- In the Process Status module, Wera Heine sets the status of the Evaluate objective contribution process step to "completed".
Process Step 4: Evaluate risks (risk checklist)
Task
- Wera Heine now wants to evaluate the risks.
Procedure
- In the Evaluation data area of the Proposal Core Data, she clicks on the Evaluate button next to the Risk value field.

- She answers the questions on risks in the following categories with Yes or No:
- Dates
- Costs
- Quality
- Miscellaneous
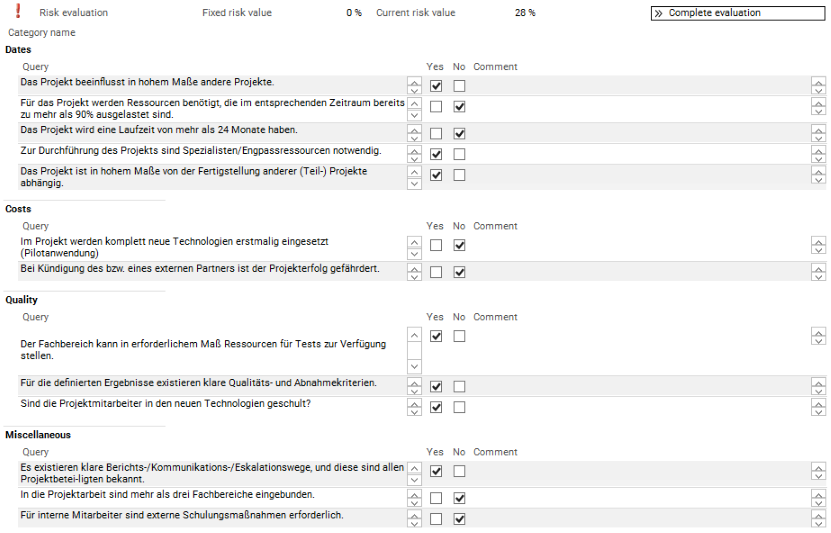
- Wera Heine clicks on the Complete evaluation button and then on the Refresh/Reset button in the toolbar.
- The total risk contribution of the proposal is determined by the yes/no answers of queries and is displayed in the Risk value field.
- In the Portfolio Master Data panel, every answer option for every question is predefined with a certain score which weights the respective answer.
- The total risk contribution of the proposal is determined by the yes/no answers of queries and is displayed in the Risk value field.

Edit process step
- The Evaluate risks (risk checklist) process step is finished and set to completed by Wera Heine.

- The portfolio manager Wera Heine has now completed all her process steps. The experienced project manager Ronja Koch is supposed to continue planning the project. Thus, Wera Heine informs Ronja Koch (via e-mail, for instance) that she can now carry out the process steps that were assigned to her.
Process Step 5: Create Outline Plan
Task
- The project manager Ronja Koch wants to get an overview of her process steps.
- Subsequently, she wants to complete the first process step. Therefore, she checks whether the requested proposal dates are realistic. For this purpose, she creates a new schedule by copying the Implementation of PLANTA project plan to her new proposal.
Copy Schedule
- Ronja Koch logs in with her R8 user.
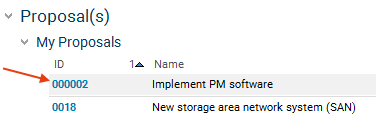
- In the My Planning Objects module she clicks on the link on the ID of the Implement PM software proposal.
- The panel of the proposal is opened. Here, Ronja Koch clicks on the Process Status tab on the bottom left margin of the screen. The corresponding module is opened.
- Ronja Koch can now see which process steps she has been assigned to.
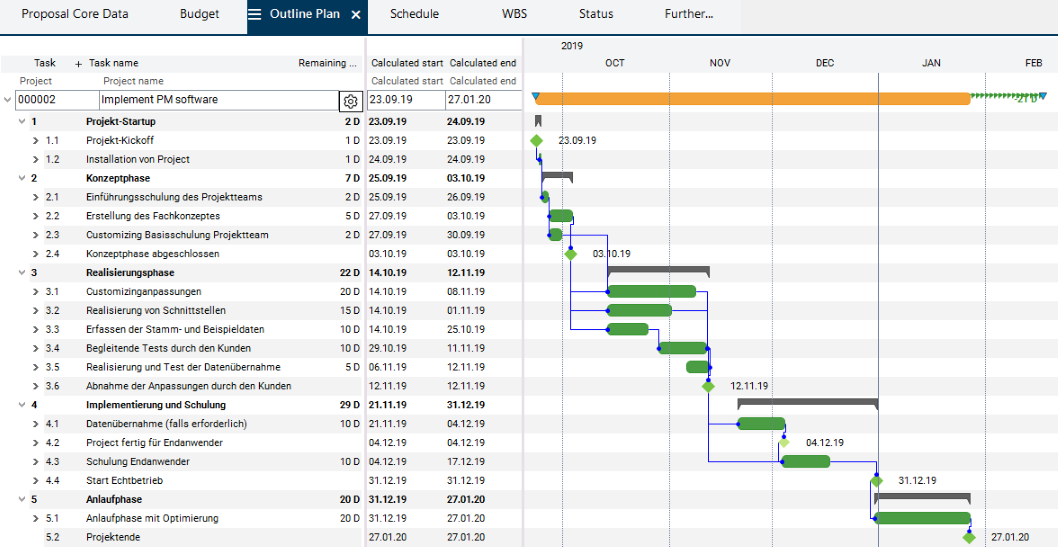
- She starts by carrying out the Create outline plan process step. To do so, she clicks on the Outline Plan tab and switches to the module of the same name.
- When opening the module, the following confirmation prompt is displayed: Adopt a schedule?
- She answers the query with Yes.
- The Copy Schedule module is opened.
- Ronja Koch selects PL-PROJECT Einführung von PLANTA project ("Implementation of PLANTA project") from the listbox.
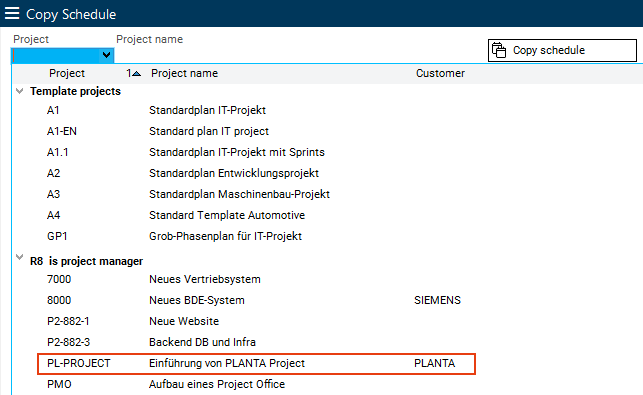
- The project manager starts the copy operation by clicking on the Copy schedule button.
- Simultaneously, the planning of the tasks is calculated on the basis of the previously defined dates.
Edit process step
- The Create outline plan process step is finished and Ronja Koch sets it to "completed".

Process Step 6: Outline Resource Planning
Task
- Ronja Koch wants to define the resources necessary for her proposal.
Procedure
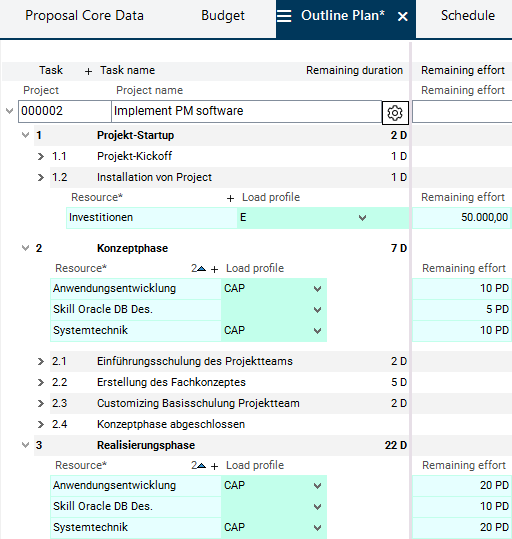
- Switch to the Outline Plan module.
- Assign the required resources to the individual tasks and allocate the effort.
- Save.
- Click on the
 Calculate schedule button.
Edit process step
- Ronja Koch finishes the Create outline resource planning process step in the Process Status module by selecting the "completed" entry from the listbox.

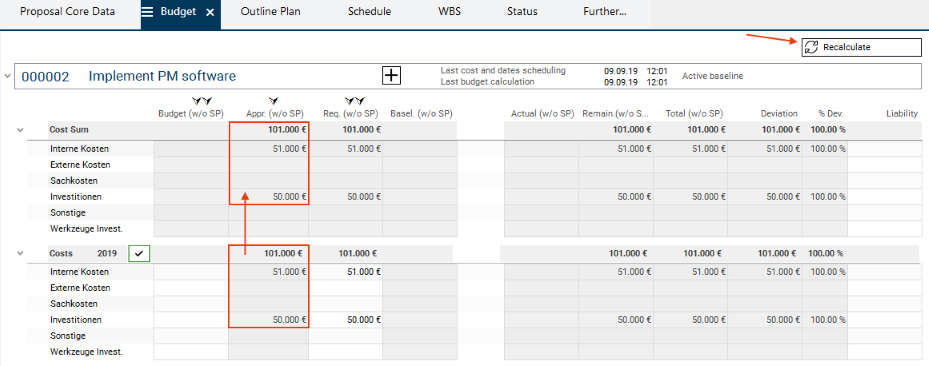
Process Step 7: Plan budget and costs
Task
- Ronja Koch wants to request the budget for the Implement PM Software proposal for the year 2019.
Procedure
- Open the Budget module.
- Click on the Recalculate button.
- The costs calculated on the basis of the previously allocated effort are displayed both in the yearly tranche of the respective year and summarized upwards to proposal level.
- The project manager requests the budget by copying the costs from the Total (w/o SP) column to the Requested (w/o SP) column on the yearly tranche by clicking on the left arrow button above the Requested (w/o SP) column.

- Subsequently, she clicks on the Recalculate button so that the values from the yearly tranche are adopted at proposal level.

Edit process step
- The Plan budget and costs process step is finished and Ronja Koch sets the status to "completed".
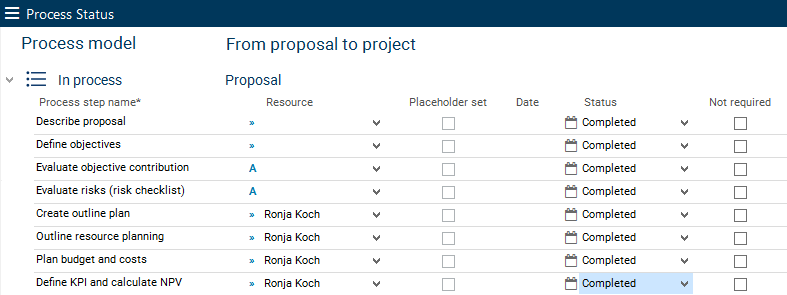
Process Step 8: Define KPI and Calculate NPV
Information
- A key performance indicator (KPI) is a measurement variable which can be used to measure the achievement of an objective.
- The net present value (NPV) serves to evaluate the advantageousness of investments.
Task
- Ronja Koch has almost completed the editing of the proposal core data. The KPI specification and the calculation of the NPV value are still missing.
- The project manager estimates which measures benefit the company economically.
- She thinks about lowering the costs (e.g. by simplifying the creation of status reports) in the amounts of €200,000 for 2019 and €400,000 for 2020.
Procedure
- Click on the Insert KPI button in the Proposal Core Data module in the Key Performance Indicator area.
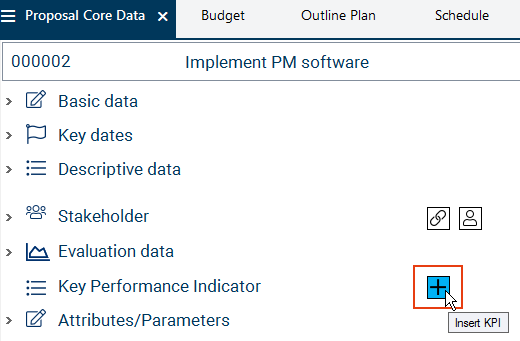
- Name the required Key Performance Indicator in the newly created record (here: "cost savings").
- Insert a new record for the benefit via the button next to the required KPI record or via the Insert → Benefit context menu command. PR_PLUS
- Enter 2019 in the Year field and 200,000 € in the Planned benefit field.
- In the same way, insert a second benefit record.
- Enter the year 2020 and the Planned benefit of €400,000.
- Save.

- The NPV value in the Evaluation data area in the Proposal Core Data module has not yet adjusted to the KPI value:

- Ronja Koch switches to the Budget module.
- She clicks on the Recalculate button. As a result, the previously created user data is copied from the Proposal Core Data module to the Budget module and is offset with the planned costs.

- The specifications from the newly calculated budget plan are then incorporated in the calculation of the NPV of the proposal. The data displayed in the Proposal Core Data module is updated accordingly:

Edit process step
- The project manager terminates the Define KPI and calculate NPV process step by setting it to "completed".
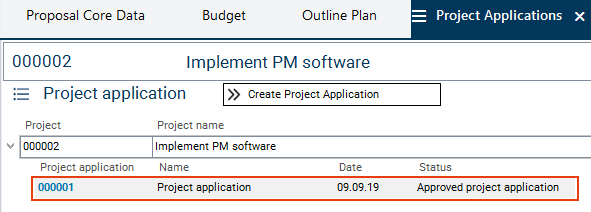
Process Step 9: Create project application
Information
- Ronja Koch considers the proposal to be economically interesting for the company.
Task
- The project manager wants to receive approval for the newly created proposal which is to become a project.
Procedure
- In the Proposal panel she opens the Further... tab and clicks on the Project Applications link. By doing so, she activates the Project Applications module.
- In the Project Applications module, she clicks on the Create project application button.
- She confirms the Do you really want to create a project application? message with Yes.
- The Project Application module is opened automatically, displaying the project application data. The project application has the Pending project application status.

- Ronja Koch checks the project application for completeness and correctness.
- Since no changes are required, she clicks on the Approve button.
- The project application is now fixed and can no longer be changed.
Edit process step
- In the Process Status module, Ronja Koch sets the Create project application process step to "completed".
Process Step 10: Submission of project application
Task
- Finally, Ronja Koch is supposed to submit the frozen project application.
Procedure
- In the Process Status module, Ronja Koch clicks on the link on the name of the separate Submission of project application process step.
- The following dialog message is displayed: Do you want to comment?
- Ronja Koch answers with Yes.
- In the Comment field, she formulates the following remark: The implementation of the PLANTA software seems economically advantageous to me.
- She saves.
- Ronja Koch clicks on the Submission of project application link again.

- Additionally, you switch to the Send Info module where the message on the completed submission step can be written and sent to the corresponding stakeholder.
- Ronja Koch clicks on the Send button.
- Result: Portfolio manager Wera Heine receives the info on the submission of the project application via e-mail.
Portfolio
Task
- The portfolio manager is supposed to check the proposal, possibly approve it and thus release it.
- For this purpose, she wants to include the proposal in an existing portfolio in order to decide whether the implementation of the project will be profitable.
Procedure
- Wera Heine logs on to the system with her R70 user.
- The Multi-Portfolio Board is automatically opened, displaying Portfolios module.
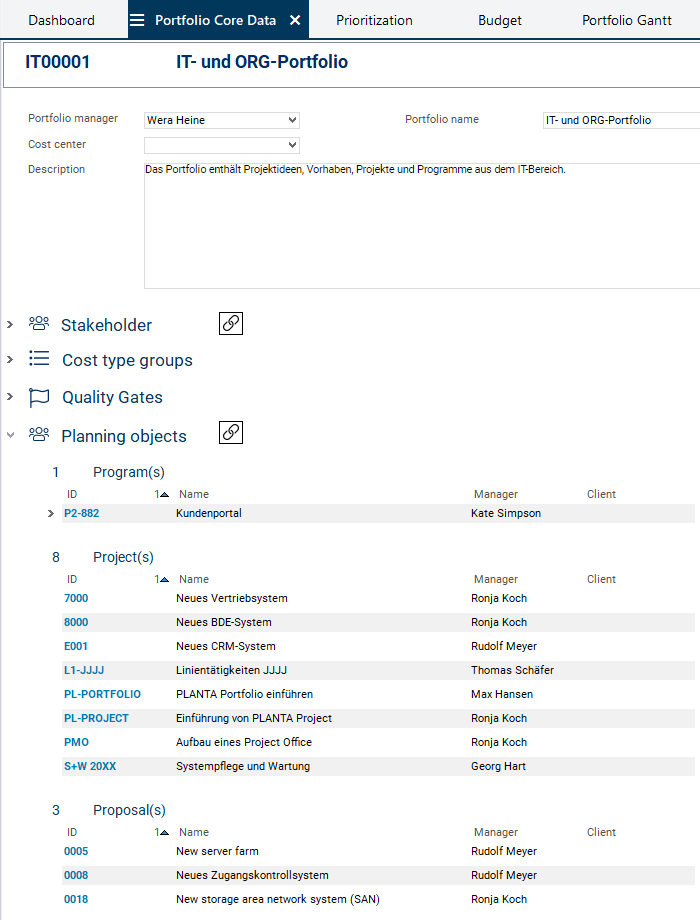
- The portfolio manager clicks on the ID "IT00001" to open the IT and ORG portfolio and subsequently on the Portfolio Core Data module tab to open the module of the same name.
Information
- In the Portfolio Core Data module you can see that portfolio IT00001 already contains several planning objects.
- Ronja Koch's Implement PM software proposal is not yet contained.
Assign the Proposal to the Portfolio
Task
- Wera Heine now wants to include Ronja Koch's proposal in the portfolio.
Procedure
- In the Portfolio Core Data module, the portfolio manager clicks on the
 Assign planning object(s) button in the Planning objects area.
- The Assign Planning Objects to the Portfolio module is opened.
- In the Planning objects without portfolio assignment area, Wera Heine activates the Select checkbox in the record of the new proposal and clicks on the Assign selected objects button.
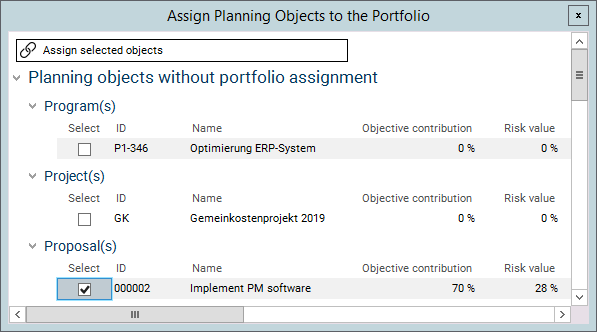
- The Implement PM software proposal is now assigned to the portfolio and is displayed in the Portfolio Core Data module.
Portfolio Budget
Task
- The portfolio manager wants to check whether the portfolio budget for the newly included planning object is still sufficiently covered.
Procedure
- Wera Heine opens the Budget module by clicking on the tab of the same name.
- She clicks on the
 Refresh portfolio button.

Details
- The budget of the Implement PM software proposal is now considered in the portfolio.
- The red traffic light on the deviation fields signalizes to the portfolio manager that the Relevant Budget (i.e. the budget required for the realization of the planning objects contained in the portfolio) is greater than the Portfolio Budget.
Current state of the portfolio budget:

Comparison: State of the portfolio budget before the new proposal was included in the portfolio.

The portfolio manager clicks on the link on the Costs heading for the period of 2019.
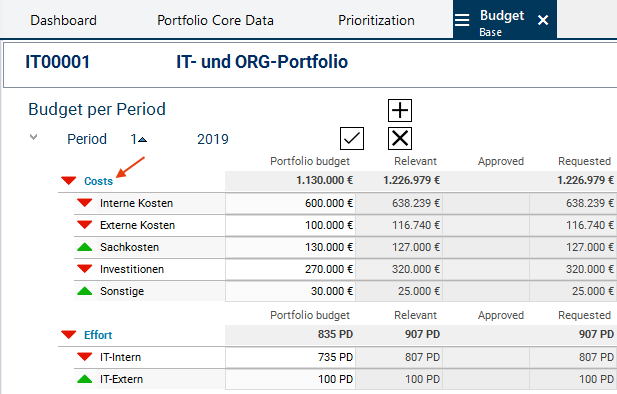
The Edit Portfolio Period: Costs 2019 module is opened. In this module she can check the exact compilation of the budgets of the individual planning objects for the 2019 period.

Problem
- In the momentary constellation, there is a budget overrun.
- How can the portfolio manager prevent overrun?
Problem solution
- Wera Heine wants to compare project ideas and proposals of the portfolio regarding objective contribution, risk value, and NPV.
- On the basis of this information, she wants to decide which proposals and ideas are profitable and can be realized as projects and which ones can possibly be removed from the portfolio or be set to inactive temporarily.
Procedure
- The portfolio manager clicks on the Prioritization tab.
- In the title bar she clicks on the Bubble Chart button.

- The Planning Objects by Objective Contribution and Risk Value module is opened.
- Projects, proposals, and ideas are displayed in relation to each other.
- Reference values:
- Objective contribution
- Risk value
- NPV
- The visual comparison option helps the portfolio manager to quickly come to a decision on which ideas or proposals to cancel and which ones to turn into projects.
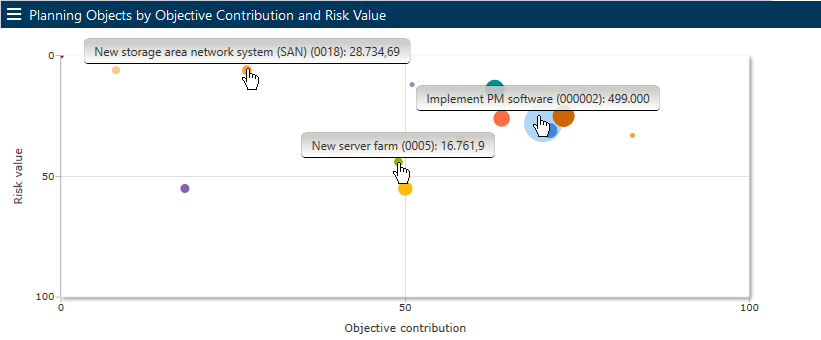
Details
- A proposal should possess the following characteristics so that it can be turned into a project.
- High NPV → Big bubble
- High objective contribution (>50%) and low risk value (<50%) → placement of the bubble in the top right quarter of the bubble chart.
Procedure
- Wera Heine analyzes the bubble chart and the values of depicted proposals and ideas.
- Result:
- Turning the Implement PM software proposal into a project would be economically interesting for the company:
- The Risk value of 28% is quite low.
- The Objective contribution is at 70% and is therefore high.
- With about €500,000, the NPV is sufficiently high.
- Proposal 0005 New server farm is less economically interesting for the company:
- The Risk value is relatively high (44%).
- The Objective contribution is comparably low (49%).
- The NPV is clearly too low (approx. €17,000).
- Proposal 0018 New storage area network system (SAN) is not very profitable either:
- The Objective contribution is very low (8%).
- With about €28,500, the NPV is also comparably low.
- Turning the Implement PM software proposal into a project would be economically interesting for the company:
- Result:
Task
- Wera Heine wants to remove the proposals 0005 New server farm and 0018 New storage area network system (SAN) from the portfolio. The costs which can be saved by canceling these proposals would even out the Portfolio budget.
Procedure
- She switches to the Budget module and from there to the Edit Period: Costs 2019 module.
- In the Proposal area, she deactivates the Active checkbox of proposals 0005 and 0018. As a result, the budget reserved for these proposals is no longer considered in the portfolio, i.e. the Relevant budget is reduced.
- The Portfolio budget is hence balanced.
Result
- The measures taken by Wera Heine lead to the desired gross profit. The Relevant budget falls below the Portfolio budget by €27,861. You can see this immediately by the green traffic light on the deviation fields.

Resource Simulation and Utilization
Task
- Wera Heine wants to check the practicability of her proposal from a resource utilization point of view.
Procedure
- Wera Heine clicks on the link on the ID of the Implement PM software proposal to open the Proposal panel.
- In the Proposal panel, she switches to the Status module by activating the tab of the same name.
- To freeze the current state of the Implement PM software proposal, she creates a status report and releases it.
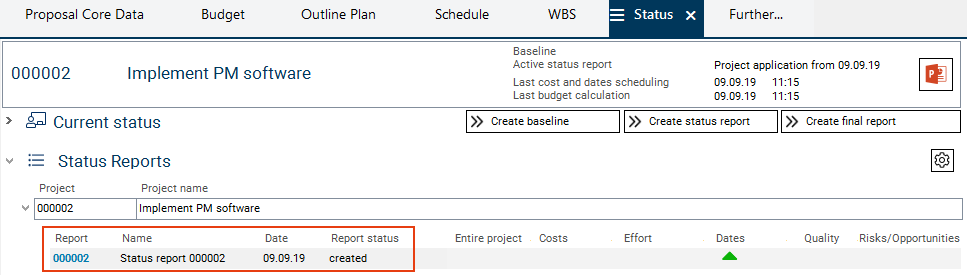
- In the Portfolio panel, Wera Heine clicks on the Simulations tab.
- The module of the same name is opened.
- Wera Heine wants to use the status report she just created for the simulation.
She clicks on the Select a status report button in the Status report selection area in the line of the Implement PM software proposal.

The Assign Status Report module is opened. Wera Heine selects the checkbox of the status report and clicks on the Assign selected status report button.

The status report is now assigned to the proposal.

- Subsequently, Wera Heine clicks on the Create simulation button in the header.
- The Simulation module is opened, in which the status report data of the planning objects are stored as a kind of copy, which enables you to simulate different planning scenarios without having to change the real data.
- The data here is the data of the status reports which have been selected in the Simulations module for the respective planning objects. If no status reports have been selected for particular planning objects or if planning objects do not yet possess status reports, status reports are automatically created when you click on the Create simulation button, however, these status reports are used for the simulation only and are not visible in regular status report modules.
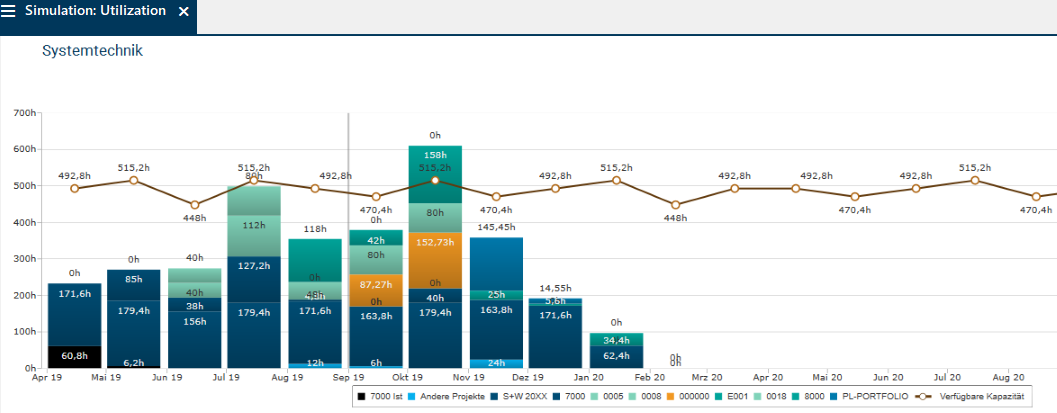
Graphical display of the dates of all portfolio planning objects in the Simulation module.
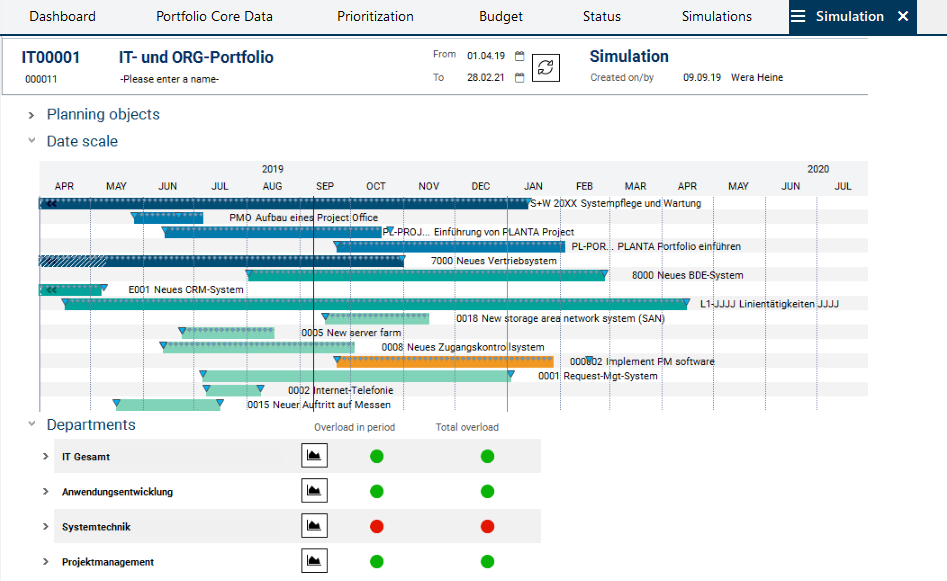
Procedure
- By means of the red traffic light in the Overload in period and Total overload columns in the Departments area, Wera Heine immediately sees that there is a resource overload in the Systemtechnik ("System Technology") department in the current planning situation.
- The portfolio manager now wants to get an idea of the department utilization.
- To do so, she clicks on the
 Display utilization button next to the red traffic light.
- The Utilization: Simulation module is opened.
- The Gantt chart represents the utilization of the resources of the Systemtechnik department in all planning objects.
- By the color display of the planning objects by code, the portfolio manager can immediately tell which planning objects cause the Overload. It is primarily the new proposal the code color of which is "orange".
Task
- The portfolio manager wants to optimize the resource planning.
- For this purpose, she wants to move dates in order to change the load of the resources.
Procedure
- Wera Heine switches back to the Simulation module.
- By clicking on the bar of the Implement PM software planning object and holding down the mouse button, she drags the bar to the right in order to reduce date overlapping with other projects.
- As a result, the entire bar is moved.
- She releases the mouse button at the required position.
- The bar represents the simulated dates of the planning object, the dotted line visualizes the initially calculated dates.
- She saves.
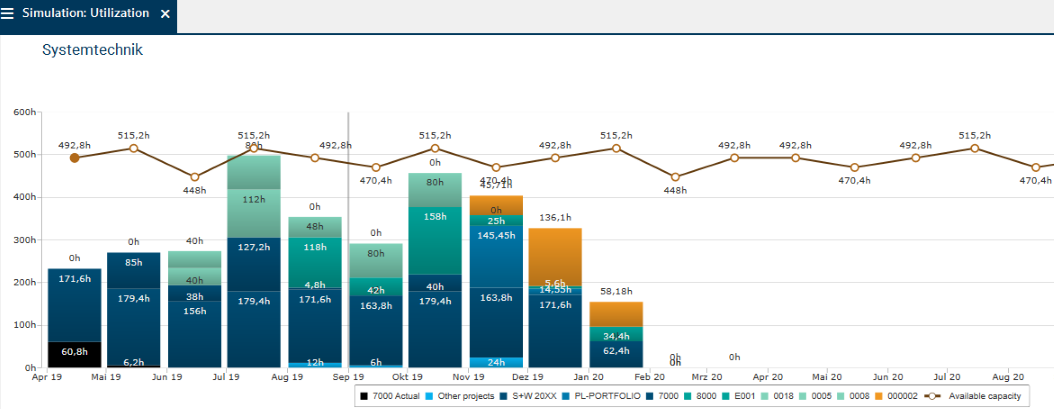
Graphical display of the dates of all portfolio planning objects in the Simulation module after dates were moved.

Result
- After the portfolio manager has moved the dates (if necessary, also the dates of another planning object), the traffic light switches from red to green, indicating that the overload of the Systemtechnik department has disappeared.

- In order to check the exact utilization, Wera Heine opens the Utilization Simulation module.
Graphic display of the resource utilization throughout all planning objects after date change.
Information
- The portfolio manager wants to record the changed schedule and saves the present simulation as a road map by clicking on the
 Define simulation as road map button in the header of the module.
 - The road map dates are subsequently displayed in the Proposal Core Data and can be adopted as as new requested dates for the proposal by copying.
Approval of the Budget
Information
- Wera Heine has calculated the objective and risk contribution and optimized the utilization of the resources.
Task
- She wants to approve the budget of the proposal now.
Procedure
- In the Proposal panel of the Implement PM software planning object, the portfolio manager switches to the Budget module by clicking on the tab of the same name.
- In the Costs 2019 budget period, Wera Heine copies the costs from the Requested (w/o SP) column to the Approved (w/o SP) column by clicking on the arrow above the target column.
- Subsequently she clicks on the
 Approve costs and effort button next to the Costs 2019 heading.
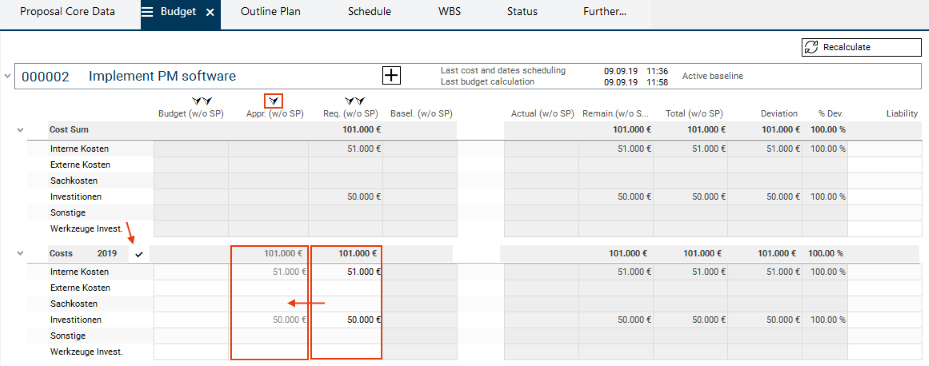
- As a consequence, a green box is displayed around the checkmark:
 . This confirms the budget approval.
 - Wera Heine clicks on the Recalculate button. The figures from the Costs 2019 yearly tranche are summarized to project total level.
Process Step 11: Project Approval
Task
- After approval of the budget, Wera Heine now wants to approve the proposal. Subsequently she wants to inform the project manager Ronja Koch about the approval.
Procedure
- In the Process Status module, Wera Heine clicks on the Approval of project application process step.
- A dialog window containing the What do you want to do? question is displayed.
- The portfolio manager answers the query by clicking on the Approve button.
- Wera Heine switches to the Project Core Data module in the Project panel.
- In the Stakeholder area she selects the Send info context menu command in the record of Ronja Koch.
- She enters the message on the approval and clicks on the Send button.

- Result: Ronja Koch receives the info about the approval via e-mail.
Information
- In the Process Status module after completion of the approval, the Proposal phase is moved to the Completed phases area.
- In the course of this, the status of all process steps is changed to "accepted" and in the Approval field, the date of approval by portfolio manager Wera Heine is displayed.

Project
Information
- The approval has turned the Implement PM software proposal into a project. This change is done automatically in line with the rules stored in the process model.
- In the Portfolio Core Data module of IT00001 IT and ORG portfolios you can see that
- the number of projects in portfolio IT0001 has increased from eight to nine.
- the number of proposals has been reduced from four to three.

- When clicking on the link on the ID of the Implement PM software project, the Project panel is now opened and not the previously set Proposal panel.
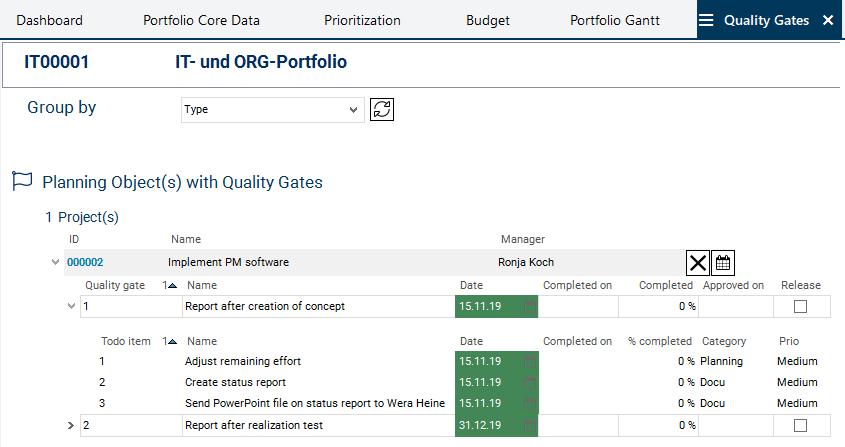
Insert Portfolio Quality Gates in Project
Task
- In order to be able to better track the progress of the new project later, the portfolio manager presets quality gates for the new project.
- To do so, she selects a quality gate template for her portfolio in the Portfolio Core Data and inserts it into her new project.
Procedure
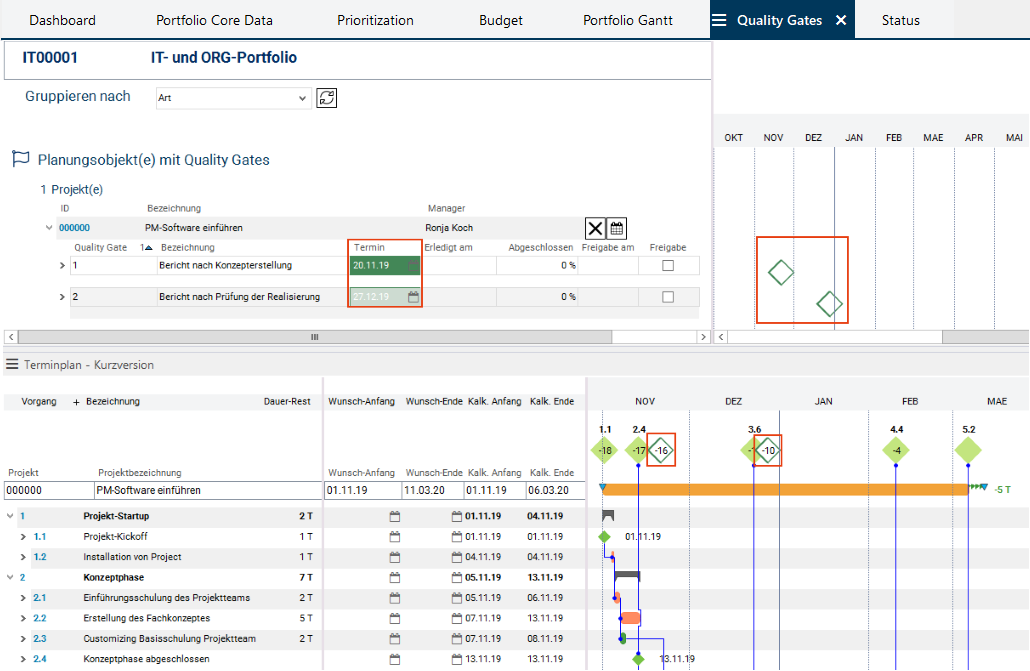
- In the Portfolio panel, Wera Heine opens the Quality Gates module.
- In the Planning object(s) with quality gates section she deletes the quality gates of PL-PROJECT Einführung von PLANTA project ("Implementation of PLANTA project").
- She switches to the Portfolio Core Data module and selects the newly created QG Template 3 template in the Active template field.
- Wera Heine opens the Quality Gates module.
- In the line of the Implement PM software project, she clicks on the
 Copy quality gate template button.
- Wera Heine confirms the query with Yes.
- In the line of the Implement PM software project, she clicks on the

- The project is automatically moved to the Planning object(s) with quality gates area and the quality gates defined in the active template are displayed in the expanded project record.
- The portfolio manager wants to adjust the quality gate dates set in the template by default to those of the project. For this purpose, she wants to check the schedule of the Implement PM software project.
- She opens the panel of the project by clicking on the ID of the Implement PM software project.
- She activates the Project Core Data tab.
- In the Key dates area she activates the Schedule with gates checkbox.
- She opens the panel of the project by clicking on the ID of the Implement PM software project.

- She switches back to the Quality Gates module of portfolio IT00001.
- The portfolio quality gates are inserted in the schedule of the project and are visible in the scale area.
- They are also displayed below the scale in the Quality Gates module in the portfolio.