Tutorial: Plan a Project (Light)
Introduction
Information
- This tutorial is designed for persons who want to get a first quick and compact glimpse of the operating principles of PLANTA project.
- This tutorial is a simplified variant of the more detailed and comprehensive Create, Plan, and Control a Project with PLANTA project tutorial, which addresses PLANTA project users who want to get to know the operating principles and learn how to use the program.
Please note:
- All exercises are based on the PLANTA demo data. This demo data must be installed beforehand.
- Master data such as the calendar, resources, users, hourly rates, etc., is already preset in the PLANTA demo data. This tutorial does not cover the definition of master data (for this, see Master Data Entry). It merely describes the planning of a new project in addition to already existing ones and its impact.
- The screen shots used in this tutorial are mere examples of functions and may differ from the actual layout in the program.
Did you know?
There is a video tutorial on this topic. Go to the Plan a Project video tutorial
Project Creation and Outline Planning by a Multi-Project Manager (r41)
Start Program
Information
- In the PLANTA project standard version, new projects are created by a multi-project manager. The multi-project manager can also make a first outline planning of the new project which he then passes on to the project manager for detailed planning.
Procedure
- Open the PLANTA client.
- Enter “r41” (code of the multi-project manager in the PLANTA demo version) in the upper input field.
- Demo users do not possess passwords, so no input is required in the second field.
- Click on the Log in button.

- A module with an overview of all projects is opened.
- In this module, the multi-project manager can get a quick overview over the status of the projects (e.g. he can quickly recognize delays in the bar view, receive the project managers’ estimate, etc.)
Create New Project
Task
- A new IT project with a duration of 6 months is to be created.
Procedure
- Click on the Multi-Project Management → Project Planning → New Project link in the user menu or click on the New project button in the Projects module.
- The Project panel with the focused Project Core Data module is opened.
- The ID for the new project is generated automatically and is visible in the module header.
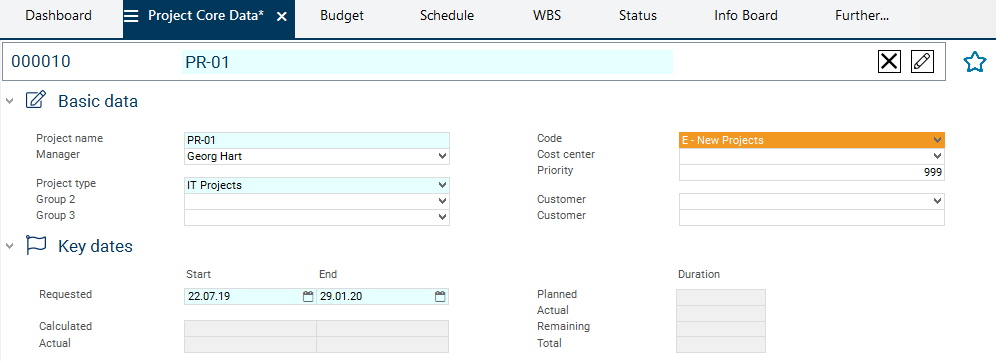
- Enter the Project name for the new project in the module header in the field next to the ID, e.g. PR-01.
- Here, the -Please enter a name- dialog is displayed by default.
- Define further project data, e.g.:
- Project type: IT projects,
- Requested start: one week from today
- Requested end: 6 months + one week from today.
- Save by pressing CTRL + S or by clicking on the save symbol in the toolbar.
- Other entries may be added at a later point if required.
Create Schedule
Task
- Create a schedule on the basis of a project template, e.g. a template for IT projects.
Procedure
- Open the Schedule module in the Project panel by clicking on the tab of the same name.
- When you open the Schedule module, the following confirmation prompt is displayed: Adopt a schedule?
- Confirm the message with Yes.
- The Copy Schedule module is opened at the bottom of the panel.
- If you negate the query by mistake, you can open the Copy Schedule module by right-clicking on the project header and selecting the command of the same name.
- Select project template A1-EN Standard plan IT project from the listbox.

- Start the copy operation by clicking on the Copy schedule button.
- The schedule which has been copied to the project is displayed and can be edited.

Edit Schedule (Adjust)
Delete Tasks
Task
- Delete required tasks, e.g. the Preliminary study task with all subordinate tasks.
Procedure
- Mark the Preliminary study task in the Schedule module (by pressing CTRL and clicking on the task line). The child tasks are also marked.

- Click on the Delete button in the toolbar.
- A prompt for confirmation is displayed before deletion.
- Confirm the query with Yes. The marked tasks are deleted.
- Afterwards, recalculate the project plan by clicking on the
 Calculate schedule button in the toolbar.
Adjust Task Duration
Task
- The Create outline concept task is to be completed earlier than specified in the project template. The task duration is supposed to be 10 days.
Procedure
- Enter the planned duration (e.g. 10 for 10 days) in the Remaining duration field in the Schedule module of the Create outline concept task.

- Recalculate the project plan by clicking on the Calculate schedule button in the toolbar.
- In the calculation, the remaining duration of the Outline concept summary task is adjusted to the reduced duration of the Create outline concept task.
Create New Tasks
Task
- Two more tasks are to be added to the project plan:
- Coordinate outline concept task under Create outline concept
- Coordinate IT concept under Create IT concept
Procedure
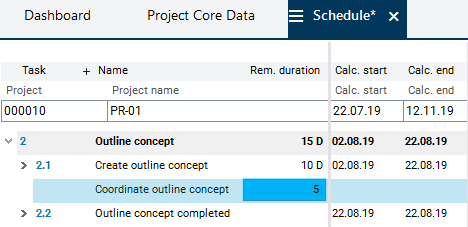
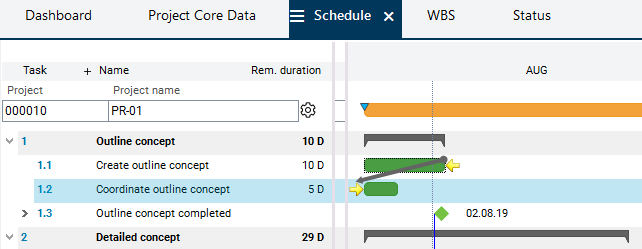
- In the Schedule module, right-click on the Create outline concept task and select Insert → Task from the context menu.

- Enter the Name, here: Coordinate outline concept, and the planned duration (Remaining duration field), e.g. 5 for 5 days, in the task line.
- Right-click on the Create IT concept task. Select Insert → Task from the context menu.
- Enter the name Coordinate IT concept.
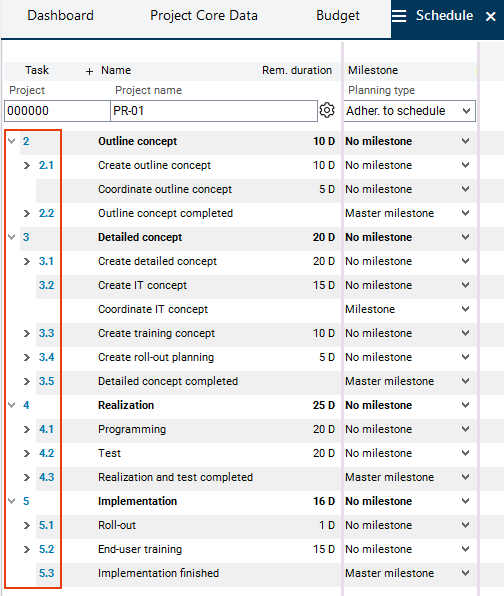
- Scroll to the Milestone column in the middle window.
- Define the task as a milestone via listbox selection.
- No duration is to be allocated to the tasks that are defined as milestones or master milestones in PLANTA project.

- Save.
- Due to the deletion of previous tasks, the first remaining task, Outline concept, begins with code "2". No codes have been assigned to the newly added tasks Coordinate outline concept and Coordinate IT concept yet.
- Click on the Calculate schedule button in the toolbar to update the WBS codes for all tasks of the project and to generate codes for the new tasks.
- Result:

Connect Tasks via Links
Task
- The newly created Coordinate outline concept task and the Coordinate IT concept milestone are to be included in the project via links.
- This is to be done graphically in the Gantt chart.
Information
- Links are dependencies between tasks that (can) have an effect on the calculated dates.
- There can be multiple links between two tasks. In the calculation of the schedule, the most unfavorable relationship takes effect, i.e. the link that causes the latest start date.
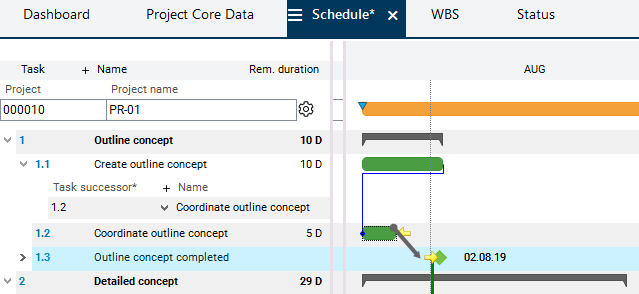
Procedure Connect the Coordinate outline concept task to the Create outline concept and Outline concept completed tasks via links.
- Step 1: Delete the existing link between the Create outline concept and Outline concept completed tasks.
- To do so, right-click on the link line and select the Delete links command from the context menu.

- Step 2: Place the cursor at the end of the bar of the Create outline concept task. The mouse pointer becomes a cross. Drag the task to the beginning of the bar of the Coordinate outline concept task by holding down the left mouse button. As a result, a connection line between the two bars are displayed. As soon as the target bar is reached, the start position in the source bar and the target position in the target bar are marked by yellow arrows. Release the mouse button.
- Result:

- Step 3: Link the bar (end of the bar) of the Coordinate outline concept task to the bar (beginning of the bar) of the Outline concept completed milestone in the same way.
- Result:
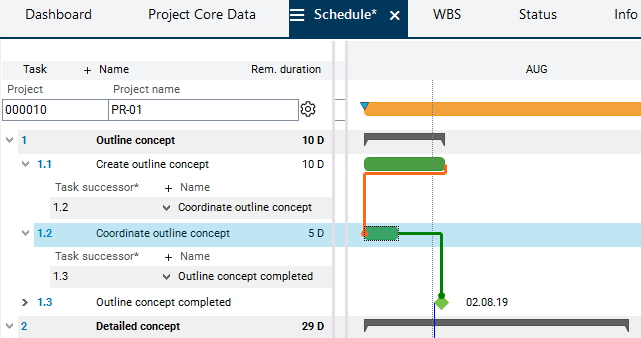
- When clicking on a bar, incoming links are visualized in red, and outgoing ones are visualized in green.
- Step 4: Recalculate the schedule by clicking on the Calculate schedule button in the toolbar.
- Result: The beginning of the Coordinate outline concept task was postponed until after the end of the Create outline concept task. The duration of the Outline concept summary task has changed accordingly.

- Link the new Coordinate IT concept milestone to the Create IT concept and Create training concept tasks in the same way and click on the Calculate schedule button in the toolbar.
Note
- In the Schedule module it is also possible to create links in table form.
Plan Resources
Task
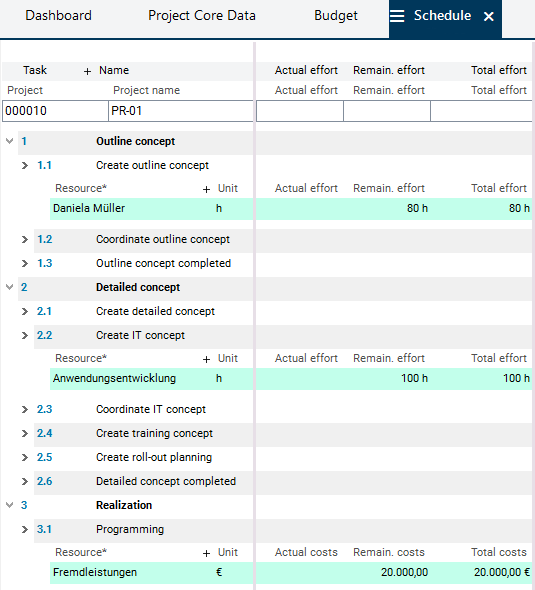
- Plan resources and specify an estimated effort:
- For the Create outline concept task: effort of 80 h for employee Daniela Mueller.
- For the Create IT concept task: Effort of 100 h, employee not defined yet, however, it will be an employee of the IT department, and the Anwendungsentwicklung ("Application Development") department resource is therefore initially planned for the task.
- The estimated programming effort is EUR 20.000. Resource Fremdleistungen ("External Services") is used for this.
Procedure
- For the planning of employee Daniela Mueller:
- Right-click on the Create outline concept task.
- Select Assign resources from the context menu.
- Activate the Select checkbox in the line with Daniela Mueller’s name in the dialog module and click on the Assign selected objects button.

- Below the Create outline concept task in the schedule, a resource record with the resource Daniela Mueller is created.
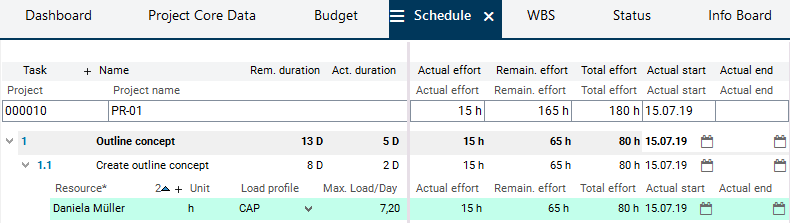
- Enter the estimated effort of 80 (= 80 hours) in the Remaining effort field.
- Assign the Application development department to the Create IT concept task in the same way and enter the Remaining effort of 100 h.
- For scheduling of external services:
- Right-click on the Programming task.
- Select Assign cost and revenue resources from the context menu.
- Activate the Select checkbox in the line named External services and click on the Assign selected objects button.
- The External services resource is assigned to the Programming task. Enter the estimated effort of 20.000 (EUR) in the Remaining costs field.
- Click on the Calculate schedule button in the toolbar. Result: The Total effort or Total costs column is also filled with the appropriate values since it is always calculated by the program and represents the sum of actual and remaining values.
Freeze Planning Status (Create Baseline)
Task
- The current planning state of the new IT project is to be frozen so that planning changes which may occur in the course of the project remain controllable.
Details
- The current planning status of the project is frozen in a status report. At the start of a project it is usually a baseline.
Procedure
- Open the Status tab in the Project panel in order to switch to the module of the same name.
- Here, the current status of the project and the existing status reports are displayed.
- It is a preview module in which new status reports can be created.
- Click on the Refresh button on the bottom left of the module so that the current project data is displayed in the module.

- Make estimates and write comments for each factor (costs, dates) if required.
- Click on the Create baseline button.
- Answer the Do you really want to create a baseline? message with Yes.
- The current status of the project is then frozen and the baseline report is created.
- The created baseline report is displayed in the Status reports area with Baseline report status.

Approve Project and Define Manager
Procedure
- Once the baseline has been created, the planning of the project is completed and the multi-project manager approves the project for further editing and reporting of working hours by deactivating the Locked checkbox in the Attributes/parameters area in the Project Core Data.


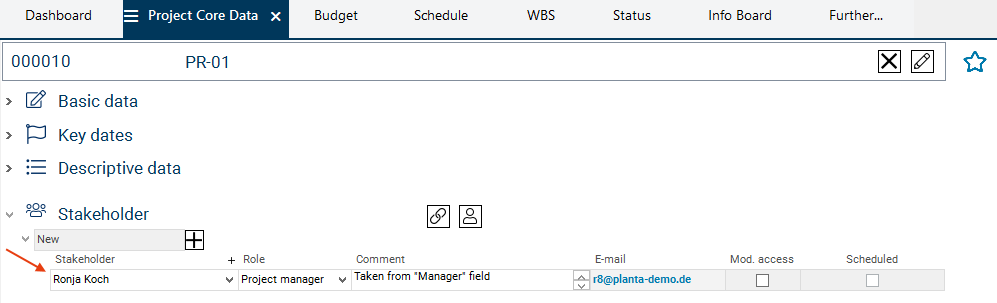
- Furthermore, the multi-project manager wants to charge the experienced project manager Ronja Koch with project controlling and define her as the project manager.
- To do so, he selects Ronja Koch from the listbox in the Manager field in the Project Core Data.
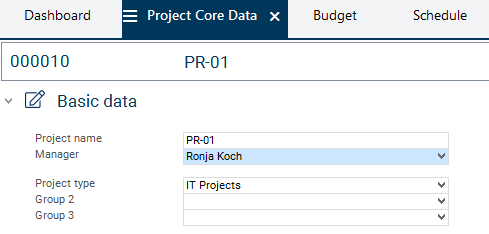
- Since the creator of a project is automatically set as project manager and as stakeholder of the project at the same time, the following query is displayed when another manager is selected: Do you want to delete the current stakeholder assignment of the manager or do you want to assign the new manager additionally?
- Confirm this message with Yes.
- As a result, the new manager is set as a stakeholder in the Stakeholder area and multi-project manager is deleted as a stakeholder.
Hour Recording by an Employee (r1)
Task
- Project team member (Daniela Mueller) wants to find out about her scheduling and todo items. Additionally, she wants to record the hours she spent working on the project.
Procedure
- Start a new PLANTA client.
- Log in with user “r1” (project team member).
- Daniela Mueller’s Employee Board is opened.
- In the My Activities module, the project team member can see which projects she is assigned to and which tasks and todo items are to be completed.
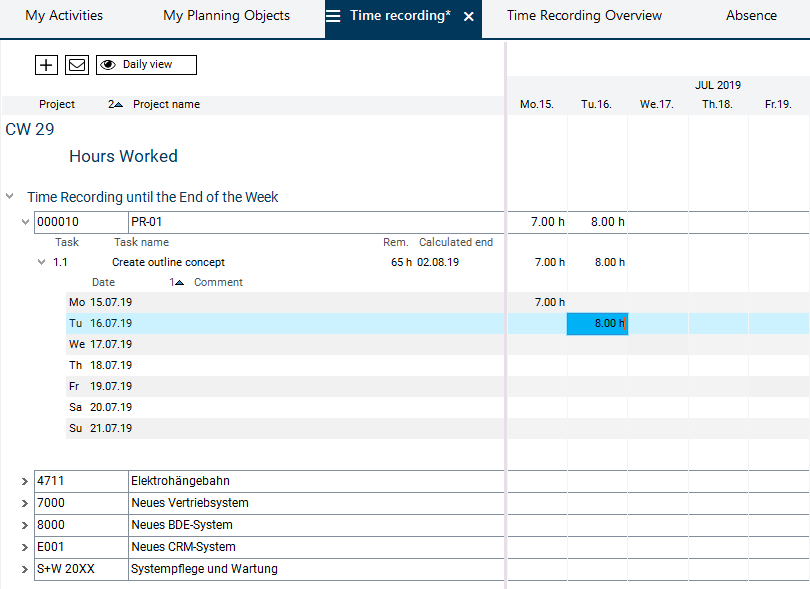
- Activate the Time Recording tab.
- In the left window, all projects for which the employee is scheduled are displayed.
- In the Remaining field, the employee sees the number of hours she is expected to spend on the respective task.
- In the right window, click in the field below the required date in the line of the Create outline concept task.
- Daniela Mueller enters the number of hours she has already spent on the task (actual hours).
- As a result, the planned value displayed in the Remaining field is reduced automatically so that you can quickly see how many of the planned hours still remain for the completion of the work.
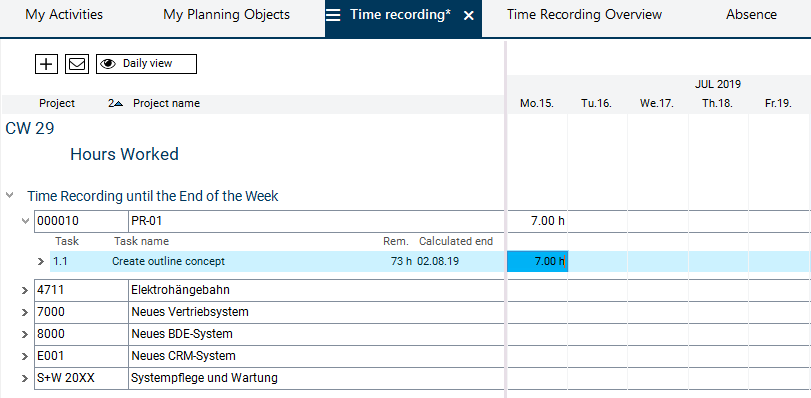
- Save.
- Enter hours for all required days in the same way.
- Expand the task to see the existing load records for all days of the selected week.
- In the Comment field you can write a comment on the load record.
Transfer of the Recorded Hours to the Planning by the Project Manager (r8)
Task
- Project manager Ronja Koch wants to take a look at the changes in the schedule.
Procedure
- Start a new PLANTA client.
- Log in with user “r8” (project manager).
- The My Planning Objects module is opened automatically.
- In this module, an overview of all planning objects of the project manager is displayed.
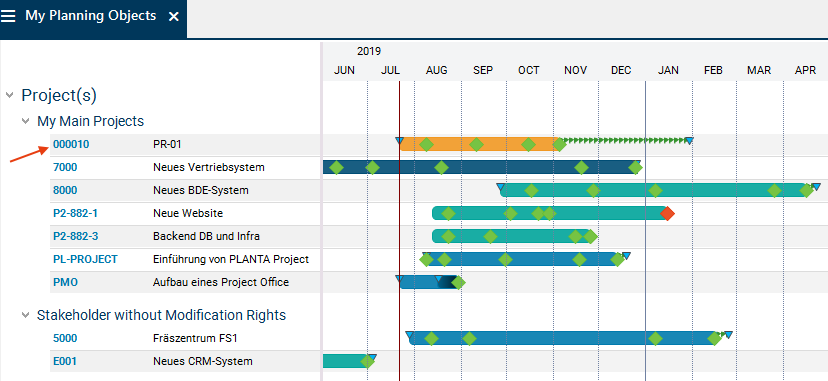
- Click on the ID (here: 000000) of project PR-01.
- The project panel of project PR-01 is opened.
- Activate the Schedule tab.
- Click on the Calculate schedule button in the toolbar.
- The schedule is refreshed: as a result, the reported hours are copied to the schedule as actual effort and the remaining effort is reduced accordingly. At the same time, the actual start of task and project is set to the date on which the first hours were reported and the duration of task and project is adjusted.