Projects Panel
Information
- In the Projects panel, users can, depending on their permissions, view and edit existing projects and create new projects.
Access path
- Menu → Projects
- Click the PLANTA logo in the Home Bar
- Click on the project title in the Boards panel to open a specific project directly in the Projects panel.
- Click on the project title in the board bar of a board to open the project of the board directly in the Projects panel.
Details
- When starting PLANTA pulse, the Projects panel is opened by default.
- The home page can be configured in the User Settings → General or in the Administration panel, if needed.
Example
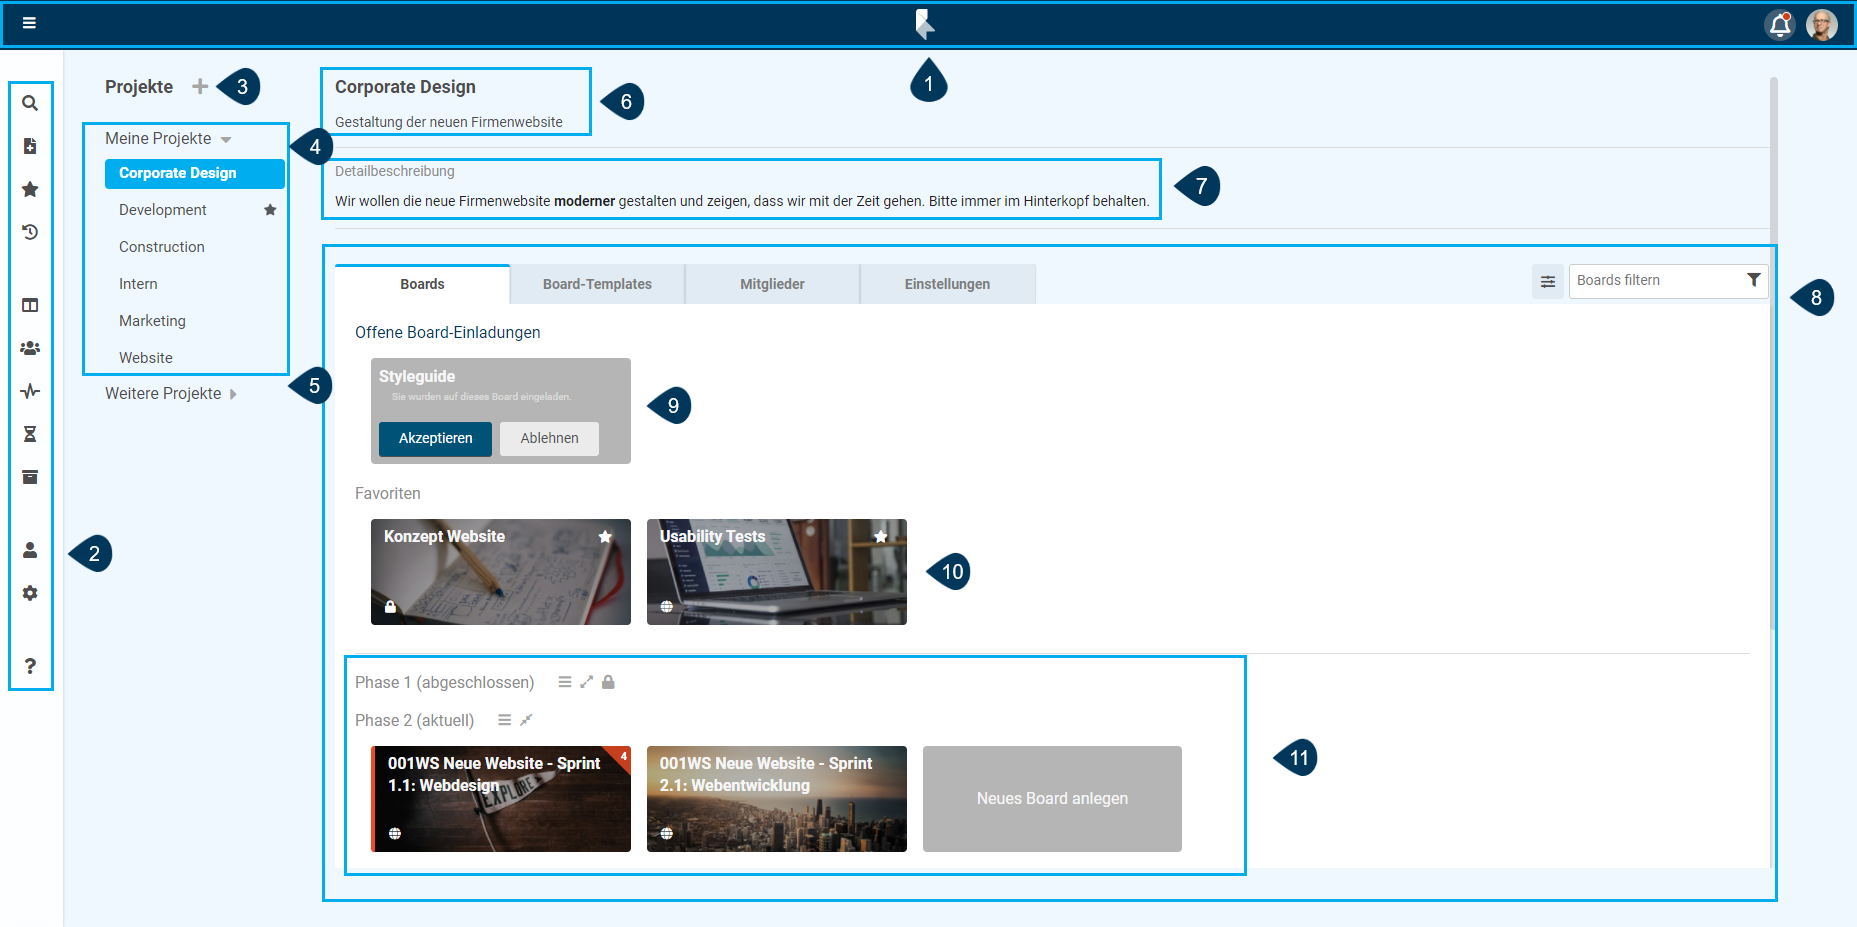
- The Projects panel as seen by a global admin:
Details
- Home Bar (1)
- Menu (2)
- Button to add a new project (3)
- List of projects of which I am a member (4)
- List of projects with public boards of which I am not a member (5)
- Title and description of the project (6)
- Detailed description of the project (7)
- Tab area (8) to manage the
- Area for pending board invitations in the project (9)
- Favorite boards in the project (10)
- Board Groups (11)
Details
- The Projects panel contains two project lists:
- In the My Projects area, all projects of which the currently logged-in user is a member are listed.
- When a user is a member on a board of the project, he/she is considered a member of the project as well.
- Projects can be viewed, edited or created depending on the permission.
- Projects in this list can be added as favorites. These are displayed at the top of the list.
- In the Further Projects area, all projects are listed of which the currently logged-in user is not a member, but who do contain public boards the user could join.
- The list is collapsed by default and can be expanded, if needed.
- The setting is saved.
- The projects in the Further Projects area can only be viewed.
- If the user joins a board of the project, he/she becomes a member of the project and the project is moved into the My Projects list.
- The list is collapsed by default and can be expanded, if needed.
- In the My Projects area, all projects of which the currently logged-in user is a member are listed.
- By clicking the project title, the project view of the project can be opened.
- By default, the last viewed project is loaded when the panel is opened.
Add a project to favorites
- Open the Projects panel.
- With the mouse, hover over the project which is to be added as favorite.
- The icon appears.
- Click on the star.
- Next to the project title, the icon is now displayed and the project is moved to the top of the My Projects list.
Note
- By clicking again, the project is removed from the favorites.
Project Boards (Boards Tab)
Menu → Projects → Select project → Boards tab
Information
- In the Boards tab, the Boards of the currently opened project are displayed.
- They can be arranged in board groups.
- Via the placeholder board card Create New Board, new boards can be created within a project and within a board group.
Search/Filter Boards
- Menu → Projects → Select project → Boards tab
- Enter a search term into the filter field in the upper right corner in order to display only boards which contain the search term.
- The search term will be searched for in board titles and board descriptions.
- Boards which don’t belong to a board group will not be filtered, but are always displayed.
- By clicking , the filter options can be opened.
- Here, you can define whether public boards of which the user is not a member are to be displayed.
- By default, the setting is activated. Changes are saved per project.
- For PLANTA Hybrid projects, you can also define whether unsynchronized boards are to be displayed.
- Here, you can define whether public boards of which the user is not a member are to be displayed.
Pending Board Invitations
Menu → Projects → Select project → Boards tab
Information
- If there are pending board invitations in a project, they are displayed at the top in the Pending Board Invitations area.
- The Pending Board Invitations area is displayed only when there are board invitations in a project.
Favorites
Details
- If the currently logged-in user has added boards of the project to their favorites, they are displayed outside of their board group in the Favorites area.
- This area is always displayed above the board groups.
- The Favorites area is displayed only when there are board favorites in a project.
Board Groups
Information
- By default, an empty board group Boards is displayed for new projects.
- If needed, new board groups can be created to sort the boards (e.g. by project stages or departments).
- The board groups as well as the boards themselves can be arranged in the Projects panel using Drag&Drop.
- In the Boards panel, the sorting is not displayed. Here, all boards are sorted alphabetically.
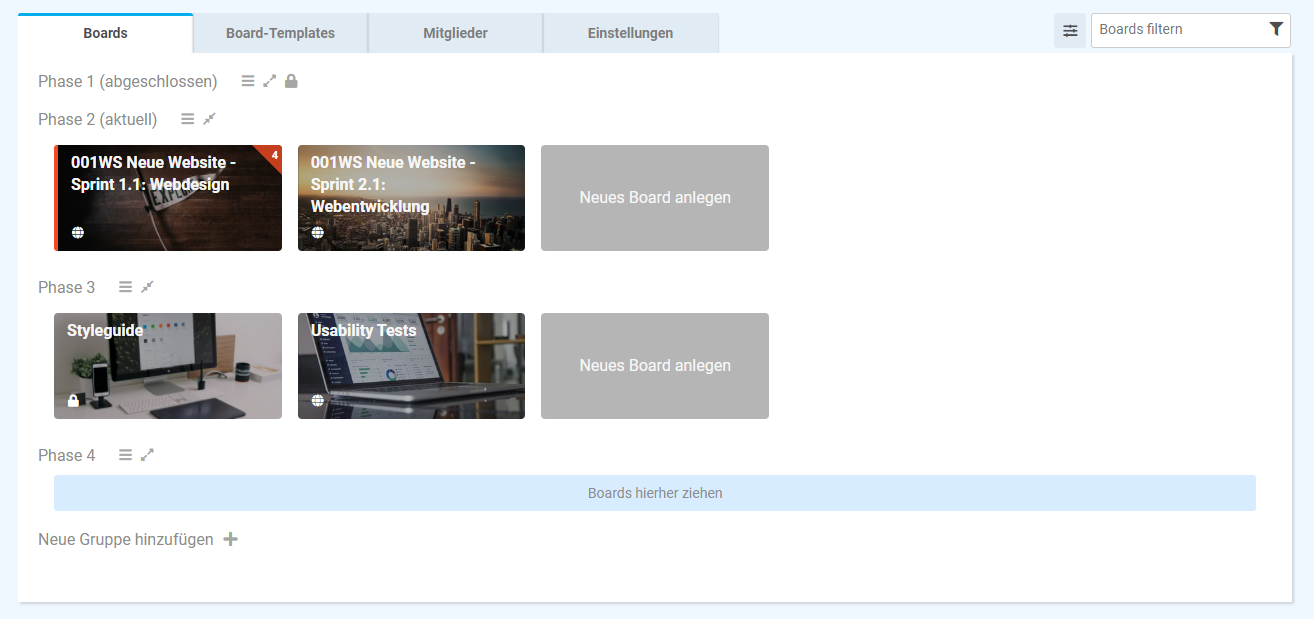
Example for boards sorted in board groups
Create a New Board Group
- Menu → Projects → Select project → Boards tab
- Click Add New Group.
- Enter a title for the board group.
- Click Create.
Edit Board Group
- Menu → Projects → Select project → Boards tab
- Via , the board group menu with further options can be opened.
- Via Always Hide/Display Boards, the boards of the board group can be displayed/hidden by default.
- Boards can still be moved into a collapsed board group using Drag&Drop.
- Via , the boards of a board group can be hidden and via , they can be displayed again.
- In the Settings area, the title of the board group can be edited. The board group can also be locked.
- No boards can be added to locked board groups.
- By clicking Delete Board Group, a board group can be deleted.
- You will be asked which other board group the boards of the group should be assigned to instead.
- The last board group cannot be deleted.
Notes
- Board groups can only be created and edited by global admins or by project admins.
Project Templates (Board Templates Tab)
Menu → Projects → Select project → Board Templates tab
Information
- In the Board Templates tab, the templates of the currently opened project are displayed.
- They are labelled as board templates with the icon .
- On the icon, there is a tooltip which indicates how many boards have already been created out of the template.
- The board templates can be sorted into template groups.
- Via the placeholder board card Create New Template, new templates can be created within a project and within a template group.
Template Groups
Information
- By default, an empty group Templates is displayed for new projects.
- If needed, new template groups can be created to sort the board templates (e.g. by project stages or departments).
- The templates groups as well as the board templates themselves can be arranged in the Projects panel using Drag&Drop.
Create a new template group
- Menu → Projects → Select project → Board Templates tab
- Click Add New Group.
- Enter a title for the template group.
- Click Create.
Edit template group
- Menu → Projects → Select project → Board Templates tab
- Via , the template group menu with further options can be opened.
- Via Always Hide/Display Templates, the board templates of the template group can be displayed/hidden by default.
- Templates can still be moved into a collapsed template group using Drag&Drop.
- Via , the board templates of a template group can be hidden and via , they can be displayed again.
- In the Settings area, the title of the template group can be edited. The template group can also be locked.
- No templates can be added to locked template groups.
- By clicking Delete Template Group, a template group can be deleted.
- You will be asked which other template group the board templates of the group should be assigned to instead.
- The last template group cannot be deleted.
Filter Board Templates
- Menu → Projects → Select project → Board Templates tab
- Enter a search term into the filter field in the upper right corner in order to display only board templates which contain the search term.
- The search term will be searched for in board template titles and board template descriptions.
- Board templates which don’t belong to a template group will not be filtered, but are always displayed.
Notes
- Template groups can only be created and edited by global admins or by project admins.
Project Members (Members Tab)
Menu → Projects → Select project → Members
Information
- In this area, members can be added to or removed from the project and the permissions of the individual members can be edited.
Note
- The members of the projects will automatically be added to all newly created boards of the project.
Project Settings (Settings Tab)
Menu → Projects → Select project → Settings
Information
- In the Settings tab, the settings of the project can be managed.
Procedure
- Perform the required changes in the Settings area (e.g. changing the title or the project key).
- Click Save.
Details
- The regular expression for the project key pattern can be edited in the Administration panel.
- The comment format template defines in which format time recording comments will be synchronized from PLANTA pulse to PLANTA project.
- This setting is only relevant for PLANTA Hybrid projects and is only displayed for these projects.
- The comment format template can also be edited globally in the Administration panel in the Settings tab → Time Recording Settings.
- In the Detailed Description field, a more detailed description of the project can be entered.
- Via the Hide Project in Time Recording Panel checkbox, the cards and hours worked of the project can be hidden in the Time Recording panel.
- Recording hours worked directly on cards of the project is still possible, but these hours will not be displayed in the Time Recording panel.
- The listbox Enable Linking of Boards and Cards defines whether linking boards and cards will be allowed in the project.
- The listbox is displayed only when the parameter of the same name in the Administration panel has been activated.
Notes
- The Settings tab is only available for project admins and global admins.
- The other members of the project cannot access the Settings tab.
- Projects can also be edited in the Administration panel.
- Only global admins can access the Administration panel.
- In the Administration panel, projects can also be deleted and existing boards can be assigned to a project.