Migration Packet Generator
General
Information
For migration packets, which are most frequently written, PLANTA offers a so called migration packet generator
The most frequently written migration packets are packets which carry out simple schema adjustments (add new data table/columns)
The migration packet generator can also be used for customer individual schema adjustments.
The migration packet generator is available in the system customizer in the Data Dictionary module on data table level (as a button) and on data item level as a context menu entry.
Details
The migration packet which exports data items as a migration packet contains:
The statements for adding the column
The automatically generated constraints
The automatically generated indeces
The statement for adding the column to the
_HIStable, if configured
Before creating the migration object, the migration packet always checks whether the object already exists. If it already exists, the creation is skipped. This means that the packets are easily run multiple times even if changes are made subsequently.
Procedure
Create Table
Create a table with all data items as a migration packet:
Customizer - System Customizer - Data Dictionary
Select the required data table.
The Activated parameter must be = in the selected data table
Click on the Export as a migration packet button.
A dialog module is opened, for more information, please see the Handle Dialog Module section.
Create Data Items
Create selected data items as a migration packet:
Customizer - System Customizer - Data Dictionary
Select the required data table.
The Activated parameter must be = in the selected data table
Mark data items which are to be included in the migration packet.
The Activated parameter must be = for all data items in question
Right-click and select the Create migration packet for marked data items command from the context menu.
A dialog module will be opened, for more information, please see the Operate Dialog Module section.
Handle Dialog Module
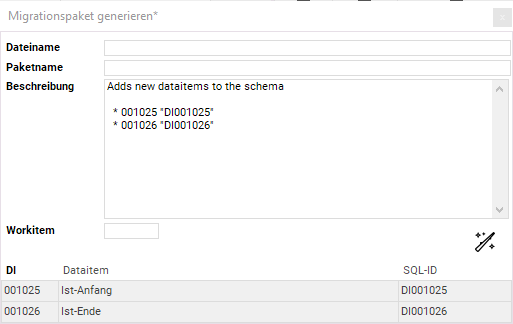
In order to complete the migration packet you have to fill some fields in the dialog module:
The file name which is to be used for the migration packet and its SQL files, e.g.
add_new_columns_to_projectThe packet name which is displayed in the migration module, e.g.
AddNewProjectColumnsDescription which is displayed in the migration module.
In this field, the generator automatically suggests a description.
The work item number is only required for PLANTA-internal purposes.
When clicking on the magic wand, the migration packet and its corresponding SQL files will be created and a dialog message will convey the paths
Import Migration Packet in the Development Stage
After you have created the packet, you can navigate to the migration interface:
Customizer - Migration - Migration Packets
Via Packets from file system, the new packet can be imported and is then displayed in the module.
The packet can now be run manually to create the objects.
Import Migration Packet in Test/Productive Stage
After verifying that the migration packet works, it can be imported into the customer’s test/productive environment:
The customer packets are located under
/migration/customer/in a subdirectory of the database release in which they were created.This directory can simply be zipped and sent to the customer/copied to other systems.
If the migration packet exists, the service must be shut down.
You can start the migration by executing
./planta_migration.sh config/migration/migrate_customer.parunder Linux, orplanta_migration.bat -c config\migration\migrate_customer.parunder Windows.Only the packets under
/migration/customer/are run.
When the migration has run through (in a matter of seconds), you can verify in
/log/Migration.logthat the run was successful and the service can be restarted.