Tutorial: Operation of the PLANTA Software
Objective of this tutorial
- To introduce first-time users to the elements of the PLANTA surface and to the operational functions.
Please note:
- This tutorial is especially designed for users with management role. For project team members the short version of the tutorial is recommended.
- All exercises are based on the PLANTA demo data. This demo data must be installed beforehand.
- The screenshots used are merely examples of functions. The screenshot layout may deviate from the program.
Starting and Exiting the Program
Start and log on
- Double click on the PLANTA symbol.
- The PLANTA logo now becomes visible and the network connection to the server is established.
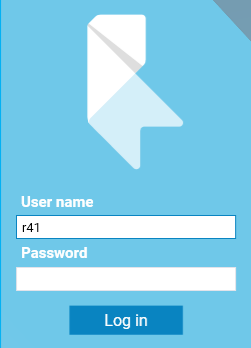
- Before the PLANTA logo, a form with two input fields for the user ID (user code) and the password appears.
- Enter the user code in the User name field, here R41 for the PLANTA demo user with project management and multi-project management roles.
- Demo users do not possess passwords, thus no input is necessary in the Password field.
- Confirm with Login.
Exit
- Use the Data → Exit Program menu item or press ALT + F4.
- If there are any unsaved changes, the following message is displayed: Save? Some data has been changed. After the message has been confirmed, the program is closed.
- If all changes have already been saved, the program is closed (without further prompt).
- If no panel is open, you can also exit the program using the x button in the title bar.
PLANTA project User Interface
Did you know?
Click here to watch a video explaining the PLANTA project user interface.
Information
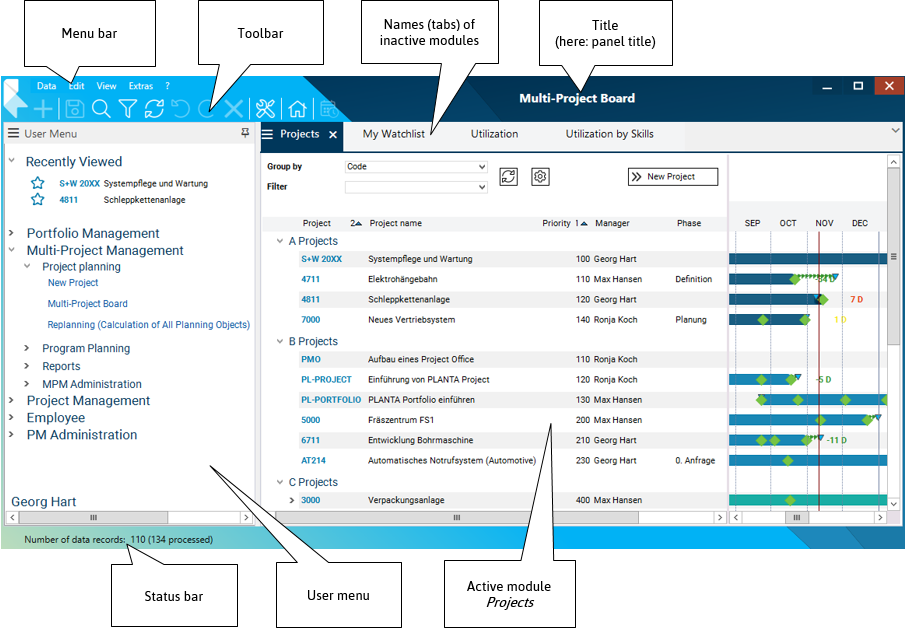
- Title bar
- forms the upper line of the screen and contains the following elements:
- PLANTA logo
- Menu bar
- includes menus with the individual menu items for execution of different actions and operations.
- Toolbar (standard)
- consists of buttons which represent the most frequently used menu items as graphical symbols.
- By clicking on a button in the toolbar, the respective action is carried out.
- the title
- of the active panel or
- the main module, if no panel title is defined, or
- the system title, in case no panel is opened.
- forms the upper line of the screen and contains the following elements:
- Status bar
- The status bar is placed at the bottom margin of the screen. Here, messages on the progress of the program which do not require confirmation are displayed.
- In between, there is the panel area which consists of user name and user modules:
- Panel
- In PLANTA, a panel is a unit which is used to group modules. It contains a user menu, a main module, and possibly one or more submodules.
- Modules can be displayed as tabs or be frozen as windows at the top or bottom, or on the left or right hand side.
- Module
- In PLANTA, a module is a unit which enables the display and editing of data from the database (e.g. project data).
- User menu
- is a module which is displayed on the left hand side of the screen and contains the following elements:
- Links to the panels with editing modules and view modules The links in the user menu are grouped by work area and role.
- The rights of the logged-on user determine which links are contained in the user menu.
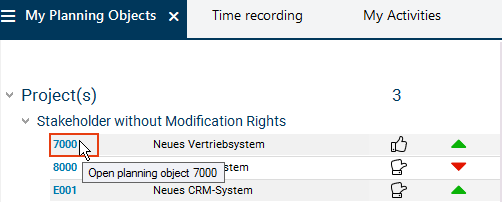
- Links to the panels of the recently viewed planning objects (projects, programs, ideas, proposals) and planning objects marked as favorites by the user.
- Name of the logged-on user.
- Links to the panels with editing modules and view modules The links in the user menu are grouped by work area and role.
- is a module which is displayed on the left hand side of the screen and contains the following elements:
Modules
Information
- A module enables data from the database to be displayed and edited.
- The data is arranged in records which again consist of individual data fields.
- A record summarizes attributes/parameters of an object (project, task, resource, etc.) with their corresponding values.
- Values are displayed in separate data fields.
- What data fields belong to a record (record structure) is defined by the customizing of the corresponding data area.
- The same data field across several records forms a data logical column.
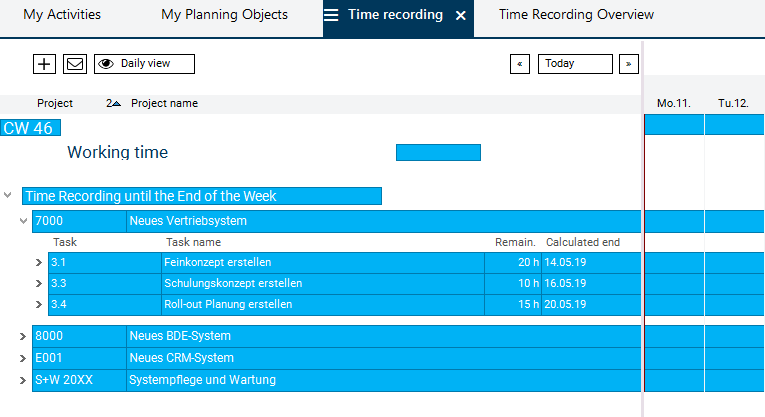
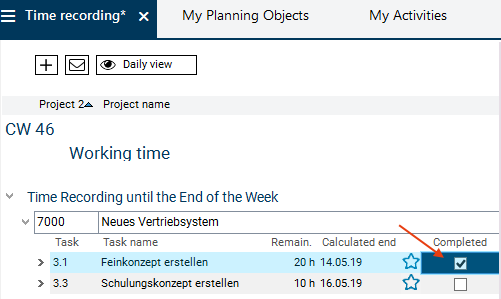
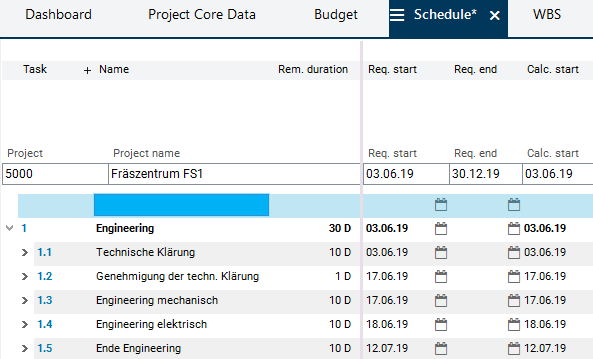
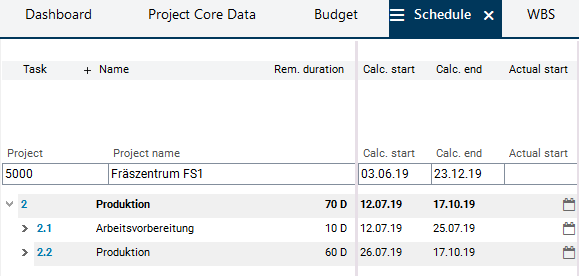
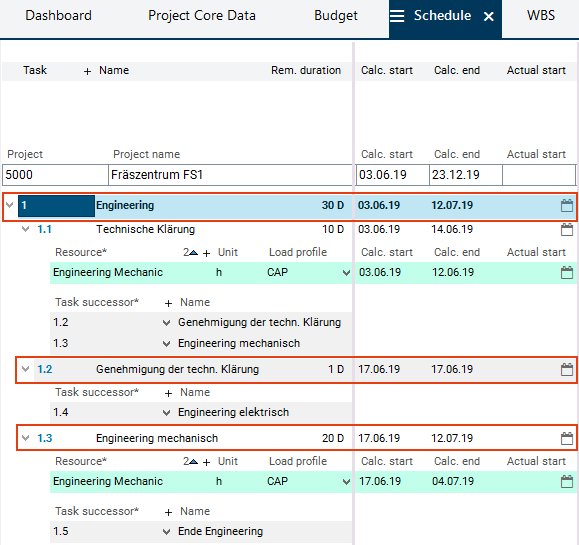
Example
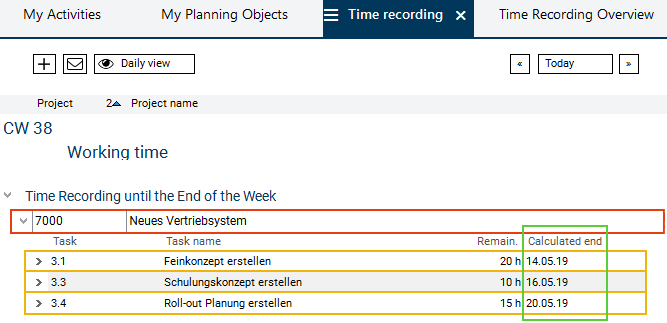
- Here, four records are displayed: one project record (marked red) and three task records (marked orange).
- The project record consists of two data fields (Project and Project name), and their corresponding values.
- The task records consist of four fields (Task, Task name, Remaining effort, and Calculated end) and their corresponding values.
- All Calculated end fields form a column (marked green). The data logical Calculated end column equates to the layout column.
| See also: Further Details on the Module Structure |
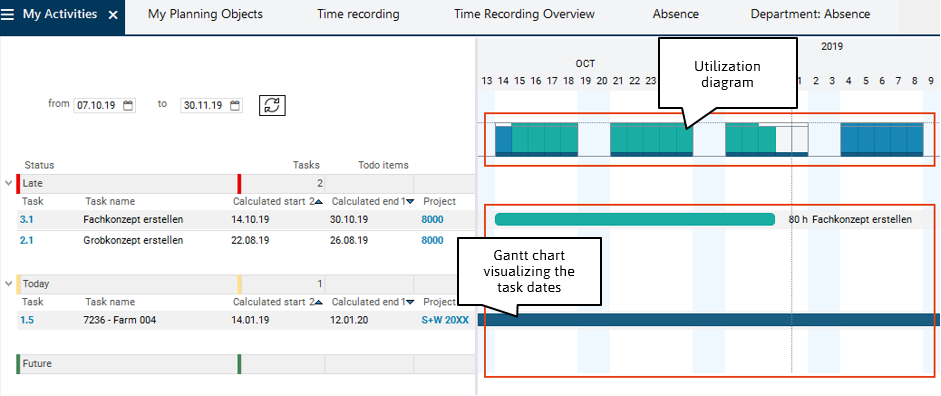
Graphical Representation of Data
Information
- In some modules, particular data is represented graphically:
- in the form of histograms, e.g. utilization diagram for the representation of resource utilization throughout a particular period,
- in the form of bars, e.g. for the visualization of project or task dates.
Module Variants
Information
- Almost every module in PLANTA project can be modified on the surface to meet individual requirements of the user and as a variant of the modified module.
- For instance, it is possible to only have the fields that are most frequently used displayed in a module while all other fields are hidden.
- For some modules, PLANTA already provides default module variants.
- In the module tab of all standard modules, there is the
 Module variants button.
 - If there are module variants of a module, the module variants and the Base variant are displayed in a listbox when you click on the button.
- In the module tab of all standard modules, there is the
Task
- Select the Inactive Projects module variant in the Projects module.
Procedure
- If the Projects module of the Multi-Project Board panel is not opened yet, select Multi-Project Management → Multi-Project Board in the user menu.
- The panel is opened. The Projects module is opened automatically.
- Click on the button in the tab of the Projects module.
- Select the Inactive Projects module variant from the listbox.
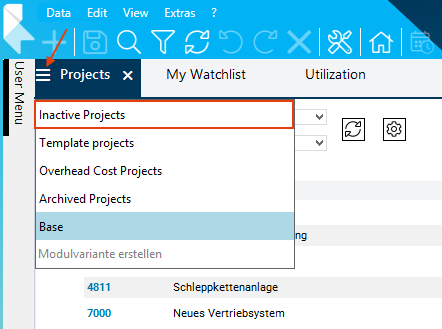
- The module variant is loaded. In the Projects module, only the inactive projects are displayed now.

- Select the Base entry in the module variant listbox to return to the Base variant.
Note
- You can create individual module variants and define them as favorites. The module variant marked as a favorite is loaded when the module is opened.
Buttons
Information
- Buttons in the PLANTA system are
- module buttons for executing differentactionsor for refreshing data or
- buttons in dialog or message boxes.
Example of module buttons
Note
- On each button there is a tooltip which gives explanations on the action on the respective button (in the case of pure symbol buttons) or further clarifies them (if the label is not quite meaningful). For this purpose, see the "tooltips” section.
Example of buttons in a dialog box
- To activate a button
- click on the button displayed on the monitor with the cursor or
- focus the button with the TAB key and subsequently press ENTER or SPACE (for module buttons) on your keyboard.
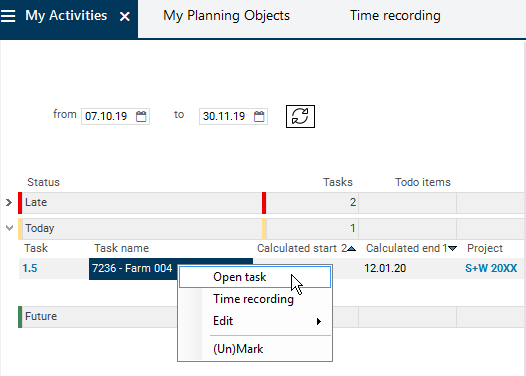
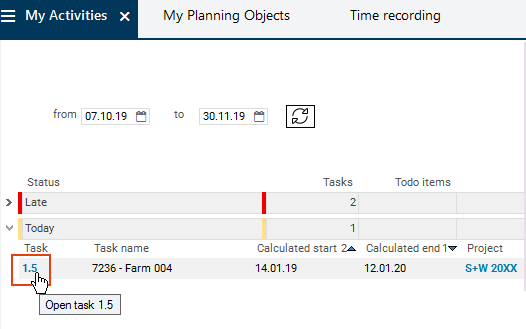
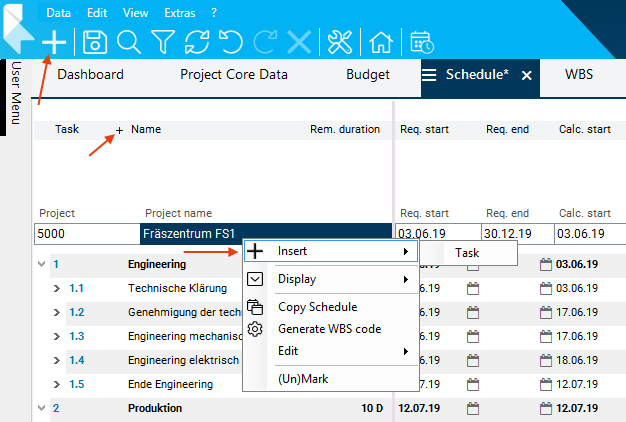
Context Menu
Information
- You can open a context menu via the right mouse button.
- Depending on the record on which the context menu command was executed, different context menu commands are offered, e.g.:
- Insert: Insertion of records
- Display: Show/hide data
- Individual context menu commands: Start actions (e.g. open modules or macros)
- Edit: Standard editing functions for the activated data field
- (Un)mark: Mark or unmark the record
Tooltips
Information
- Tooltips are texts which are shown when the mouse is moved over particular elements.
- In PLANTA project, there are 2 types of tooltips:
- Automatic tooltips are automatically displayed on the headings which are cut due to insufficient field length. In such a case, the tooltip displays the entire heading.
- Tooltips stored by the customizer. They contain help texts or explanations for the affected field. Such tooltips can be stored on regular fields as well as on fields and bars.
Create, Edit, Delete Data
Information
- PLANTA distinguishes between activation and marking of data.
- Data fields must be activated in order to record and edit data in them or to delete data from them.
- Records must be marked in order to be copied, moved, deleted, etc. entirely.
Activate/Mark/Unmark
Procedure
- Activate via click or via input.
- Only one data field can be activated (not the entire record). It is highlighted in bright blue.
- The record in which the activated field is located is considered focused. It is highlighted in light blue.
- Mark with CTRL + mouse-click.
- The entire record is marked.
- The marked record is highlighted in bright blue.
- Unmark with CTRL + click on the marked record.
- Mark several records:
- Select the first record and use CTRL + mouse click to mark it (here: task 3.1).
- Select a last record and use SHIFT + mouse click to mark it (here: task 3.4).
- This will cause all the records lying between the first and last record to be marked at the same time.
- Result:

- The marked records can be unmarked via SHIFT + mouse click on the first record.
- Mark all records with CTRL + A.
- Result:
- The marked records can be unmarked with CTRL + D.
Edit
lEdit existing values
- Which data fields can be edited and how they can be edited in existing records depends, among other things, on the data field type:
| Data field type | Description | Example |
|---|---|---|
| Input data field (input) |
|  |
| Output data field (output) |
|  |
| Link data field |
|  |
| Listbox |
|  |
| Mandatory data field |
|  |
| Checkbox |
|  |
| Traffic light |
|  |
| Continuous text field |
|  |
Copying of Data via Drag and Drop
Information
- New values can either be entered manually or be copied from other fields. For this purpose, you can used PLANTA's own Drag&Drop copy function, which replaces the conventional copying via CTRL+C and CTRL+V.
- Field to field (default setting)
- Field to column
- Column to column
Task
- Copy values via Drag&Drop in the Schedule module.
Procedure
- Click on Multi-Project Management → Project Planning → Multi-Project Board in the user menu.
- The Multi-Project Board panel is opened and the Projects module is focused automatically.
- Here, click on the link on the ID of project 5000 Fräszentrum FS1.
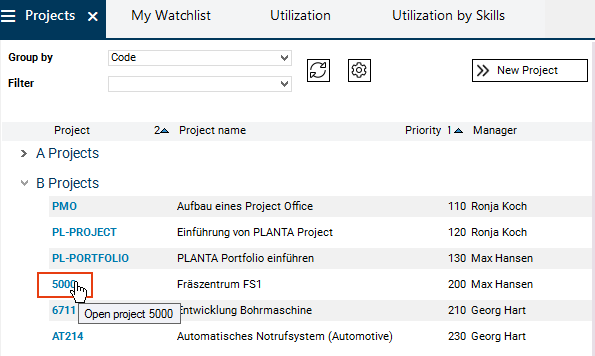
- The panel of the project is opened.
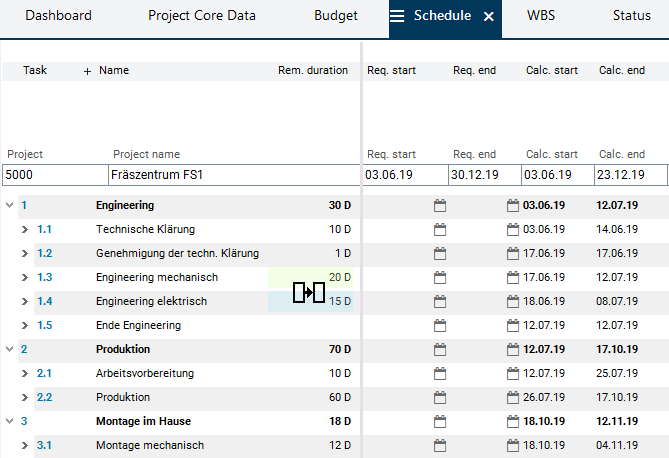
- Click on the Schedule tab to open the module of the same name.
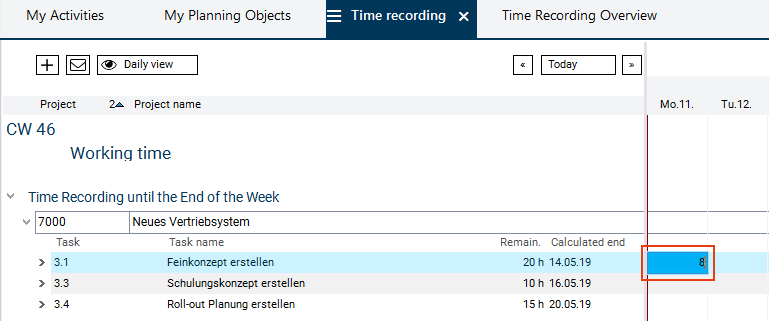
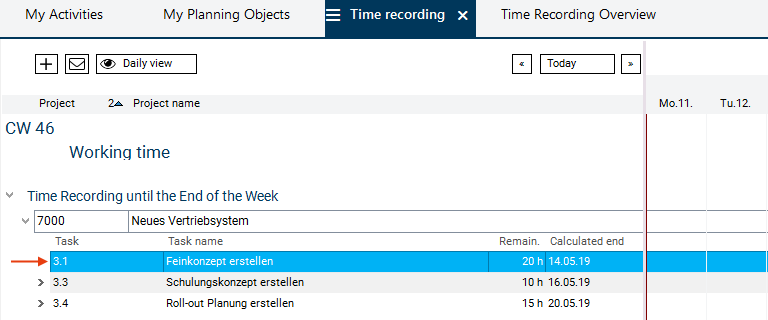
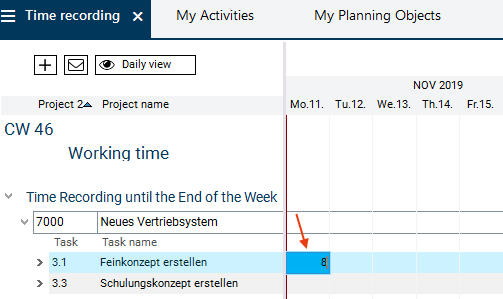
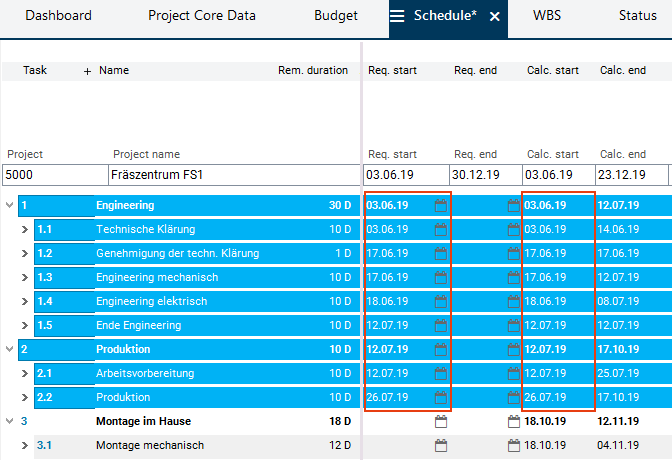
- Copy: field to field:
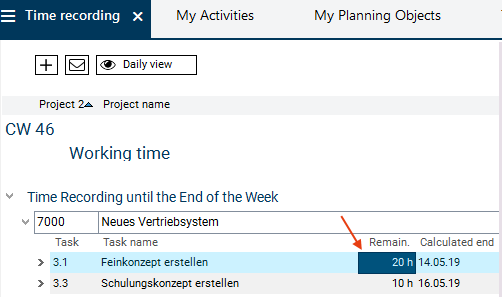
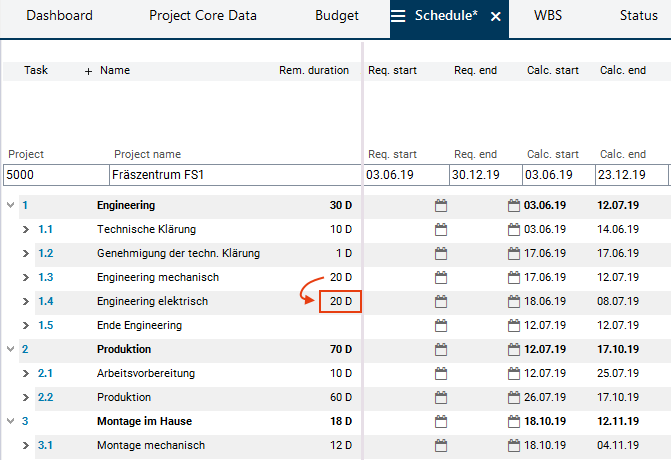
- Drag the content of the source data field (Remaining duration field of task 1.3) to the target data field (Remaining duration field of task 1.4) via CTRL + holding down the left mouse button.
- As soon as the cursor is on the target field, it changes its form (see the picture). Release the left mouse button.
- The source field value is copied to the target field.
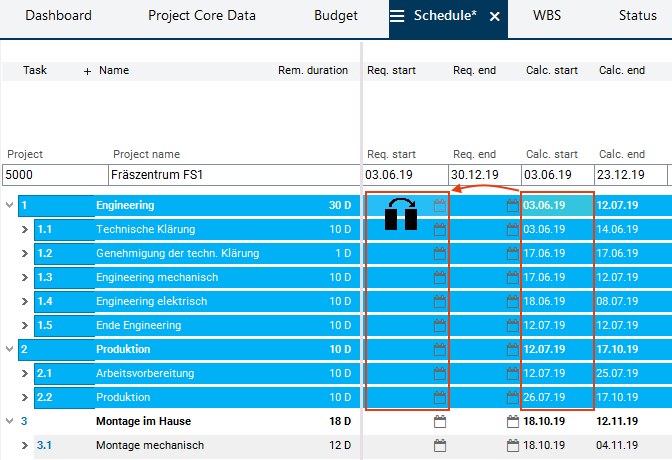
- Copy: field to column
- Define the operation in the menu bar via Edit → Drag&Drop Copy → Field to column.
- Mark all target records with CTRL + click on the start record and SHIFT + click on the end record (e.g. task 1.3 as a start record and task 2.2 as an end record).
- Drag the content of the source data field (Remaining duration field of task 1.1) to the Remaining duration target column of the marked records via CTRL + holding down the left mouse button.
- As soon as the cursor is on the target column, it changes its form (see the picture). Release the left mouse button.
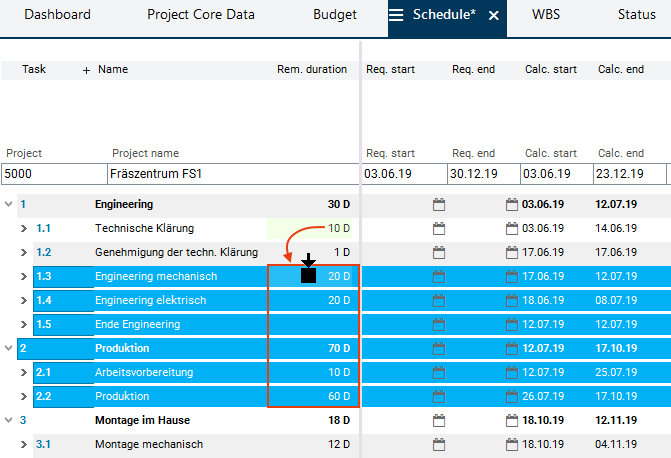
- The value of the source data field is entered for all marked records in all records of the target column.
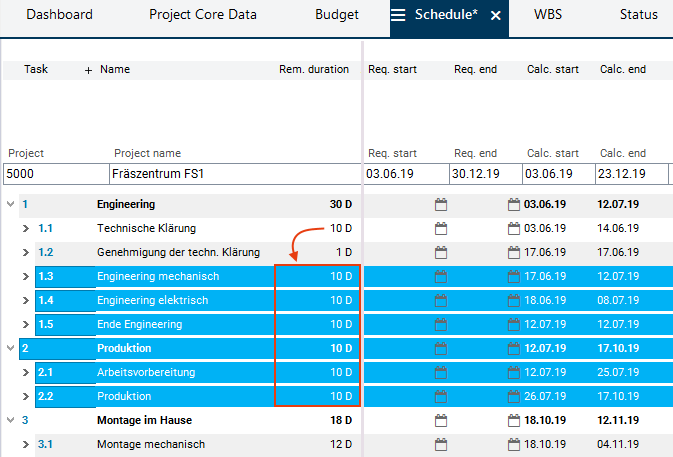
- Copy: column to column
- Define the operation in the menu bar via Edit → Drag&Drop Copy → Column to column.
- Mark all target records with CTRL + click on the start record and SHIFT + click on the end record (e.g. task 1 as a start record and task 2.2 as an end record).
- Drag the content of the source column (Calc. start) to the target column (Requested start) via CTRL + holding down the left mouse button.
- As soon as the cursor is on the target column, it changes its form (see the picture). Release the left mouse button.
- The values of the source column fields are entered in the corresponding data fields of the target column for all marked records.
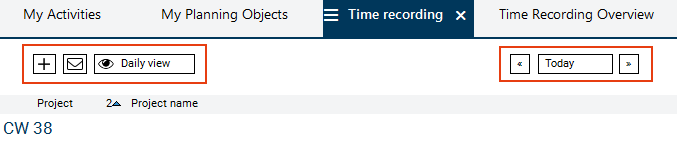
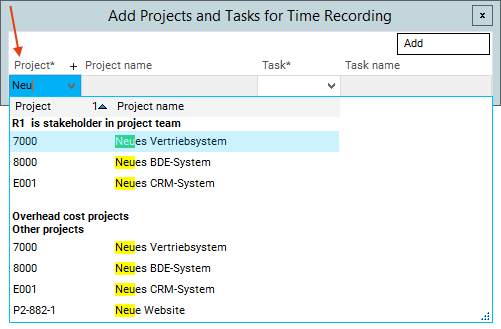
Insert New Records
Procedure
- You have the following options for the insertion of a new record:
- Press the F4 key or
- select the required option in the context menu by right-clicking or
- click on the plus symbol in the toolbar or
- click on the plus symbol in the data area caption line or in the record heading.
Example
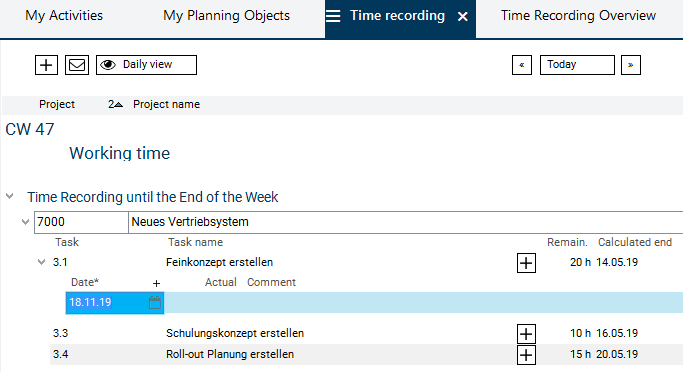
- Result: A blank record has been inserted.
- Exception: Insertion via plus symbol in the record
- This option is only available in some modules, e.g. in a variant of the Time Recording module.
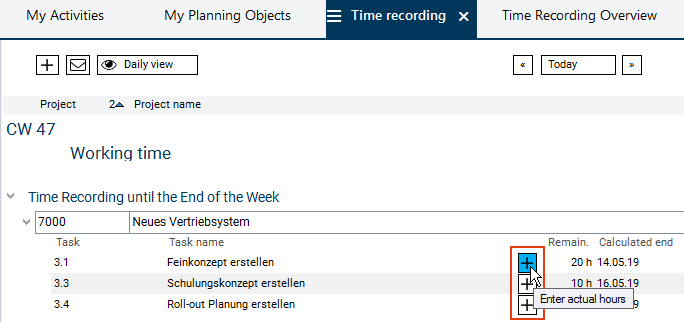
- Result:
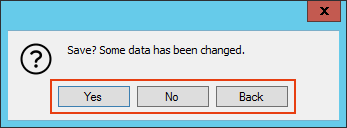
Save
Procedure
- Save data
- by clicking on the Save button in the toolbar,
- by pressing CTRL + S or
- by using the Edit → Save menu items.
- If some of the records are still invalid (blank lines) when you save, the following message appears: Mark invalid records?
- If this message is confirmed with Yes, the records with empty ID are marked. They can be edited, or they can be deleted via the Delete button.
- If the message is confirmed with No, the invalid records are not marked.
Delete
Deletion of values
- Activate the required data field.
- Delete the value.
- Save.
Deletion of records
- Mark the required record.
- Click on the Delete button in the toolbar.
- The following message appears: Delete marked data?
- Confirm it with Yes.
- Save.
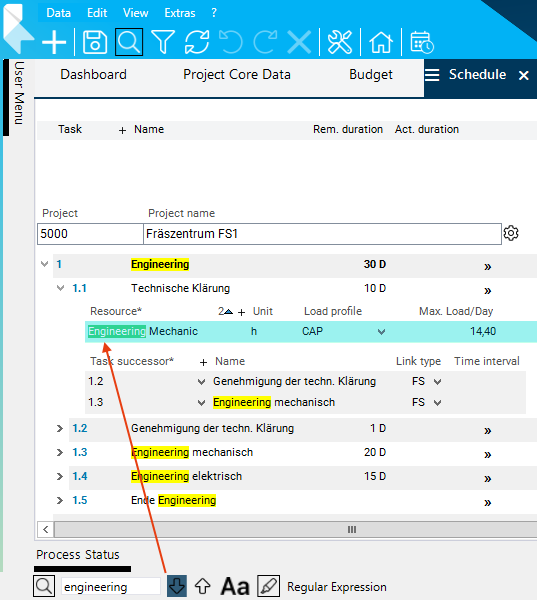
Search in Module
Task
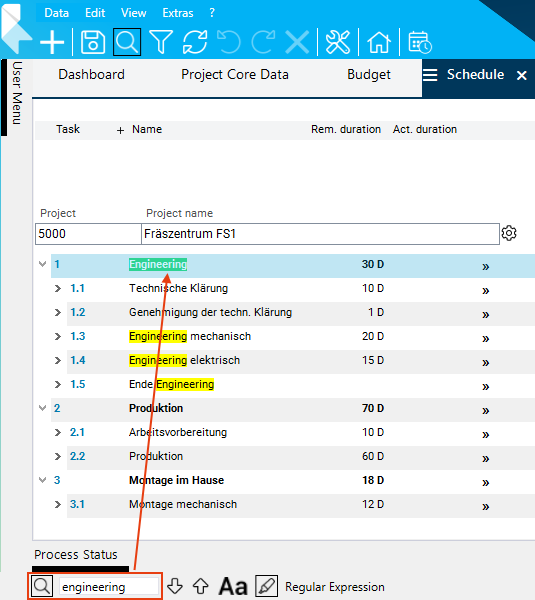
- Search a character string in the Schedule module of project 5000.
Procedure
- Go to the Schedule module of project 5000 in case it has not yet been opened.
- Display the search bar at the bottom margin of the screen via:
- the
 Search in module button in the toolbar or
 - Data → Search in module or
- CTRL + F.
- the
- Enter the character string to be searched in the input field (e.g. "engineering").
- The mouse automatically scrolls to the first character string in the module which matches the search value.
- The first hit is highlighted in green. All further hits are marked yellow.
- The mouse automatically scrolls to the first character string in the module which matches the search value.
- Navigate:
Details
- The hit selected by jumping now has a green background. All further hits are marked yellow.
- In the search, hits may also be found in the data which is not displayed. If you jump to these hits, the records which were previously invisible are opened.
| See also: Description of Further Search Functions |
Filter
Information
- Filtering enables you to restrict the display of data in a module.
- You can filter with the help of filter criteria and satisfaction rules.
Details
- Filter criteria can be set in almost every module.
- The filter options are dependent on the customizing of the module and on the individual user rights.
- In the standard, filter criteria and satisfaction are already preset by the customizer in many modules.
Simple Filtering (Filter Criteria Only)
Task
- Filter the tasks of project 5000 Fräszentrum FS1 by the required calculated start period via filter criteria in the Schedule module.
Procedure
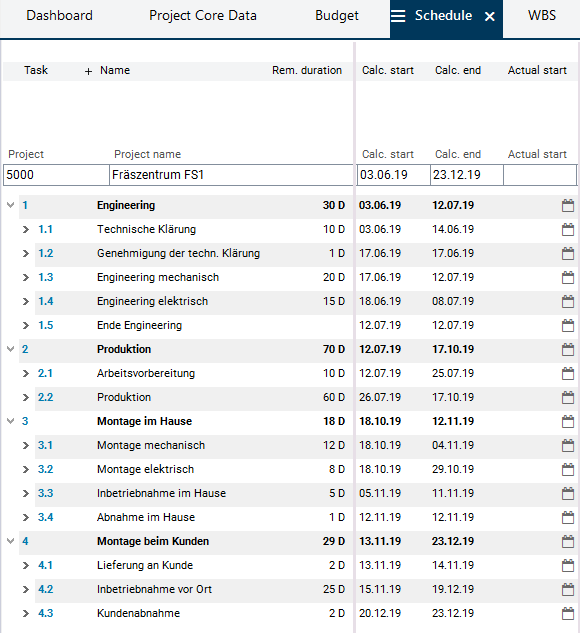
- Initial situation: Schedule of project 5000 without filter.
- Open the Filter Criteria module via:
- the
 Filter Criteria button in the toolbar or
 - the Extras → Filter Criteria menu item or
- the CTRL + ALT + F key combination.
- the
- Unfold the Task area.
- Enter its period in the Calc. start line in the Filter from and Filter to fields, e.g. "01.07.2019" up to "31.07.2019".

- Click on the Filter button.
- Result: In the Schedule source module, only those tasks of the project are displayed the calculated start of which lies within the selected period.

Details on the changing of filter criteria
- When clicking on the Filter button, a data reselection is always carried out, so that only the data which correspond to the last entered filter criteria are displayed.
- If you want the results of the newly set filter criteria to be displayed in addition to the previous filter results, click on the Filter additively button instead of the Filter button.
Filter via Satisfaction Rules
Information
- With the Satisfaction option you can determine which data from which child areas is displayed for a parent data area or not.
Operators
- & = AND
- | = OR
- ! = NOT
Task
- Filter via satisfaction rules to display only those tasks to which no resource is assigned in the Schedule module.
Procedure
- Open the Filter Criteria module from the Schedule module via the Filter Criteria button in the toolbar.
- Empty the fields in the Calc. start line.
- Enter "!21" in the Task line in the Satisfaction rule field.
- The ! operator means that only records are to be displayed which do not contain particular data (marked by the subsequent number).
- The number 21 is the Position number of the Resource data area (border blue in the picture). With the “!21” satisfaction rule you can therefore determine that only tasks for which no resource assignments exist are displayed.
- Activate the Satisfaction checkbox to apply the satisfaction rule in the filter process.
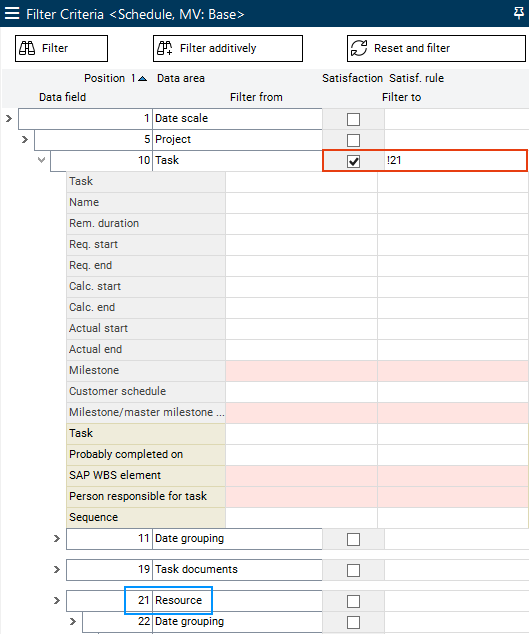
- Click on the Filter button.
- Result: Only tasks to which a resource is assigned are displayed.

Filtering via Filter Criteria and Satisfaction Rules
Information
- Filter criteria and satisfaction rules can also be combined.
Task
- In the Schedule module, filter to display, with the help of filter criteria and satisfaction rules, only those tasks
- the calculated start of which lies within a particular period and
- to which a resource is assigned.
Procedure
- Open the Filter Criteria module from the Schedule module via the Filter Criteria button in the toolbar.
- Expand the Task area.
- Enter dates in the Calc. start line in the Filter from and Filter to fields, e.g. "01.07.2019" up to "31.07.2019".
- Enter "21" in the Task line in the Satisfaction rule field.
- The entry does not contain any operators (&, |, !), so that only records are displayed which contain particular data (marked by the subsequent number). In this case it is data from the Resource data area, marked by the number 21. With the “21” satisfaction rule you therefore determine that only tasks for which a resource assignment exists are displayed.
- Activate the Satisfaction checkbox to apply the satisfaction rule in the filter process.
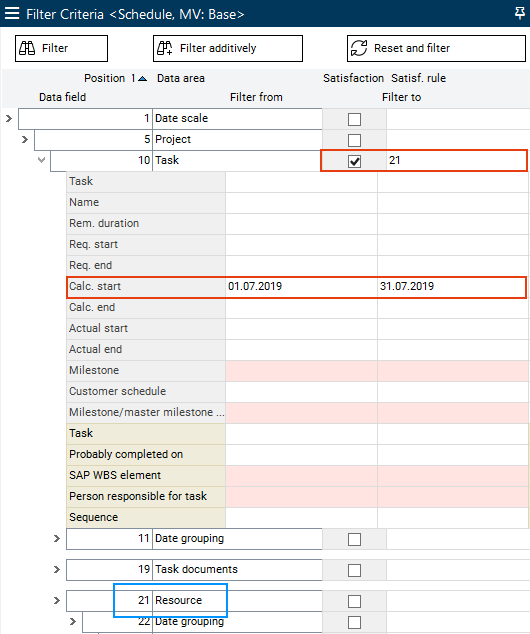
- Click on the Filter button.
- Result: Only tasks are displayed the calculated start of which lies within the selected period and to which a resource is assigned.
Reset Filter
Procedure
- To reset the filter and switch back to the default view of the Schedule module, click on the Reset and filter button in the Filter Criteria module.
- Result: In the Schedule module, all tasks are displayed unfiltered.
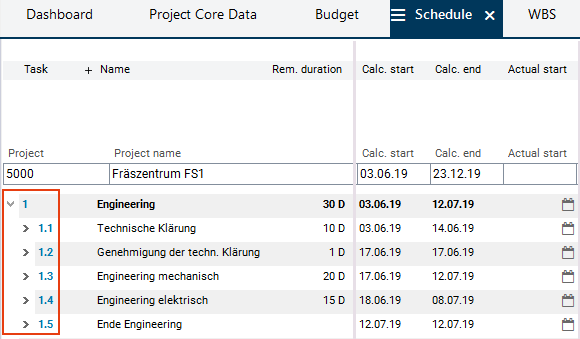
Show and Hide Child Data
Initial situation
- In the Schedule module of project 5000, summary task 1 Engineering is expanded (identifiable by the arrow symbol
 ), so that its child tasks (1.1 to 1.5) are displayed.
 - The task records 1.1 to 1.5 are collapsed (identifiable by the arrow symbol
 ), i.e. their child data is hidden.
Show/hide via the arrow symbol of the tree structure
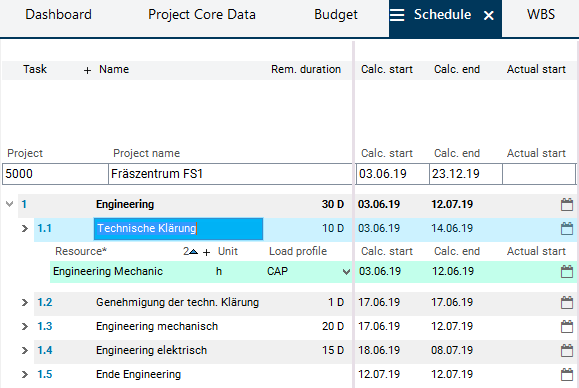
- Click on the arrow symbol of record 1.1 to expand it and to have the child data (resources, task successor) displayed.
- The arrow is pointing down (), indicating that the task is expanded.
- The arrow is pointing down (
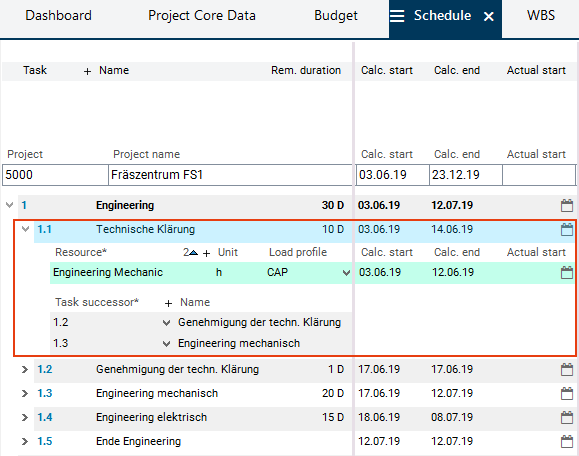
- Collapse the task by clicking on the arrow symbol .
Show/hide via double click
- Double-click on an output field (output) of task record 1.1, e.g. the Actual duration field.
- Now all child areas of the record are shown.
- Double-click again to hide the child areas.
Show/hide via key combination
- Activate an arbitrary field of task record 1.1.
- Use the CTRL + "+" key combination to display all child records of record 1.1.
- Hide the data again via CTRL + "-".
- Use the CTRL + "*” key combination to have the child data of all records displayed which are on the same level as the focused record (i.e. 1.1, 1.2, ... , 2.1, 2.2, 3.1, etc.).
- Hide the data again via CTRL + "/".
Show and hide via the context menu
- Via the context menu, child data areas can be shown/hidden individually, e.g. only the resources or only the task successors.
- Right-click on task record 1.1 to open the context menu.
- Select the Display command.
- A new level of the context menu is opened. Here, all child areas that can be shown or hidden are displayed.
- Select the required area, e.g. + Resource.
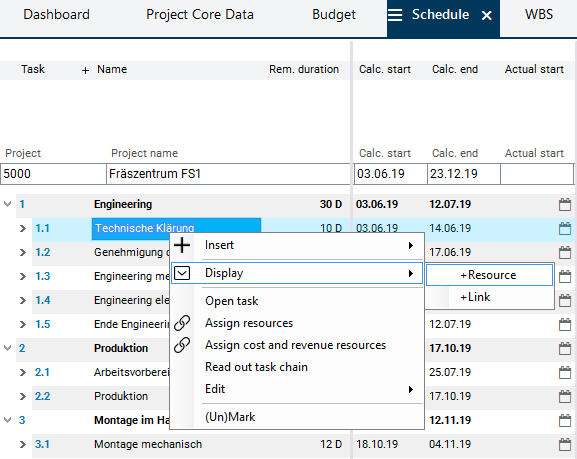
- Result: Only the child resource record of task 1.1 is shown.
- Cf. expanding records via arrow symbols or double-click. When using one of these options, all child areas are shown.
- To hide the resource record again, select Show → - Resource in the context menu.
Data Field Options
Sorting in Modules
Information
- In data sorting, a distinction is made between sort direction and sort sequence.
- With the help of a sort direction you can specify whether the data is to be sorted in ascending or descending order.
- The sort direction is then visualized in the column heading by triangles that point up or down.
- With the help of a sort sequence you can specify by which column the sorting of the data of a module is to be performed first, second, etc. if there are several identical values within the columns.
- The sort sequence is visualized by numbers in the column headings.
- With the help of a sort direction you can specify whether the data is to be sorted in ascending or descending order.
Example
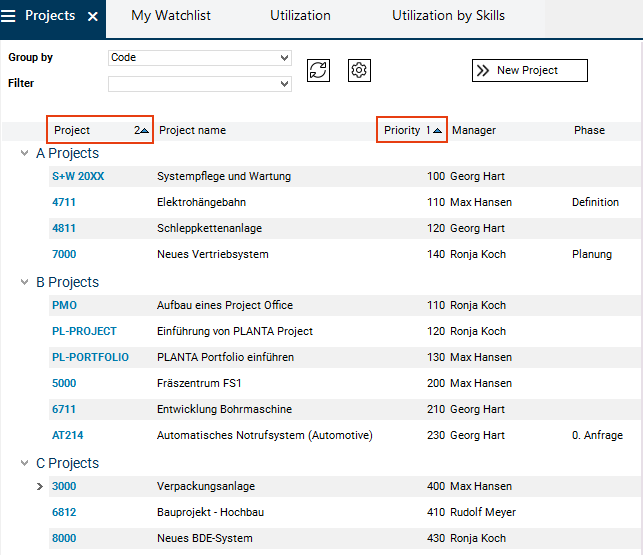
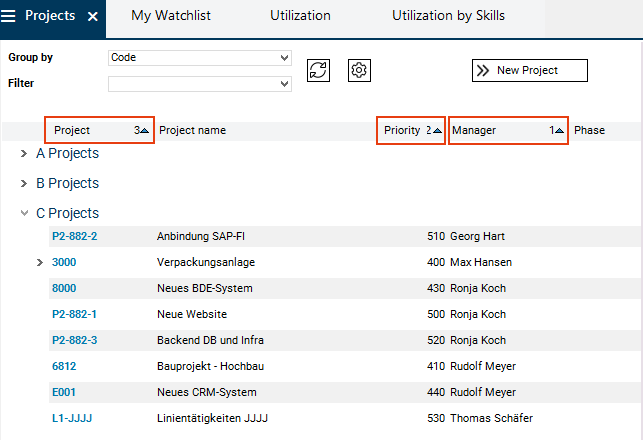
- Open the Multi-Project Board panel in the user menu via Multi-Project Management → Project Planning → Multi-Project Board. As a result, the Projects module is activated automatically.
- In this module, a sorting is already preset.
- The sorting is done within the data group, i.e. the A projects, B projects, etc. are sorted independently from one another.
- The triangles pointing up in the Project and Priority column headings show that both columns are sorted in ascending order.
- The Priority column has the number 1, i.e. the data is sorted first by this column.
- The Project column has the number 2, i.e. if in the Priority column there are several records which possess the same entry, the entries in the Project column (hence the project ID) determine the sorting among these records.
- Since in the present case no priority values occur multiple times within the project group, the data is only sorted by the Priority column. The sorting number on the Project column has no influence.
Task
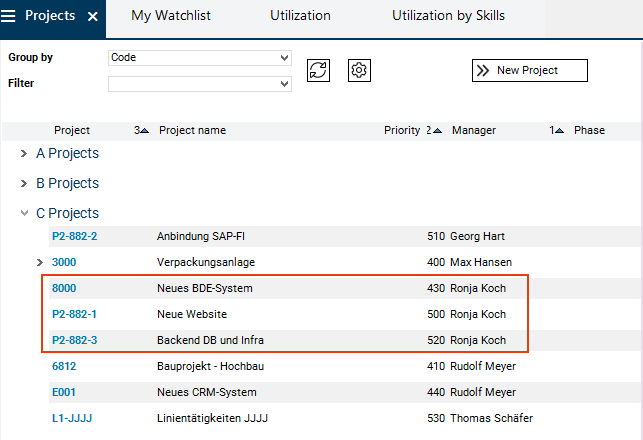
- Change the sort sequence: In the Projects module, sort first by the Manager column and define the ascending sort direction.
Procedure
- Position the mouse on the heading of the Manager column. Subsequently, both triangles for the selection of the sort direction are displayed.
- Click on the triangle pointing up to sort the data in the column in ascending order.
- Afterwards, the triangle is still displayed in the column heading and the sort sequence of the Manager column is visualized by a 1.
- The Prio and Project columns which previously had the numbers 1 and 2 now automatically receive the numbers 2 and 3.
- The column which was clicked on last always receives the sort sequence 1, i.e. the numbering of the other columns is changed accordingly.
- The project records are now sorted alphabetically by manager names (sort sequence 1).
- Since there are three entries in the C projects group for manager Ronja Koch, the respective records (projects 8000, P2-882-1, and P2-882-3) are sorted by their values in the Priority column (sort sequence 2) in ascending order.
- Since the projects of Ronja Koch have different priority values, the sort sequence 3 has no influence on the Projects column.
Task
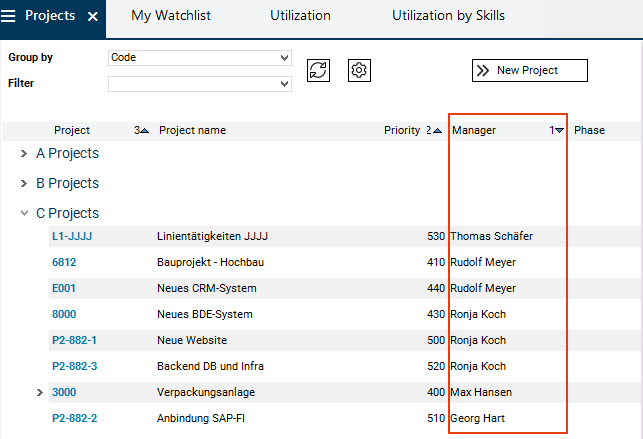
- Change the sort direction: The sort direction of the Manager column from ascending to descending.
Procedure
- In the heading, the triangle visualizes the current sort direction. The triangle pointing up on the Manager column shows that the column is sorted in ascending order.
- Change the sort direction of the column by clicking on the heading of the Manager column.
- Result: The sort direction of the Manager column is changed. The column is now sorted in descending order (cf. sorting above).
Change the Column Width (Data Field Width)
Task
- Reduce the width of the Project name column in the Projects module.
Procedure
- Position the mouse on the right separator of the Project name column or next to the column heading.
- The mouse pointer then changes its shape.
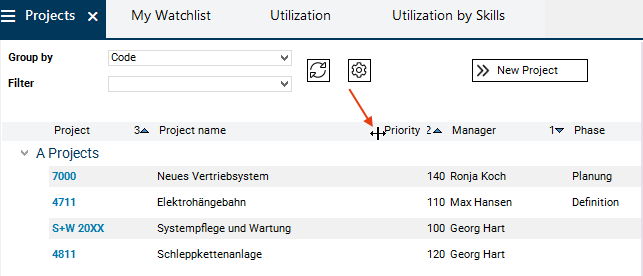
- You can now expand or reduce the size of the respective column by dragging the mouse to the right or to the left.
- In this case drag the mouse to the left in order to reduce the size of the Project name column.
- Result:

Display/Hide Columns
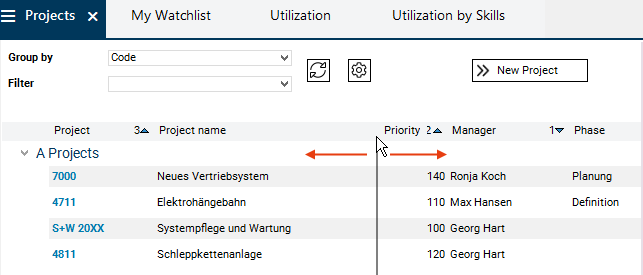
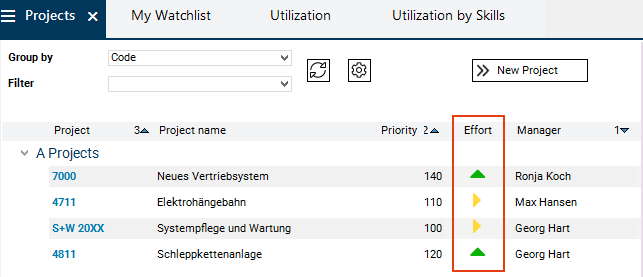
Task
- Hide the Phase column in the Projects module and show the Effort column.
Procedure
- Right-click on the column heading line.
- A menu is opened, in which all displayed columns of the current window (checkmarked) and all hidden columns or data fields (without checkmark) of the current module are listed.
- Press and hold down the CTRL button and
- deactivate the checkmark next to the Phase entry by clicking on it and
- activate the checkmark next to the Effort entry by clicking on it.
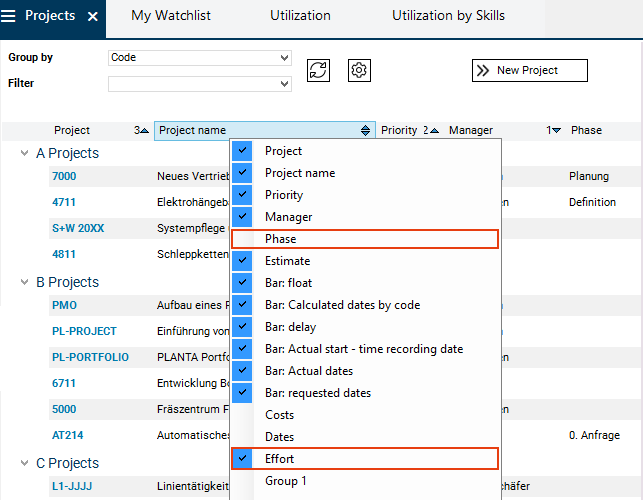
- Release the CTRL button.
- The menu is closed.
- The Phase column is now hidden and the Effort column is displayed.

Moving of Columns
Task
- Position the Effort column between the Priority and Manager columns in the Projects module.
Procedure
- Click on the heading of the Effort column.
- By left-clicking move the column to the required position and release the mouse button.

- Result:
Documentation/Online Help
Information
- For its product documentation, PLANTA uses an online documentation tool based on Confluence.
- The PLANTA Online Help is available at https://help.planta.de/.
Details
- The PLANTA Online Help is divided into 6 spaces.
- Five of these spaces belong to PLANTA project and one space belongs to PLANTA pulse.
| Product | Space | Content |
|---|---|---|
| PLANTA project | ||
| Einstieg und Bedienung | Here, you will find basic information regarding the structure and operation of PLANTA project and, for example, answers to questions like:
| |
| PLANTA project/portfolio | Here, you will find detailed information regarding the use of PLANTA project and PLANTA portfolio and, for example, answers to questions like:
| |
| PLANTA customizer | Here, you will find detailed information regarding the use of PLANTA customizer and, for example, answers to questions like:
| |
| PLANTA link | Here, you will find detailed information regarding the use of PLANTA link and, for example, answers on questions like:
| |
| Technik / Installation / Update | Here, you will find technical information and information regarding installation and update of PLANTA project and, for example, answers to questions like:
| |
| PLANTA pulse | ||
| PLANTA pulse | Here, you will find all information regarding PLANTA pulse and, for example, answers to questions like:
|
- On the start page of the PLANTA Online Help, all help areas are listed:
- The individual help areas are structured thematically.
- Via the start page of the respective help area, you can navigate directly to the required topic.
- In addition to the topic-related pages, there are object descriptions in which the modules and data fields of the PLANTA software are described.
- The object descriptions can be opened from within the software and via links (see Access). However, they will be hidden in the table of contents.
Example for a page in the PLANTA Online Help:
Read and write rights
- every PLANTA project user has read-only access to the complete PLANTA Online Help.
- Only PLANTA employees have modification rights.
Open Documentation
Information
- The PLANTA Online Help can be opened via browser or directly from within the software.
Open the PLANTA Online Help via browser
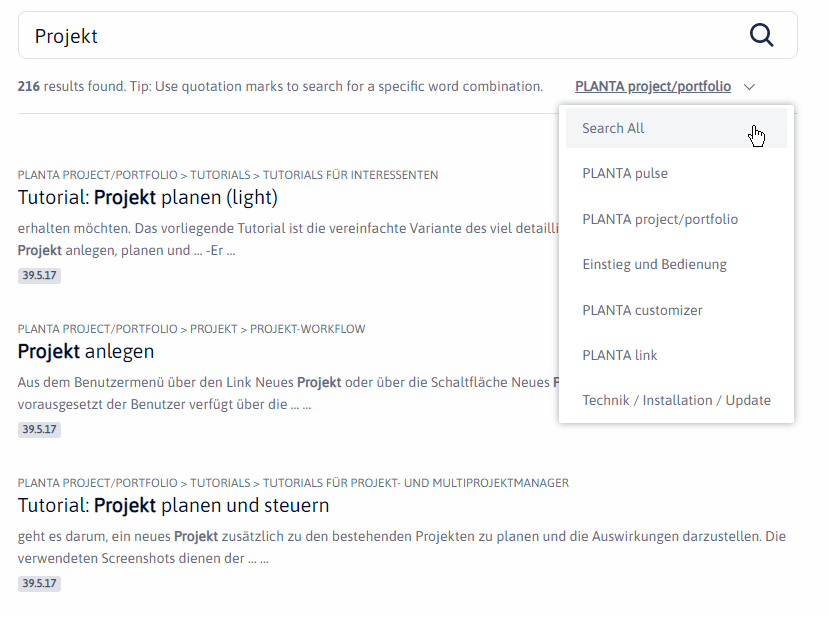
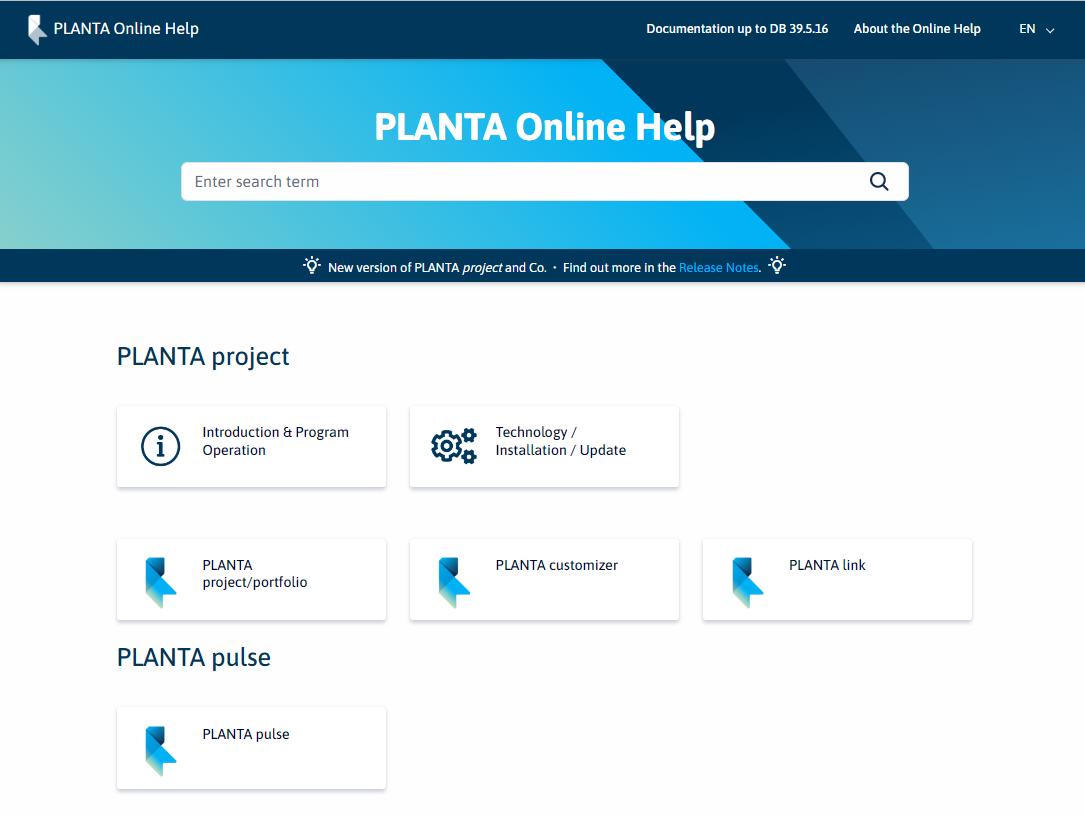
- Enter https://help.planta.de/en into your browser.
- You are now on the entry page of the PLANTA Online Help (figure 1). Here, all available spaces are listed as individual boxes.
- If you do not know yet in which space you will find the required information, you can use the search field on the entry page to search for a search term in all spaces.
- If you are looking for information regarding PLANTA project, click on the PLANTA pulse box to open the start page of this help section (figure 2). Here, all subject areas of the space are listed.
- If you cannot find the required topic on the home page of the space, you can use the search field to search for a search term in the entire space.
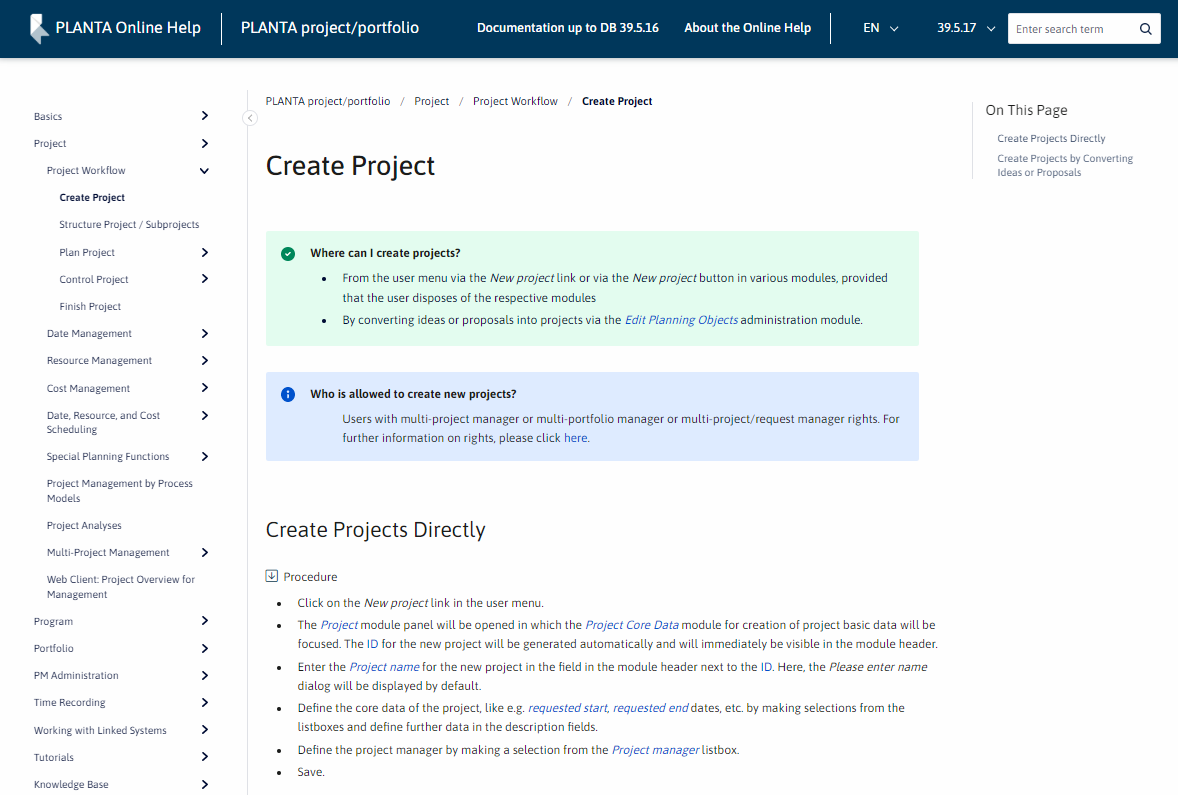
- If, for example, you are looking for information regarding basic data in PLANTA project, click on the General information and basic data box to open information on this subject (figure 3).
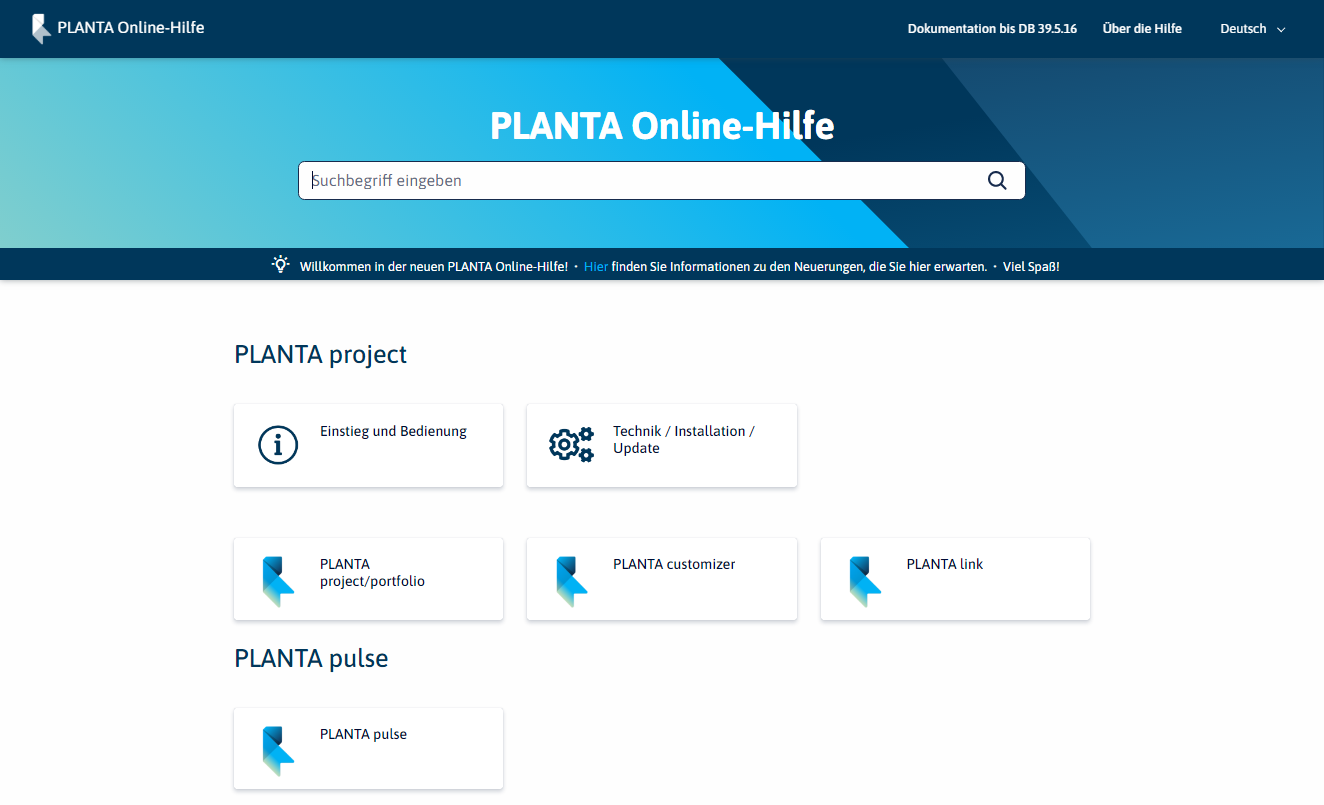
Image 1: Entry page of the Online Help
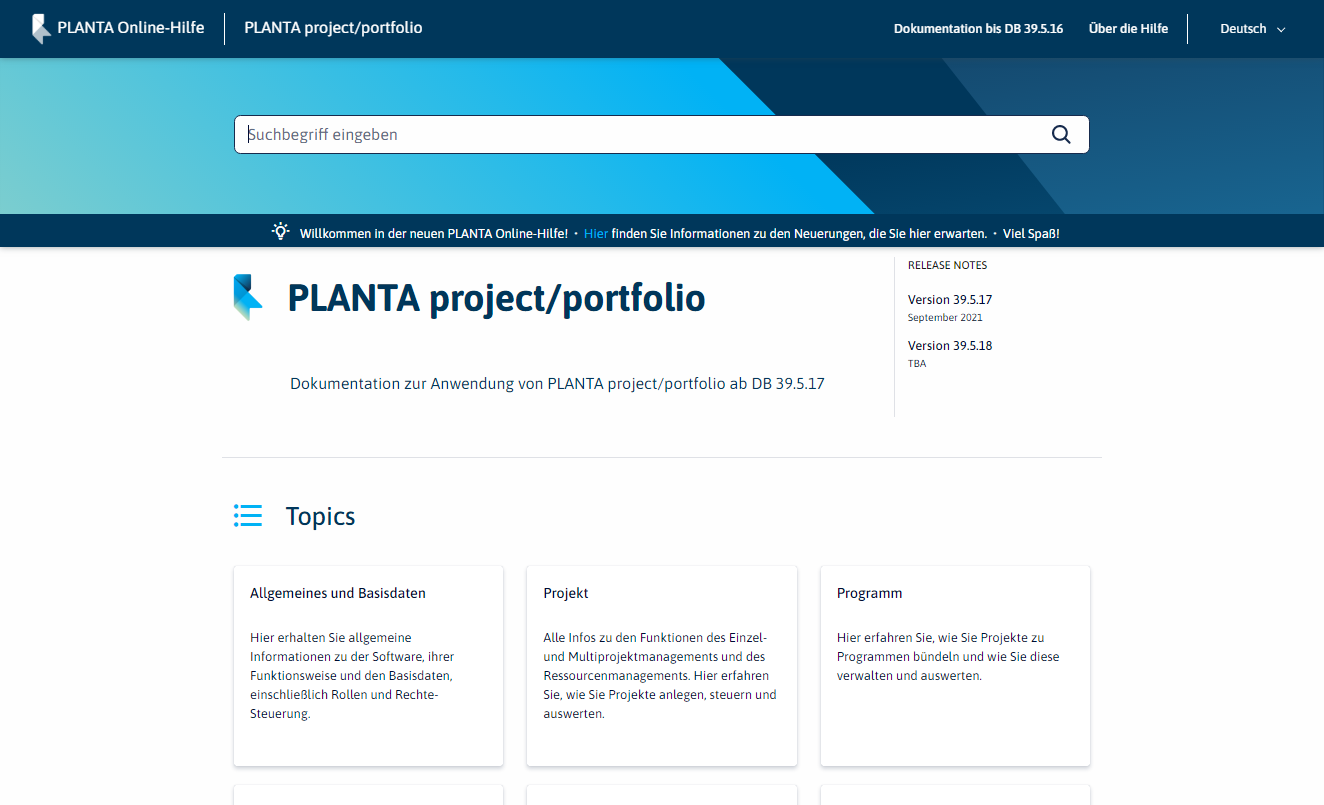
Image 2: Home page of the space
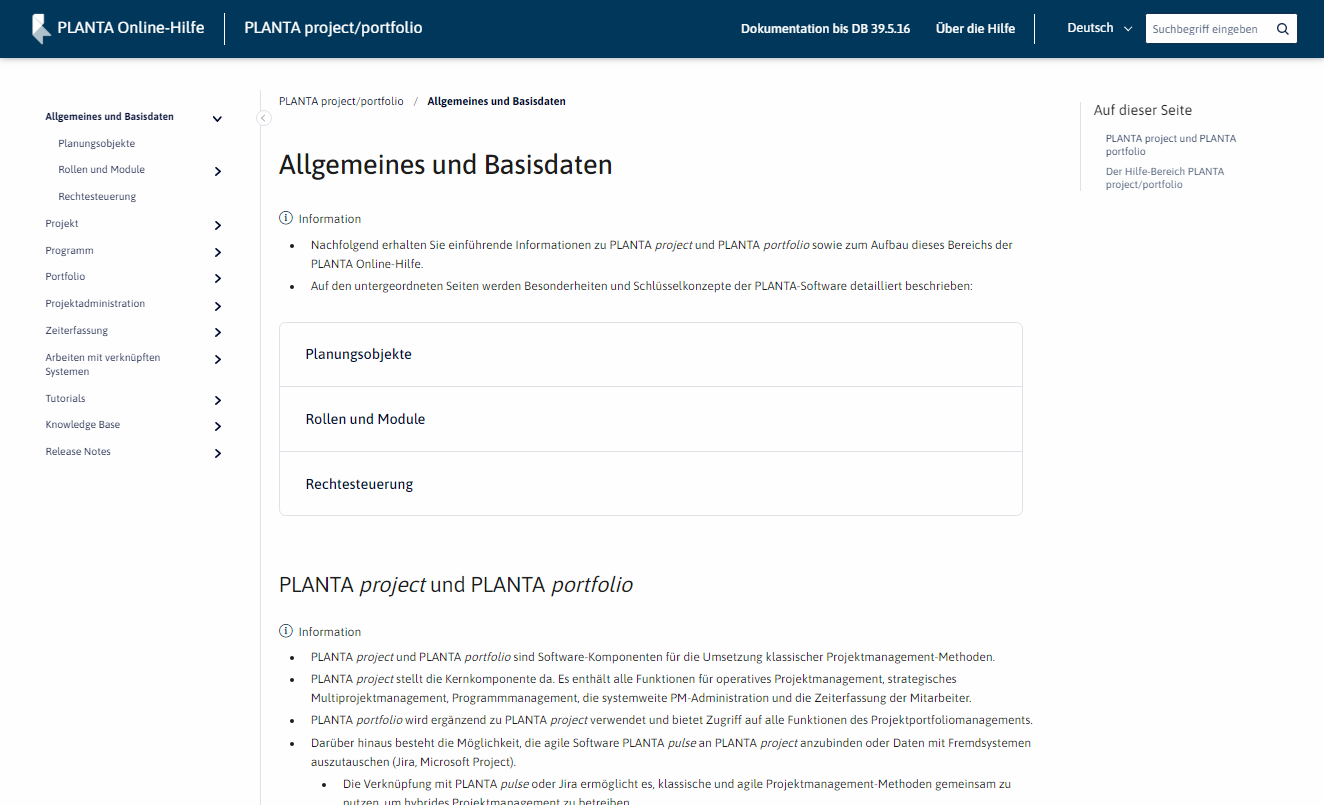
Image 3: Example of a page
By clicking PLANTA Online Help in the upper left of the header, you can return to the entry page from all spaces.
By clicking on the title of a space in the upper left of the header, you can return to the home page of the space from the individual pages of the space.
Open the PLANTA Online Help from within the program
- Open the description of a particular module:
- Press F2 or select the ? menu item → Module descriptions in the required module.
- Open the description of a particular data field:
- Press F1 in the required data field or select the ? menu item → Data field description (the data field must be focused by confirming via mouse-click).
- Open the PLANTA online help start page
- Press CTRL+M or select the ? menu item → Open Manual.
If you open the online help from within the program, the version corresponding to your program will be opened automatically.
If you open the description of a module or a data field, the appropriate help area which contains the required module or data field will be opened automatically.
By clicking on the PLANTA Online Help on the left-hand side in the header of the online help, you can switch to the start page if required in order to open another help area.
Note
- If you press F1 or F2 on a field or in a module which is not contained in the standard program but which was customized individually in your system, only a notification page will be opened in the PLANT Online Help, informing you that you are currently on an individual object.
Search
Information
- In the PLANTA Online Help, the search can be opened in three places:
- On the entry page, which is opened when opening help.planta.de/en
- If the search is started here, all spaces are searched
- On the home pages of the individual spaces
- If the search is started here, the currently opened space is searched.
- On the individual pages of the space in the upper right
- If the search is started here, the currently opened space is searched.
- On the entry page, which is opened when opening help.planta.de/en
Details
- When the search results are displayed, the information which space is being searched is also displayed.
- If needed, another space can be selected in the according listbox above the search results.
- To search all spaces, the Search All option can be selected.
- The paths above the results also contain the information in which space the search result can be found.