Tutorial: Plan and Control Project
Introduction
Objective
- To teach first-time users how to use the program and to explain its functions on the basis of typical application cases.
Please note:
- All exercises are based on the PLANTA demo data. This data must be installed beforehand.
- Master data, such as calendar, resources, users, hourly rates, etc. is already set up in the demo data. This tutorial does not cover the definition of master data (for information on this subject, see Master Data Entry). It merely describes the planning of a new project in addition to already existing ones and the impact this has.
- The screen shots used in this tutorial are mere examples of functions and may differ from the actual layout in the program.
Did you know?
There is a video tutorial on this topic. Go to the Plan a Project video tutorial
Project Management with PLANTA
Information
- The following examples are typical use cases of project management as it is practiced in real life situations.
- The following use cases were created for the 4 most frequently used PM-roles:
- Multi-project manager (user R41)
- Project manager (user R8)
- Resource manager (user R43)
- Project staff (user R1)
Details
- PLANTA project additionally enables you to plan and control projects on a process-oriented basis. For further information, please refer to the Process Model Workflow.
Start Program
Task
- As every morning, the multi-project manager (Georg Hart) wants to get an overview of his or her projects and the adherence to the project end dates.
Procedure
- Open the PLANTA Client.
- Enter "r41" for the multi-project manager in the upper input field.
- Demo users do not possess passwords, so no input is required in the second field.
- Click on the Log in button.

- The Multi-Project Board panel with the Projects main module is opened. The Projects module provides an overview of all projects.
Details
- In-depth information on the individual elements of the interface, please click here.
New project (r41)
Task
- A sales manager informs the multi-project manager (Georg Hart) about a new IT project with a required duration of 6 months.
- The multi-project manager is supposed to create a project with the name PR-01 and to pass it on to the intended project manager for project planning.
Procedure
- Click on the Multi-Project Management → Project Planning → New Project link in the user menu or click on the New project button in the Projects module.
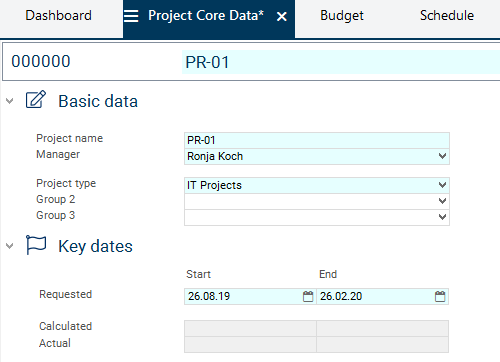
- The Project panel with the focused Project Core Data module is opened.
- The ID for the new project is generated automatically and is visible in the module header.
- Enter the Project name for the new project in the module header in the field next to the ID, e.g. PR-01.
- Here, the following dialog is displayed by default: -Please enter a name-.
- Define further project data, e.g.:
- Manager: Ronja Koch,
- Project type : IT projects,
- Requested start: one week from today
- Requested end: 6 months + one week from today.
- Other entries may be added at a later point if required.
- Save by clicking on the Save button or via CTRL + S.
- Since the creator of a project, in our case Georg Hart, is automatically set as project manager and as stakeholder of the project at the same time and is added to the stakeholders of the project, the following query is displayed when another manager is selected: Do you want to delete the current stakeholder assignment of the manager or do you want to assign the new manager additionally?
- Select the Replace existing manager stakeholder option.
- As a result, the new manager, in our case Ronja Koch, is set as stakeholder in the Stakeholder area and multi-project manager Georg Hart is deleted as stakeholder.
- Since the creator of a project, in our case Georg Hart, is automatically set as project manager and as stakeholder of the project at the same time and is added to the stakeholders of the project, the following query is displayed when another manager is selected: Do you want to delete the current stakeholder assignment of the manager or do you want to assign the new manager additionally?

- Close the R41 client.
Detailed Planning by Project Manager (r8)
Task
- The multi-project manager could carry out detailed planning for the project now as well. However, he wants to leave this task to the more experienced project manager Ronja Koch.
- He asks her to use the standard plan for IT projects which he has already prepared.
- The project manager starts the program and begins with her project planning.
Procedure
- Open a new client and log in with user "r8" (project manager).
- The My Planning Objects module is opened. It provides an overview of all planning objects of the project manager.
- The newly created project PR-01 is displayed. Since the project has not yet been calculated and divided into tasks, the duration is not visualized by a bar in the right window as in other projects, but only by 2 blue triangles which display the requested project dates.
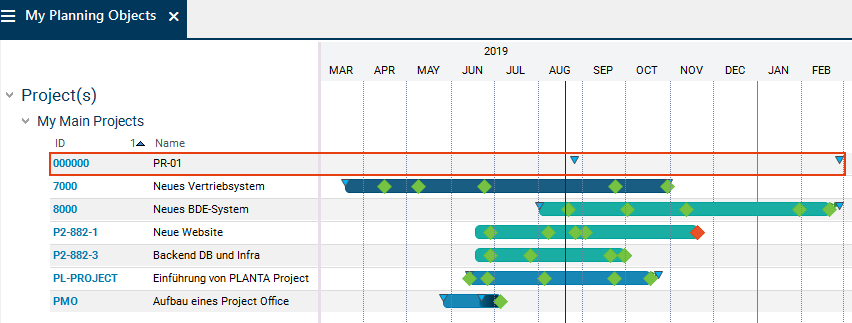
- Click on the ID of project PR-01 in the ID column.
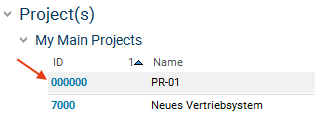
- By doing so, you will be redirected to the Project panel which provides various functions for editing the project.
Compile Project Team
Task
- The project manager wants to define which employees of the company are going to be involved in his project.
Procedure
- The Project panel is opened with activated Project Core Data module.
- Click on the
 Assign stakeholder button in the Stakeholder area.
 - A message with the To which category do you want to assign stakeholders? query is displayed
- In the dialog window, the categories which were defined by the PM administrator in the Team categories listbox category in the Listbox Values master data module are offered for selection.
- Click on the Core team button.
- The Assign Stakeholders to Planning Object module is opened with the selected category.
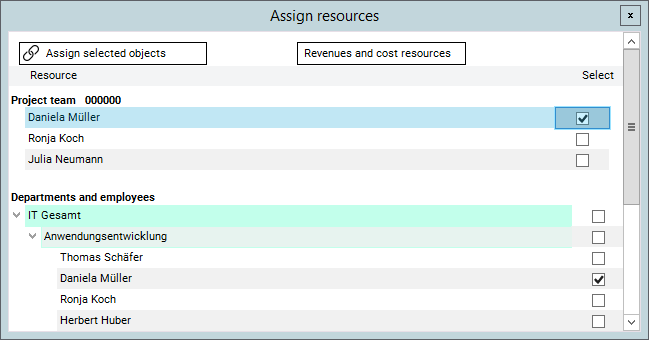
- Select the required stakeholders by activating the respective checkboxes and click on the Assign selected objects button.
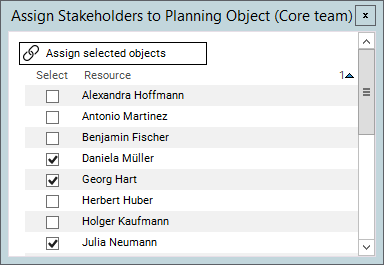
- The selected stakeholders are assigned to the defined category.
- Define their roles in the project by making a selection from the listbox as shown in the screenshot below. Define further parameters if necessary.
- Since multi-project manager (Georg Hart) also wants to receive information on the current project, he should be added to the core team as well.

Create Schedule
Task
- The project manager checks whether the requested project end date is realistic. Therefore he creates a new schedule by copying the IT standard plan to the new project.
Procedure
- Open the Schedule module in the Project panel by clicking on the tab of the same name.
- When you open the Schedule module, the following confirmation prompt is displayed: Adopt a schedule?
- Confirm the message with Yes.
- The Copy Schedule module is opened at the bottom margin of the panel.
- If you negate the query by mistake, you can open the Copy Schedule module by right-clicking on the project header and selecting the command of the same name.
- Select project template A1-EN Standard plan IT project from the listbox.

- Start the copy operation by clicking on the Copy schedule button.
- The schedule which was copied to the project is displayed and can be edited.
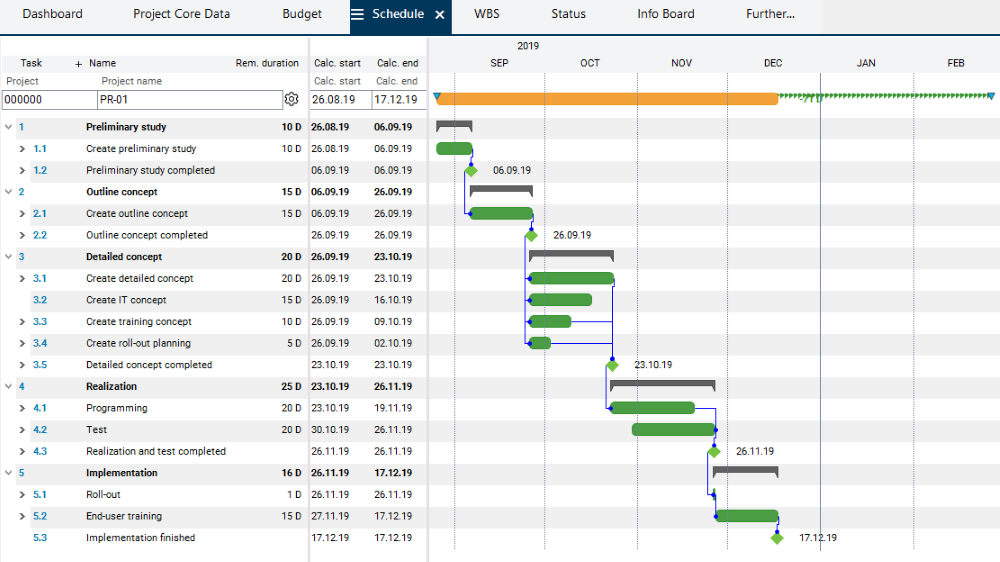
- The project manager can now continue her project planning.
Notes
- In this tutorial, the schedule is created as a copy of a standard schedule.
- Since the tasks are already structured in the copy template, the structure is copied to the new schedule.
- If a schedule is created via the creation of individual tasks, it has no hierarchical structure. To learn how to structure tasks in a schedule, please refer to the Structure Schedule tutorial.
Edit Schedule (Adjust)
Delete Tasks
Task
- Not all tasks of the adopted schedule are required in the newly project PR-01.
- The Preliminary study task can be deleted. The project manager therefore deletes all tasks that relate to the Preliminary study.
Procedure
- Mark the Preliminary study task in the Schedule module (by message with CTRL and left-clicking on the task line). The child tasks are also marked.

- Click on the Delete button in the toolbar.
- A prompt for confirmation is displayed before deletion.
- Confirm the query with Yes. The marked tasks are deleted.
- Afterwards, recalculate the project plan by clicking on the
 Calculate schedule button in the toolbar.
Adjust Task Duration
Task
- The Create outline concept task is to be completed earlier than specified in the project template.
- The project manager therefore sets the duration of the Create outline concept task to 10 days.
Procedure
- Enter the planned duration (e.g. 10 for 10 days) in the Remaining duration field in the Schedule module of the Create outline concept task.
- Recalculate the project plan by clicking on the Calculate schedule button in the toolbar.
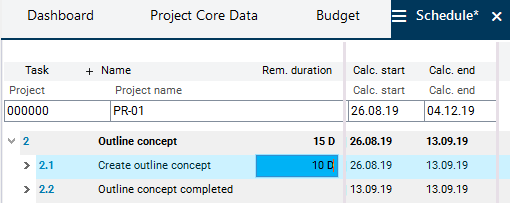
- In the calculation, the remaining duration of the Outline concept summary task is adjusted to the reduced duration of the Create outline concept task.
- In structured schedules, summary tasks are all tasks which have child tasks.
- In the calculation, the remaining duration of the Outline concept summary task is adjusted to the reduced duration of the Create outline concept task.
Create New Tasks
Task
- Two more tasks are to be added to the project plan.
- The project manager wants to insert the Adjust outline concept task below the record of the Create outline concept task.
- The additional Coordinate IT concept milestone is to be added in addition to the Create IT concept milestone.
Procedure
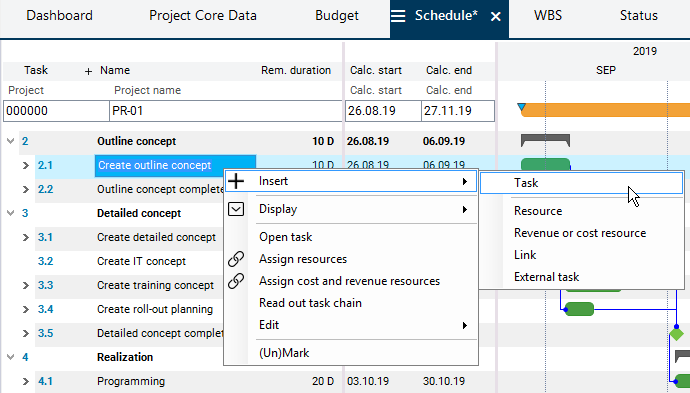
- In the Schedule module, right-click on the Create outline concept task and select Insert → Task from the context menu.
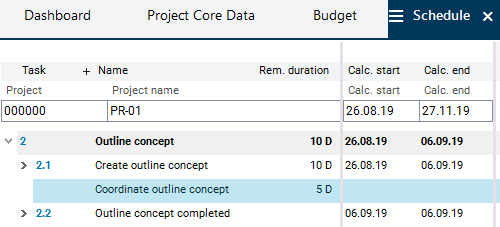
- Enter the Name, here: Coordinate outline concept, and the planned duration area in the Remaining duration field e.g. 5 for 5 days, in the task line.
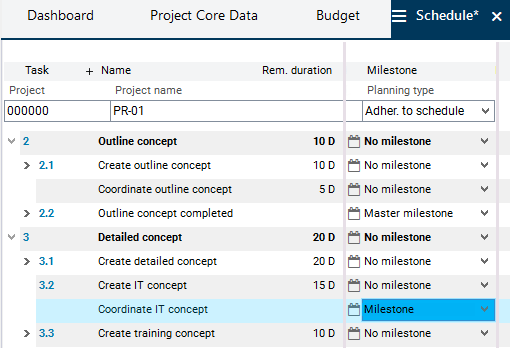
- Right-click on the Create IT concept task: Select Insert → Task from the context menu.
- Enter the name Coordinate IT concept.
- Scroll to the Milestone column in the middle window.
- Define the task as a milestone via listbox selection.
- No duration must be allocated to the tasks that are defined as milestones or master milestones in PLANTA project.
- Save.
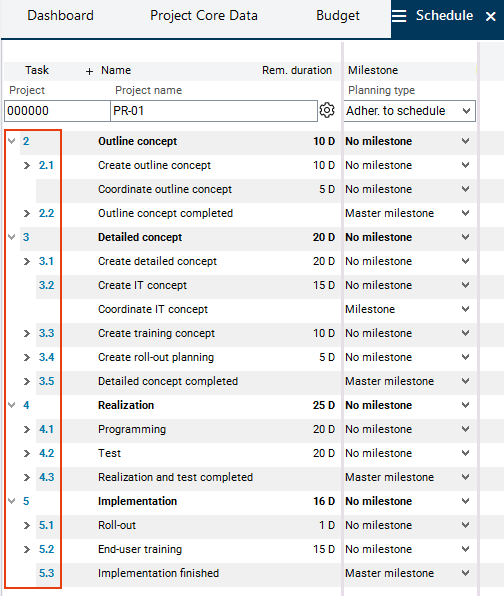
- Due to the deletion of previous tasks, the first task, Outline concept, now has code "2". No codes have been assigned to the newly added tasks Coordinate outline concept and Coordinate IT concept yet.
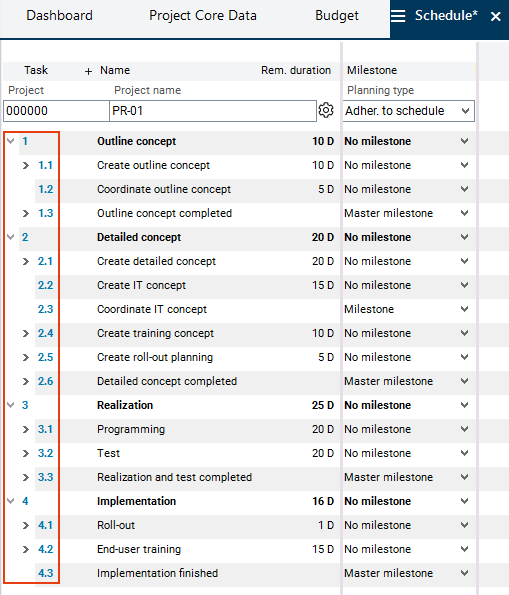
- Click on the Calculate schedule button in the toolbar to update the WBS codes for all tasks of the project and to generate codes for the new tasks.
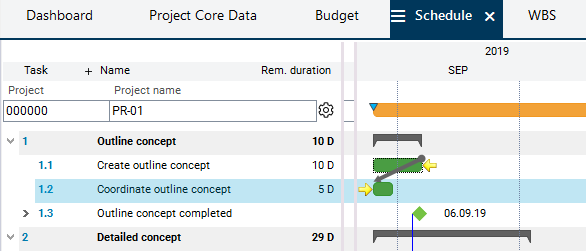
- Result:
Connect Tasks via Links
Task
- The newly created Coordinate outline concept task and the Coordinate IT concept milestone are to be included in the project via links.
- This is to be done graphically in the Gantt chart.
Information
- Links are dependencies between tasks that (can) have an effect on the calculated dates.
- There can be multiple links between two tasks. In the calculation of the schedule, the most unfavorable relationship takes effect, i.e. the link that causes the latest start date.
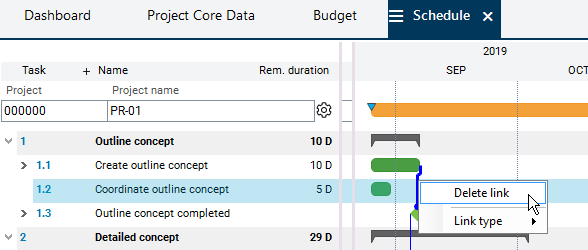
Procedure Connect the Coordinate outline concept task to the Create outline concept and Outline concept completed tasks via links.
- Step 1: Delete the existing link between the Create outline concept and Outline concept completed tasks.
- To do so, right-click on the link line and select the Delete links command from the context menu.
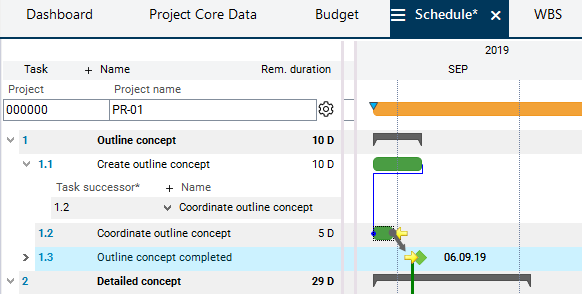
- Step 2: Place the cursor at the end of the bar of the Create outline concept task. The mouse pointer becomes a cross. Drag the task to the beginning of the bar of the Coordinate outline concept task by holding down the left mouse button. As a result, a connection line between the two bars is displayed. As soon as the target bar is reached, the start position in the source bar and the target position in the target bar are marked by yellow arrows. Release the mouse button.
- Result:

- Step 3: Link the bar (end of the bar) of the Coordinate outline concept task to the bar (beginning of the bar) of the Outline concept completed milestone in the same way.
- Result:
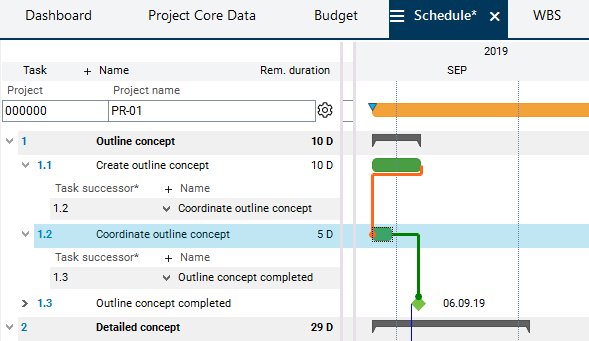
- When clicking on a bar, incoming links are visualized in red, and outgoing ones are visualized in green.
- Step 4: Recalculate the schedule by clicking on the Calculate schedule button in the toolbar.
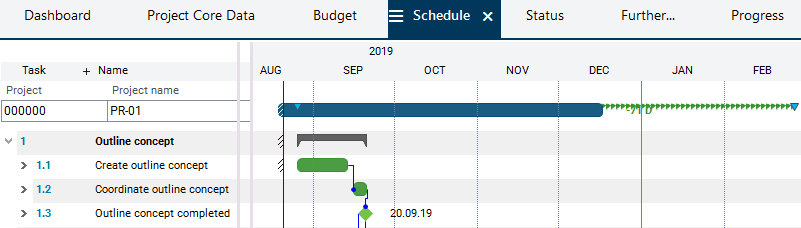
- Result: The beginning of the Coordinate outline concept task was postponed until after the end of the Create outline concept task. The duration of the Outline concept summary task has changed accordingly.
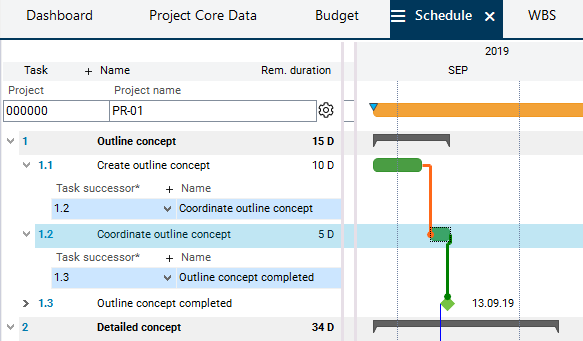
- Connect the new Coordinate IT concept milestone to the Create IT concept and Create training concept tasks and click on the Calculate schedule button in the toolbar.
Note
- In the Schedule module it is also possible to create links in table form.
Plan Resources
Task
- The project manager starts to think about the effort of her new project.
- She estimates the effort based on her experiences and schedules the required resources:
- For the Create outline concept task: effort of 80 h for employee Daniela Mueller.
- For the Create IT concept task: Effort of 100 h, employee not defined yet, however, it will be an employee of the IT department, and the Anwendungsentwicklung ("Application Development") department resource is therefore initially planned for the task.
- The estimated programming effort is estimated at EUR 20,000. The Fremdleistungen ("External Services") resource is used for this.
Procedure
- For the planning of employee Daniela Mueller:
- Right-click on the Create outline concept task.
- Select Assign resources from the context menu.
- Activate the Select checkbox in the line with Daniela Mueller’s name in the dialog module and click on the Assign selected objects button.
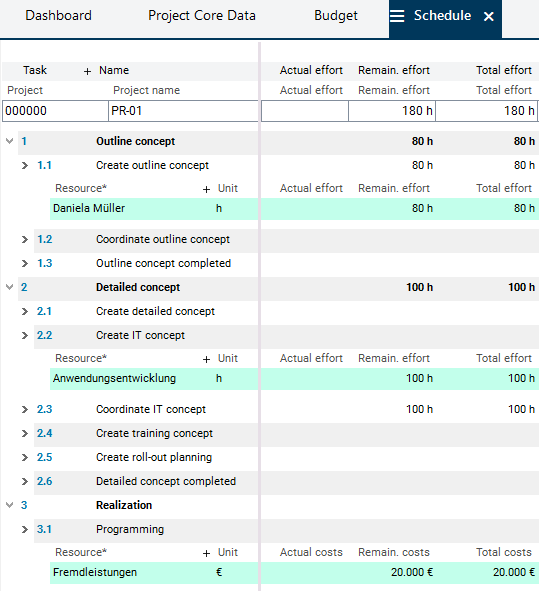
- Below the Create outline concept task in the schedule, a resource record with the resource Daniela Mueller is created.
- Enter the estimated effort of 80 (= 80 hours) in the Remaining effort field.
- Assign the Application development department to the Create IT concept task in the same way and enter the Remaining effort of 100 h.
- For scheduling of external services:
- Right-click on the Programming task.
- Select Assign cost and revenue resources from the context menu.
- Activate the Select checkbox in the External services line and click on the Assign selected objects button.
- The External services resource is assigned to the Programming task. Enter the estimated effort of 20.000 (EUR) in the Remaining costs field.
- Click on the Calculate schedule button in the toolbar.
- Result: The Total effort column or Total costs column is also filled with the respective values calculated by the program and represent the sum of actual and remaining values.
Task
- The project manager wants to know whether one of the staff resources has to do overtime as a result of his resource assignments. He checks the planning result.
Procedure
- Switch to the With Loads or Entire Schedule module variant of the Schedule module.
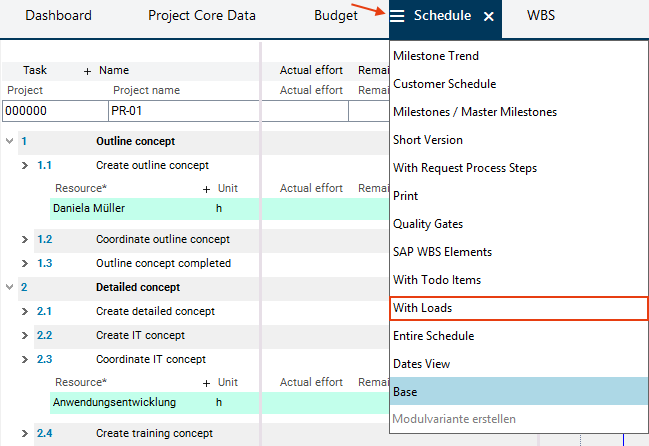
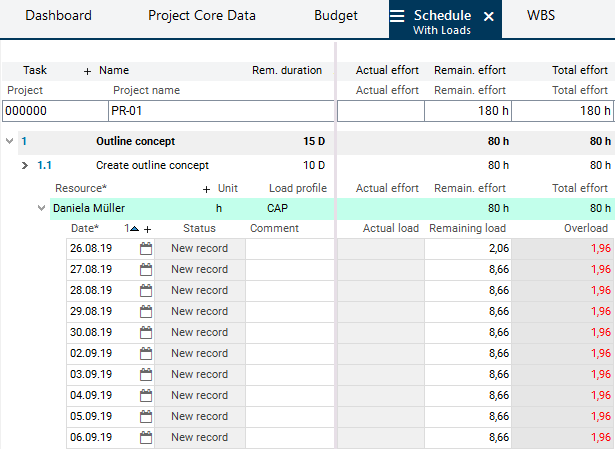
- In the middle window, scroll to the right side until the Overload column is displayed.
- If a resource is overloaded, the overload is displayed in the Overload column in red font. If there are no entries, the resource can perform the work without overload.
Further information on the planning of the resource in other projects can be consulted in the Utilization with Cause module which can be opened by right-clicking on the resource name records and selecting the Show Utilization context menu command.
Task
- The project manager wants to reduce the planned overload for the planned resources.
- The overload can be reduced by using the free resource capacity. In this case, the task is postponed until sufficient free capacity is available. Caution: The project end date may be exceeded.
Procedure
- Select the Adherent to capacity type from the listbox in the Schedule module at project level in window 2 in the Planning type field.

- Click on the Calculate schedule button in the toolbar.
- Result: The overload of the resource has disappeared, the duration of the corresponding Create outline concept task has been extended.

Alternatively, you can select the Adherent to total float planning type. In this case it is only searched for free capacity within the float and the end date is not postponed.
Request Budget
Task
- The project manager wants to view the costs calculated by the program on the basis of the resource planning and request the project budget.
Procedure
- Activate the Budget tab in the tab bar.
- In the Costs area, the costs calculated on the basis of the resources planned in the project and their conversion factors are displayed at two levels:
- at project level (here, a summary of the values of all yearly tranches (if there is more than one) is displayed),
- in the yearly tranche of the current year.
- In the Costs area, the costs calculated on the basis of the resources planned in the project and their conversion factors are displayed at two levels:
- Unfold the yearly tranche level.

- Copy the costs and effort calculated at yearly tranche level from the Total (w/o SP) column to the Requested (w/o SP) column by clicking on the arrow pointing to the left above the Requested (w/o SP) column.
- Since the current project has a runtime of less than one year, the budget cannot be distributed to several yearly tranches. The entire budget is requested for the entire year.

- Result:

Request Approval for Project Implementation
Task
- The project manager informs the multi-project manager that he has completed his project planning. He asks the multi-project manager to release the project for implementation, as the planned start date for the project is next week.
Procedure
- Click on the Project Core Data tab in the Project panel to open the module of the same name.
- Right-click on the line of multi-project manager Georg Hart in the Stakeholder area to open the context menu and select the Send info command.
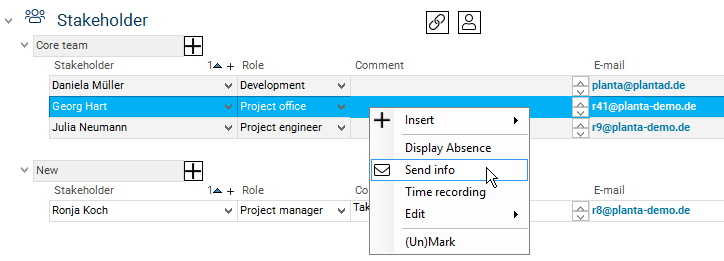
- The message window in which a message can be written is opened.
- Here, the -Please enter a subject- dialog is displayed by default. Enter a subject and the message text in the field below.

- Click on the Send button.
- Result: Multi-project manager Georg Hart receives the info via e-mail.
Approve project for implementation (r41)
Task
- The multi-project manager checks the effort and costs planned by the project manager and he can approve the project for implementation.
Procedure
- Log in again with "r41".
- Click on the link on the ID of project PR-01 in the Projects module to switch to the Project panel.
- Activate the Budget tab.
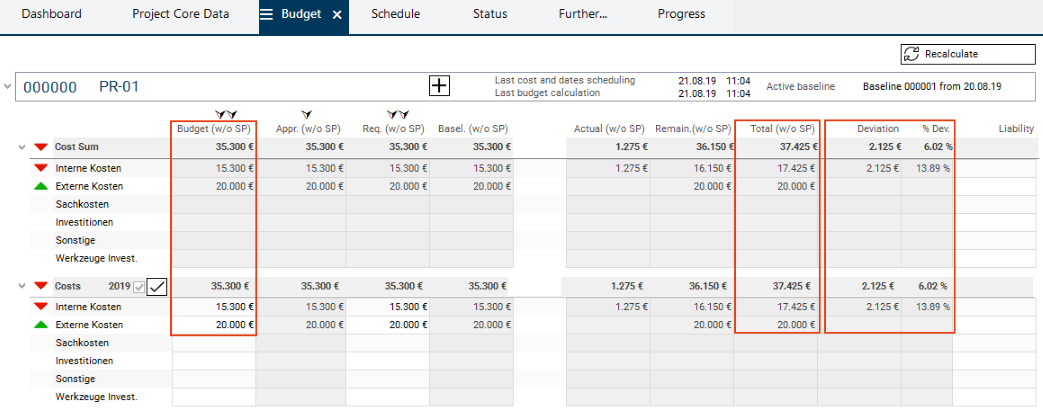
- The multi-project manager sees the budget requested by the project manager for the current project in the Requested (w/o SP) column in the yearly tranche of the current year. He now wants to approve it.
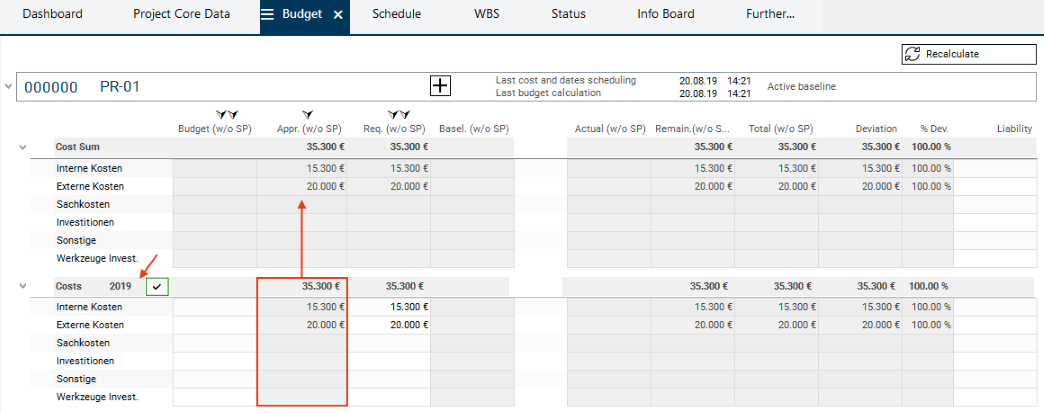
- For this purpose, he clicks on the arrow above the Approved (w/o SP) column.
- The values of the Requested (w/o SP) column in the yearly tranche of the current year are automatically transferred to the Approved (w/o SP) column in the yearly tranche of the current year as well.
- For this purpose, he clicks on the arrow above the Approved (w/o SP) column.

- The multi-project manager clicks on the checkmark next to the Costs heading to approve the budget. Subsequently, he/she clicks on the Recalculate button.
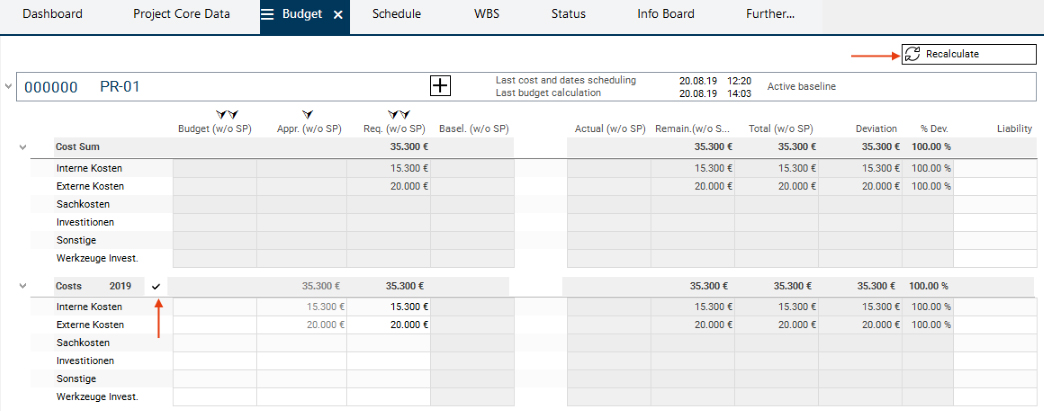
- As a result, the budget in the Approved (w/o SP) column is approved.
- The checkmark receives a dark green outline.
- The column is grayed out, which means that the values of this column cannot be edited.
- The values of the yearly tranche is summarized to project level.
- To do so, he/she will copy the values from the Approved (w/o SP) column to the Budget (w/o SP) column by clicking on the arrow pointing to the right above the Budget (w/o SP) column. He then saves and clicks on the Recalculate button.

- Subsequently, the multi-project manager switches to the Project Core Data module (activate the corresponding tab) in order to approve the project for implementation:

- Save.
- Result: The project is now approved and the employees can record their hours worked on the project.

Freeze Planning Status
Task
- The multi-project manager then wants to define the current planning status of the new IT project, so that any changes made in the course of the project flow can be controlled.
Details
- The current planning status of the project is frozen in a status report. At the start of a project it is usually a baseline.
Procedure
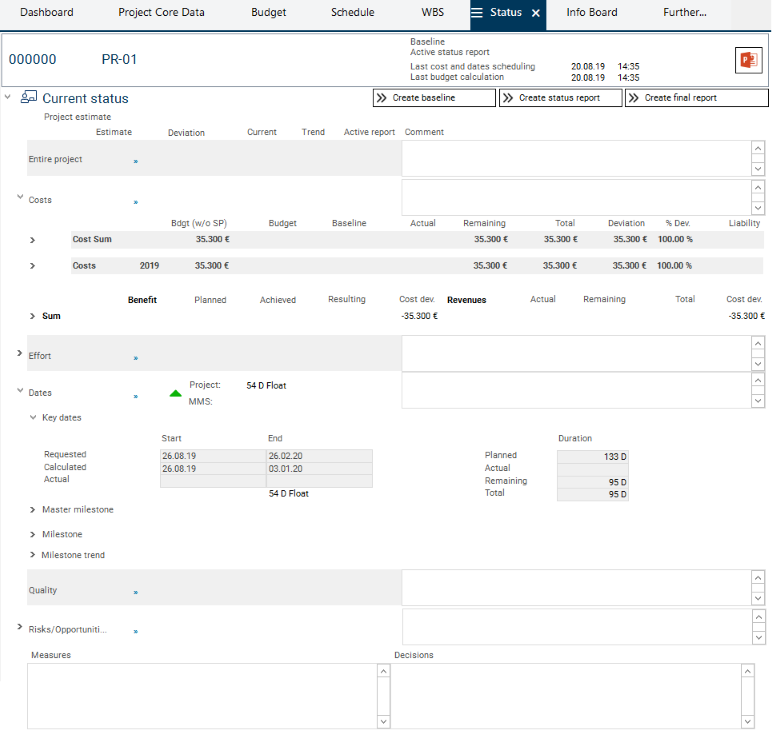
- Switch to the eponymous module by clicking on the Status tab in the Project panel.
- Here, the current status of the project and the existing status reports are displayed.
- It is a preview module in which new status reports can be created.
- Click on the Refresh button on the bottom left of the module so that the current project data is displayed in the module.
- Make required changes in the Current status area (only estimates and comments possible).
- Click on the Create baseline button.
- The following query will be displayed: Do you really want to create a baseline?
- Confirm the query with Yes.
- The current status of the project is then frozen and the baseline report is created.
- The created baseline report is displayed in the Status reports area with "Baseline" report status.

Excursus: Compare Planning Statuses
Information
- In the course of project controlling, further planning statuses can be frozen in status reports as the project progresses. They can then be compared to the current planning status.
Procedure
- Click on the
 Configure trend analysis button in the Status module at the level of the Status reports heading to open the Configure Trend Analysis module.
 - In order to be able to compare the planing statuses, you first have to activate the Milestone Trend Analysis checkbox in the Configure Trend Analysis module for the status reports which you want to compare to the current status of the project.
- Open the Deviations module via Further ... → Deviations.
- When opening the Deviations module, the current data and the data from the most recent of the selected status reports is displayed. ( If the status reports have already been compared for the selected project, data of the last compared status report is loaded by default when you open the Deviations module.
- In the Report selection area at the bottom of the module, further status reports which were preselected in the Configure Trend Analysis module are possibly offered for selection.
- Click on the number of the required status report. The data of the report is displayed next to the current data of the project and can be compared.
Replanning of the Resources by the Department Manager (r43)
Task
- The department manager of the Application Development department (Thomas Schaefer) wants to distribute the 100 hours reserved for his department by the project manager for project PR-01 among his employees.
Procedure
- Log in with user "r43".
- Click on the Resource Planning tab in the Department Board panel.
- When the module is opened, department and individual resources of the department are loaded automatically.
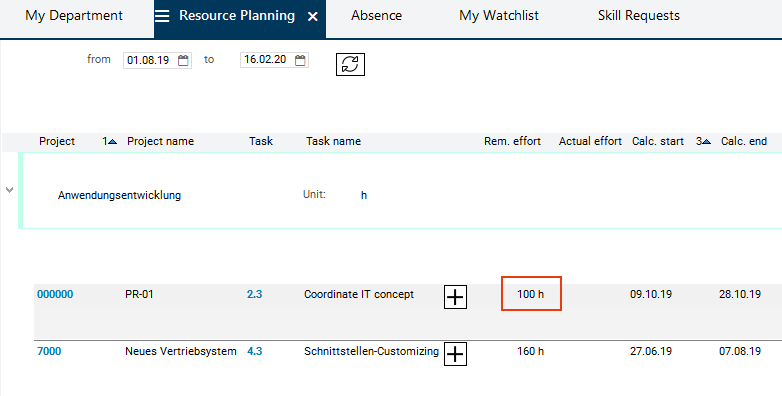
- In the left window, projects and tasks are listed, for which the Application Development department or individual employees of the department are planned.
- Under Application Development, the department manager sees a reserved capacity of 100 h for project PR-01, task Create IT concept.
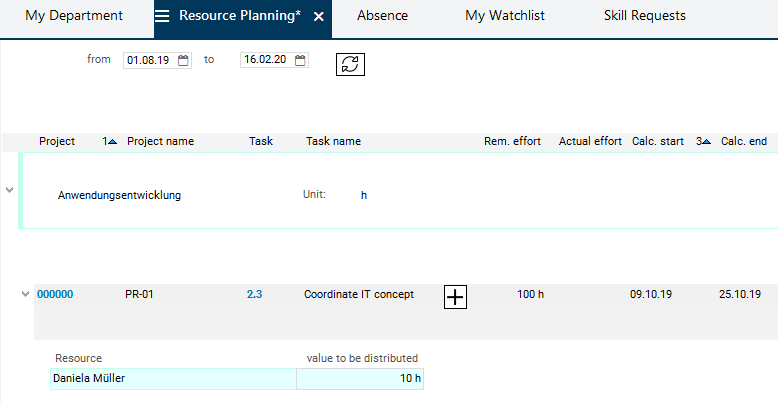
- Right-click on the Create DV concept task and select Insert resource from the context menu or
- click on the arrow button next to the task name in order to insert an empty record for resource selection.
- Select a resource from the listbox in the Resource field (e.g. Daniela Mueller).
- The listbox shows all employees of the Application Development department.
- Enter the effort which is to be distributed, e.g. 10 hours, in the to be distributed field.
- Click on the Distribute effort button at the bottom left margin of the module.
- Confirm the Distribute resource effort? message with Yes.
- Replanning is carried out.
- Result:
- The department planning volume has been reduced to 90 hours.
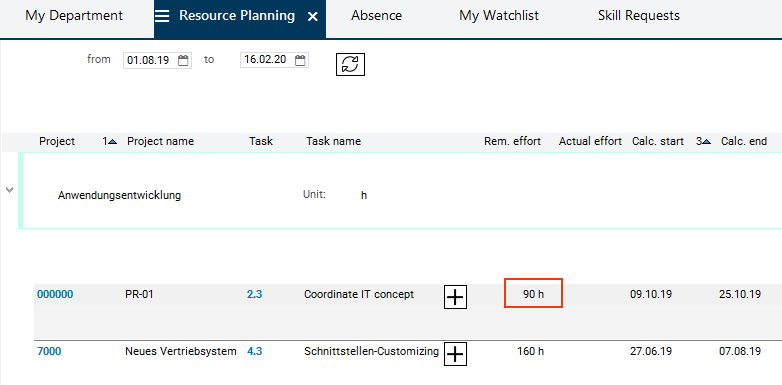
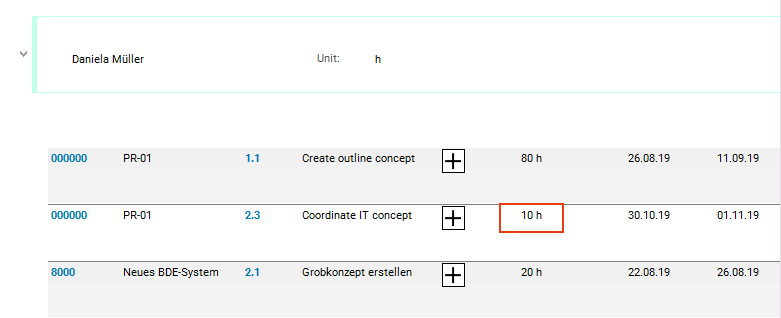
- 10 hours are now redistributed to employee Daniela Mueller.
Time Recording by the Employee (r1)
Task
- Project team member (Daniele Mueller) wants to find out about her scheduling and todo items. Additionally, she wants to post the hours already worked to the projects.
Procedure
- Start a new client.
- Log in with user “r1” (project team member).
- Daniela Mueller’s Employee Board is opened.
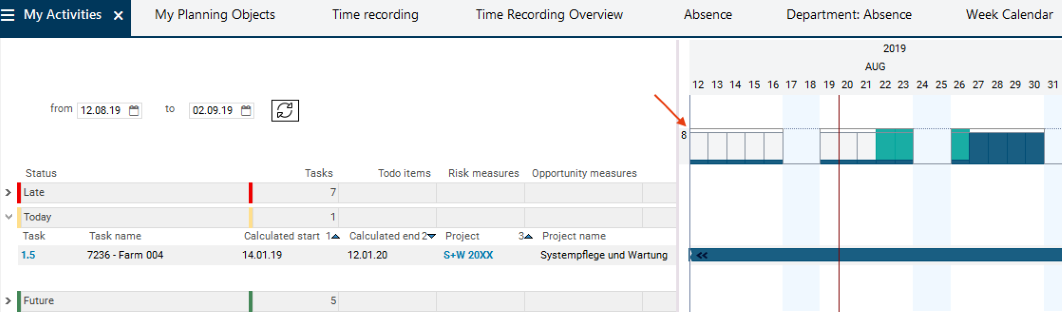
- In the My Activities module, the project team member can see for which projects she is planned and which tasks and todo items are to be completed.
- By consulting the utilization diagram below the time scale, Daniela Mueller can see her utilization for the set period.
Details
- By default, the period filter is set to show all plannings up to the first day of the week after the next. To view todo items which are further in the future, you have to change the filter criteria in the from and/or to fields in the upper left window.
Time Recording on Tasks
Task
- At the end of the week, project team member R1 wants to report his hours for the Create outline concept task.
Procedure
- Activate the Time Recording tab in the Employee Board panel.
- In the left window, all projects for which the employee is scheduled are displayed.
- Unfold project PR-01.
- All tasks for which Daniela Mueller is planned are displayed.
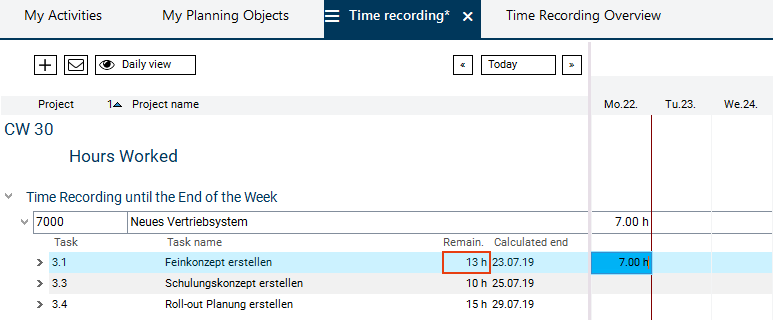
- In the Remaining field, the employee sees the number of hours planned for her for the respective task.
- Click in the field below the required date on which the work was carried out in the line of the Create outline concept task in the right window.
- The required number of hours already worked (actual hours) is entered.
- As a result, the planned value displayed in the Remaining field is reduced automatically so that you can quickly see how many of the planned hours still remain for the completion of the work.
- Save.
- Enter the hours for all required days in the same way.
- Expand the task to see the existing load records for all days of the selected week.
- Here you can write a comment on the process model.

Forecast of Remaining Effort
Task
- After the project team member has completed the first version of the outline concept and has identified a couple of problems, she is afraid that the effort for completion may now be higher.
- She wants to inform the project manager about this additional effort.
Procedure
- In the header area of the Time Recording module, Daniela Mueller clicks on the
 Send forecast button.
- The Send Forecast module is opened.
- She enters the estimated remaining effort of 90h in the Forecast field in the corresponding task line of project PR-01 and saves.
- She clicks on the
 Send forecast button in the project line.

- The Send Info module is opened which contains an automatically created message.
- The message contains the following data: resource (sender), actual, remaining and forecast values for effort, and the calculated end date.
- The project manager of the project is automatically entered as recipient (here: Ronja Koch).
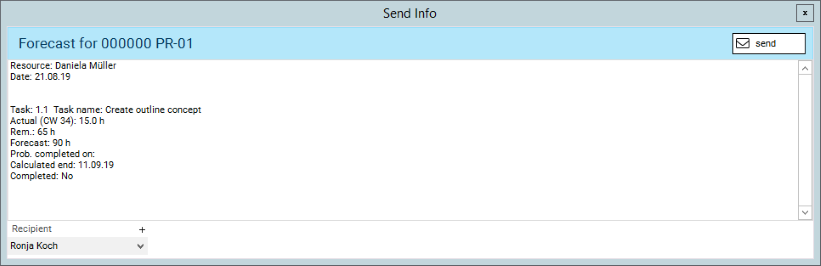
- Click on the Send button.
- Project manager Ronja Koch will receive this message via email.
Controlling and Replanning by Project Manager (r8)
Adopt Actual Hours and Forecasts
Task
- At the beginning of the week, the project manager (Ronja Koch) routinely monitors the project progress.
Procedure
- Start a new client.
- Log in with user R8.
- The My Planning Objects module is opened automatically.
- Click on the ID of project PR-01.
- The panel of project PR-01 is opened.
- Activate the Progress module in the project via Further... → Progress.
- Click on the Calculate schedule button in the toolbar in order for the recorded actual hours to be adopted.
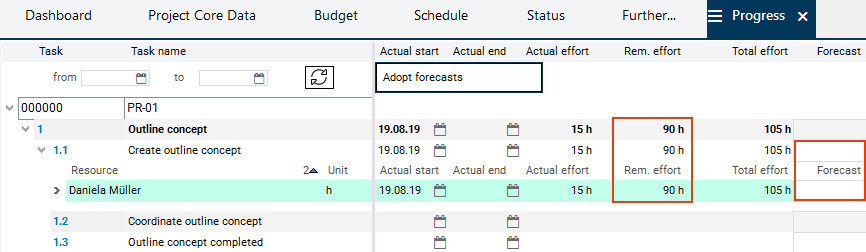
- The actual effort entered by project team member Daniela Mueller and the forecasted effort are displayed.
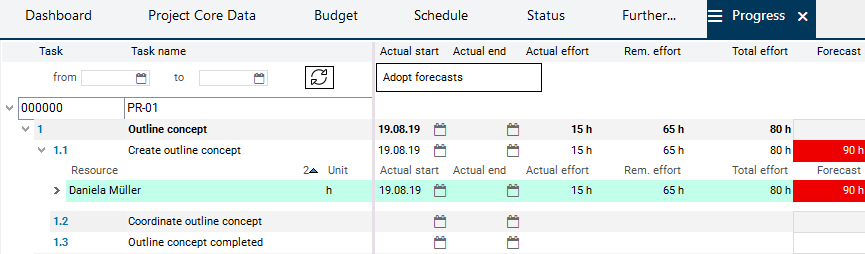
- Click on the Adopt forecasts button.
- Confirm the No data marked. All forecasts are adopted. message with OK.
- If you do not want to adopt all forecasts, mark the records of the forecasts you wish to adopt and subsequently click on the Adopt forecasts button.
- Result: Daniela Mueller’s forecast has been copied to the Remaining effort field and the Forecast field has been emptied.
- Confirm the No data marked. All forecasts are adopted. message with OK.
- Click on the Calculate schedule button in the toolbar.
- Switch to the Budget module.
- Click on the Recalculate button.
- The cost details show additional costs due to additional effort.
- However the end date can still be met.
Create Project Status
Task
- The monthly project status report is to be created, edited, and released by the project manager.
Procedure
- Switch to the eponymous module by clicking on the Status tab in the Project panel.
- Click on the Refresh button on the bottom left of the module so that the current project data is displayed in the module.
- Make necessary changes to the Current status area (only estimates and comments possible).
- Click on the Create status report button.
- Subsequently, the following message will be displayed: Have you updated your estimates and comments?
- If you do not want to make any further changes, confirm the query with Yes.
- The status report is created and is automatically opened in the Status Report module.
- If you do not want to make any further changes, confirm the query with Yes.
- The created status report is displayed in the Status reports area in the Status module.
- The report status has now changed to "created".

- Click on the Release button in the Status Report module to release the status report.
- A released status report can no longer be changed.

- Confirm the query with Yes.
- Click on the Refresh/reset button in the toolbar.
- In the Status module, the status report now has report status "last released".

Management Analyses (r41)
Project Overviews
Task
- The multi-project manager (Georg Hart) wants to find out which projects are vulnerable.
Procedure
- Start a new client.
- Log in with user R41.
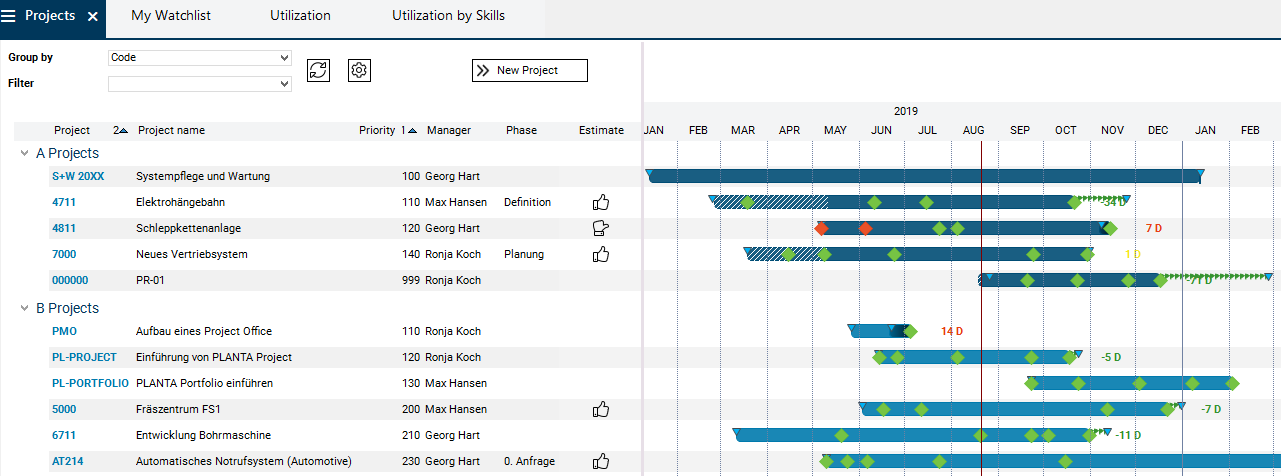
- In the Projects module, the multi-project manager checks the project buffer (green arrows) or the delay (red bar) which are both displayed behind every project bar.
- The thumb symbols inform about the respective project manager's personal estimate regarding the project status.
Task
- In project 4811, the multi-project manager notices a project delay. He wants to get a more detailed picture of the project.
Procedure
- Click on the ID of the project or select the Edit project context menu command to switch to the Project panel.
- Here, the multi-project manager can consult the data or evaluations of the project via various modules, e.g. Project Core Data or Info Board.