Tutorial: Hybrid Planning with PLANTA project and pulse
Introduction
Objective of this tutorial
- To introduce first time users to the functionality of the PLANTA Hybrid method and to teach them how to work with it.
Please note:
- All exercises are based on the PLANTA demo data. This data must be installed beforehand.
- Before you start with the Hybrid tutorial, you have to set up a PLANTA pulse system and connect it to PLANTA project.
- Please ask the administrator for the IP address of the pulse system.
- The screenshots used in this tutorial are mere examples of functions and their layout may deviate from the actual layout in the program.
Did you know?
You can also watch our video tutorials about the hybrid PLANTA system.
Information
- PLANTA Hybrid is a method which allows you to combine traditional and agile project management in the planning and controlling of projects.
- PLANTA project offers numerous options for traditional project management, e.g. detailed resource planning and scheduling, budget calculation, and status report creation.
- For explanations of these functions, please refer to the PLANTA project documentation, e.g. in the Plan and Manage a Project, Plan a Portfolio or Manage My Activities and Hours Worked tutorials.
- PLANTA pulse comes with numerous options for agile project management in project teams, e.g. task management, data and information exchange, and a time recording function with a clear design.
- For detailed descriptions of the PLANTA pulse functionality, please refer to the PLANTA pulse documentation, e.g. to the Pulse Tutorial.
- PLANTA project offers numerous options for traditional project management, e.g. detailed resource planning and scheduling, budget calculation, and status report creation.
- Hence, PLANTA Hybrid combines the advantages of agile project management in PLANTA pulse with the benefits of traditional project management as provided by PLANTA project.
- In this concept, PLANTA project is used for the outline planning of project tasks and for resource assignment, for monitoring the progress, and for analysis of the project by the project manager.
- PLANTA pulse is used to carry out the detailed planning, to control the implementation of individual tasks by the teams, as well as to record hours worked.
PLANTA project Project Creation and Outline Planning
Project Creation and Resource Assignment
Task
- Multi-project manager Georg Hart wants to plan a new IT project using the PLANTA Hybrid method.
- To do so, he first creates a project in PLANTA project and carries out the resource assignment.
Procedure
- Open the PLANTA project client.
- Login with user name "r41" for Georg Hart.
- The Multi-Project Board panel is opened and the Projects module is focused automatically.
- Click on the New project button or select Multi-Project Management → Project Planning → New Project in the user menu.
- The Project panel is opened.
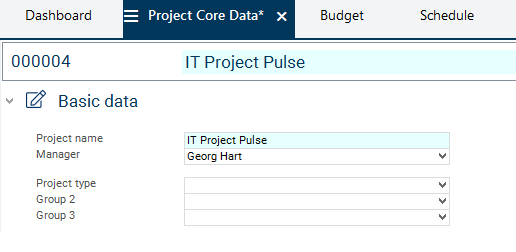
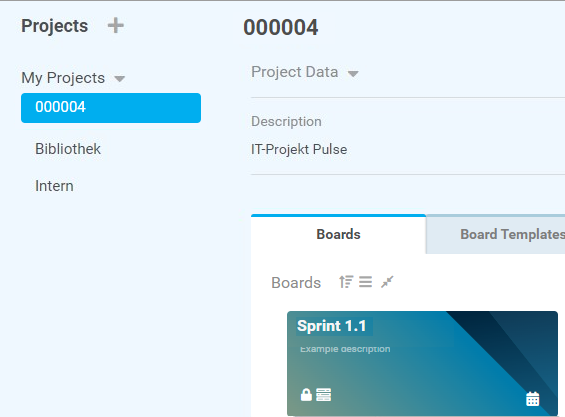
- Enter a project name (e.g. “IT Project Pulse”).
- Georg Hart is automatically entered in the Manager field. Do not change the entry, for he is to be the responsible project manager of the new project.
- Save. Result:
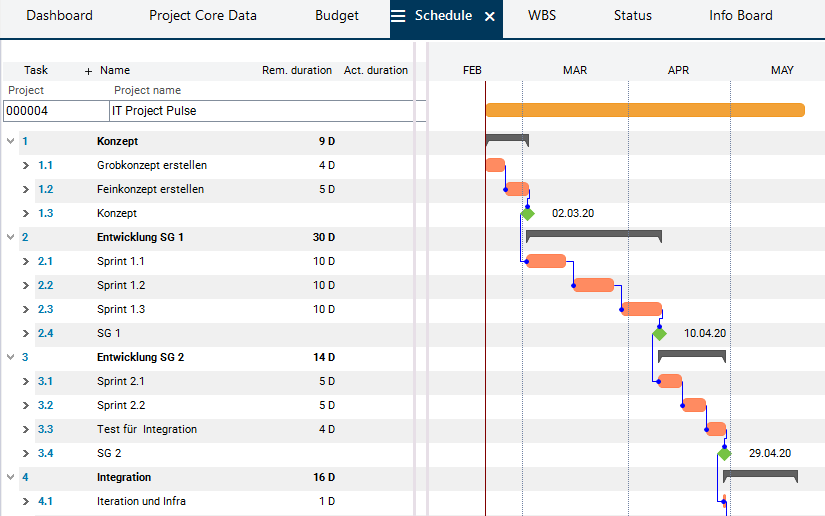
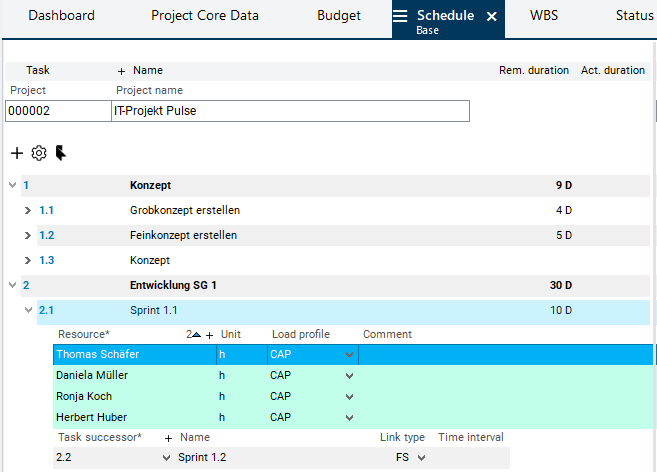
- Switch to the Schedule module.
- Answer the Do you want to copy a schedule? query with Yes.
- Select schedule template A1.1 Standardplan IT-Projekt mit Sprints ("Standard schedule IT project with sprints") from the listbox in the Copy Schedule module.
- Click on the Copy schedule button.
- Result:
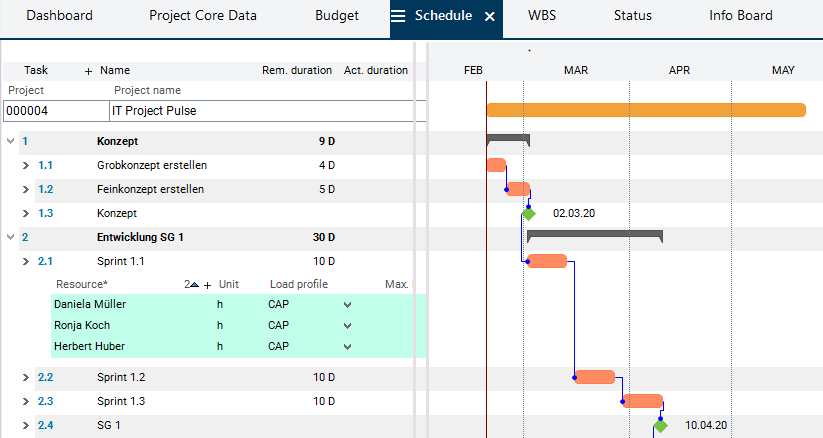
- Right-click on the Sprint 1.1 task to open the context menu and select the Assign resources entry.
- The Assign Resources module is opened.
- Activate the checkboxes of the resource entries for Daniela Mueller, Ronja Koch, and Herbert Huber.
- Click on the Assign selected objects button.
- Save. Result in the schedule:
Prepare the Project for Synchronization
Information
- The project must be approved for editing before it can be connected to an external system like PLANTA pulse. If the project is locked, an error message will be displayed when attempting to assign an external system to the project.
Task
- Georg Hart wants to approve the IT Project Pulse project for editing and connect the project to the external system PLANTA pulse so that the synchronization can be carried out afterwards.
Procedure
- Deactivate the Locked checkbox in the Attributes/Parameters area in the Project Core Data module of IT Project Pulse.
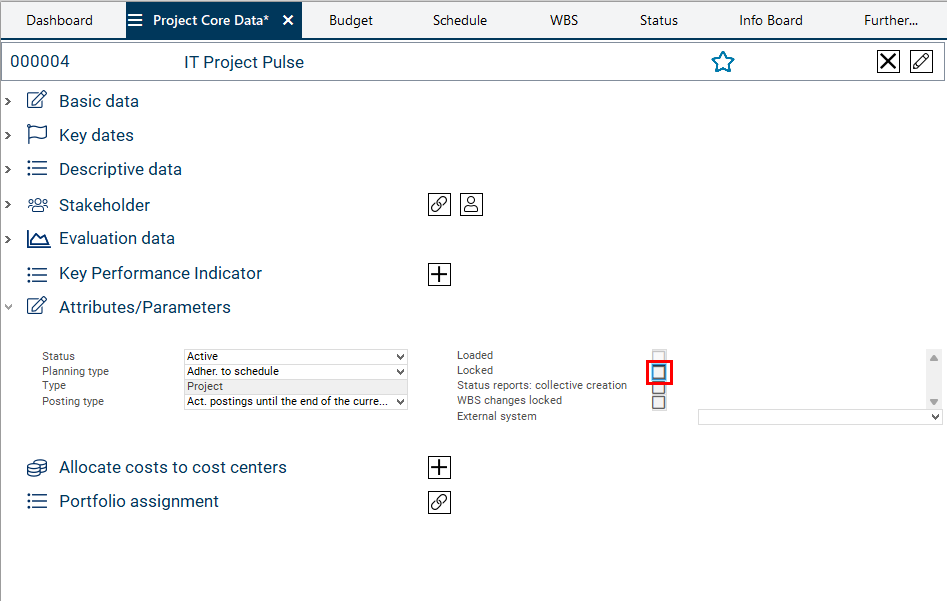
- Save. The project is now approved for editing.
Synchronization
Task
- The outline planning in PLANTA project has been completed and the IT Project Pulse project is ready for synchronization. Georg Hart now wants to link and synchronize the Sprint 1.1 project task with PLANTA pulse, so that he can begin with his agile planning.
Synchronization
- In initial synchronization,
- a corresponding project is created in PLANTA pulse for the project from PLANTA project and
- a respective board is created for the selected task in PLANTA pulse, on which the todo items of this task can be planned.
- If resources are assigned to the synchronized task in PLANTA project, the same persons are assigned to the respective board in PLANTA pulse as board members.
- The subsequent synchronization of the changed data in an already synchronized task is automatically carried out directly after the changes have been saved.
- In the reverse direction, synchronization is carried out automatically as well. If new members are added to boards or if hours are recorded in PLANTA pulse, they are automatically copied to PLANTA project. This does, however, not apply to the deletion of objects in PLANTA pulse. If, e.g., board members are removed from boards or recorded hours are deleted, this information is not transmitted to PLANTA project.
- For in-depth information on what data is synchronized in what direction and on the restrictions that apply, please click here Synchronization of Planned Data in PLANTA Hybrid.
Synchronize Project
Procedure
- Select the PLANTA pulse entry from the External system listbox in the Project Core Data module in the Attributes/Parameters area.
- Save. PLANTA pulse is now assigned to the project as an external system.
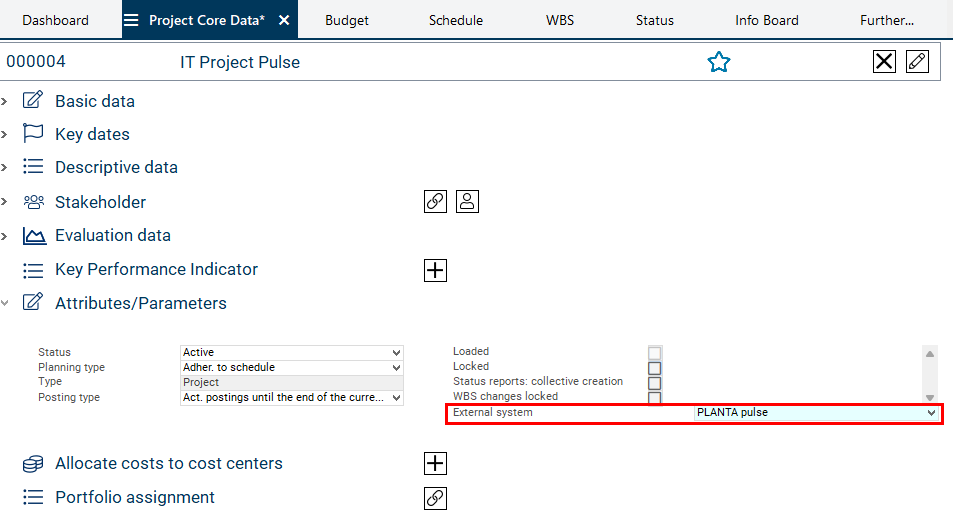
- As soon as the synchronization is completed, a message will be displayed which informs you on whether synchronization was completed successfully or whether problems occurred.
- If the synchronization of the project was not successful, you can view the reasons in the synchronization protocol under Further... → Hybrid Protocol.
Synchronize Project Tasks
- Switch to the Schedule module.
- Click on the
 PLANTA button in the button area.
 - The pulse column is displayed in which individual tasks can be selected by activating the corresponding checkbox for synchronization.
- Please note that (master) milestones and summary tasks cannot be synchronized with PLANTA pulse.
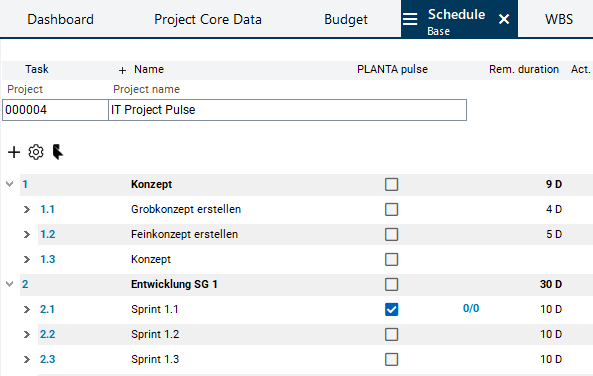
- Activate the pulse checkbox in the line of the Sprint 1.1 task.
- As soon as the synchronization is completed, a message will be displayed which informs you on whether synchronization was completed successfully or whether problems occurred.
Check Synchronization Results
Procedure
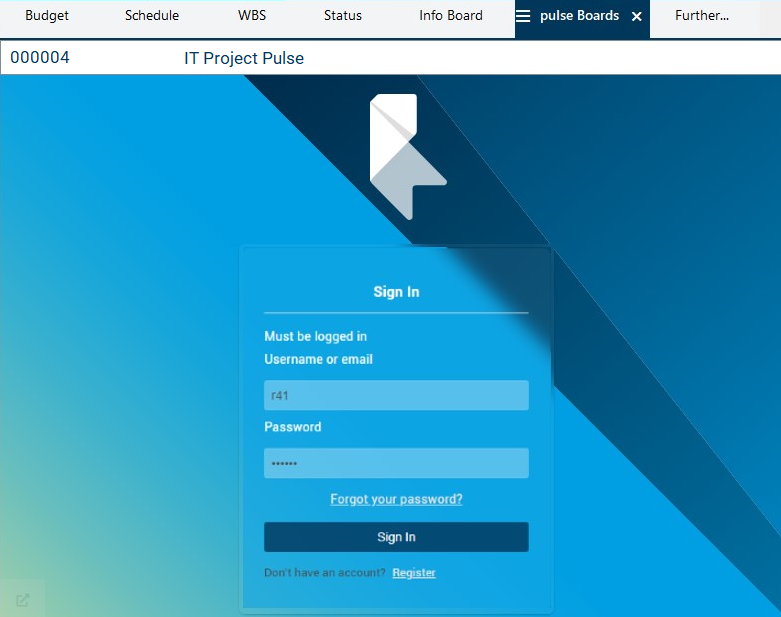
- If synchronization has run successfully, a new pulse boards tab will be displayed in the tab bar which contains a widget which contains the PLANTA pulse view, so that you can view and edit PLANTA pulse data without having to switch to pulse. If you want to switch to the pulse application regardless, you can do so by clicking on the change app symbol
 at the lower left margin of the widget.
 - First, you have to log in with Georg Hart’s pulse data: r41 and passord 123456.
- A board has been created for the synchronized Sprint 1.1 project task in PLANTA pulse.
- The name of the pulse board is the same as the name of the task in PLANTA project.
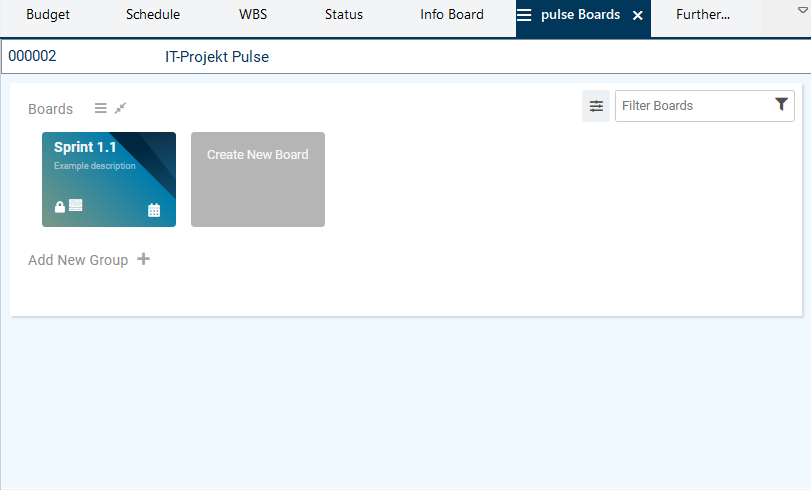
- Click on the board card to open the board.
PLANTA pulse: Plan Project Task in Detail
- In PLANTA pulse, a board is a planning unit which can either be created as a standalone unit directly in PLANTA pulse or, in case you work with the PLANTA hybrid method, it is the result of the synchronization of a task from PLANTA project.
- In PLANTA pulse, the task synchronized from PLANTA project can be planned in more detail by splitting it up into individual sub-tasks (simply called "tasks" in PLANTA pulse) which are collected and managed on the board in the form of cards.
- You can picture a board as a pin board and a card as a sticky note.
- You can create an unlimited number of cards per board which allows for very detailed planning. For the sake of clarity, cards can be aligned via lists (vertically) and swimlanes (horizontally).
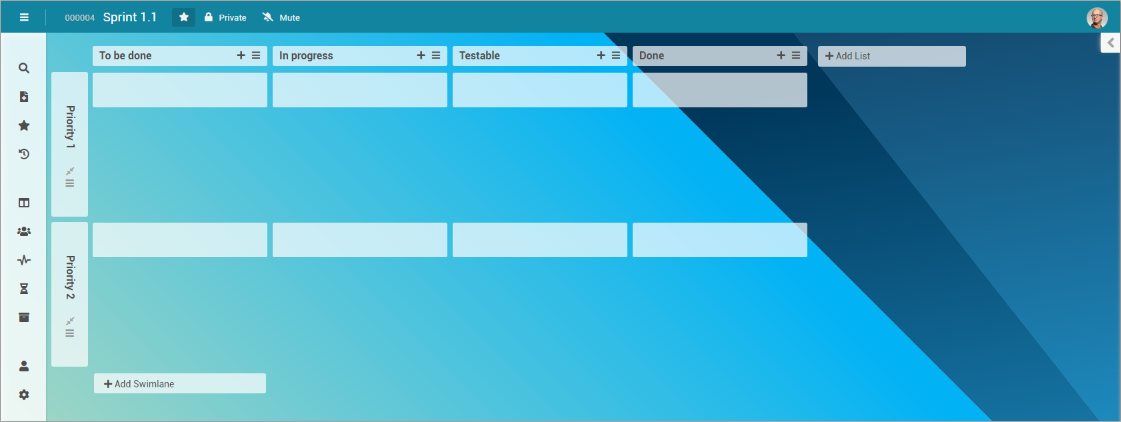
Example for a board in PLANTA pulse
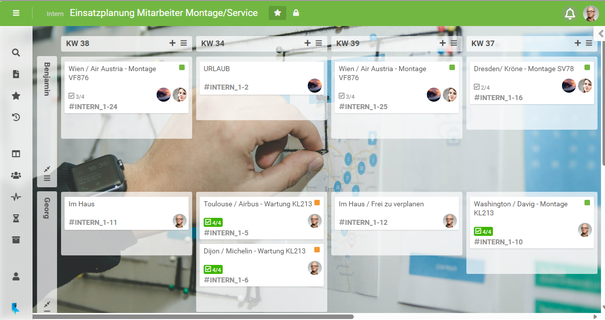
- In the initial synchronization of a project task, a board template containing a standard structure is copied into the newly created board in PLANTA pulse. You can change and adjust it as desired in the course of your project work.

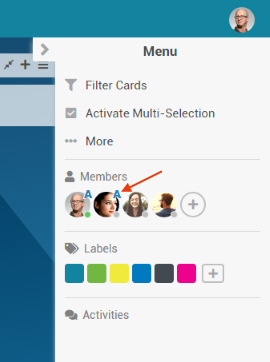
View members
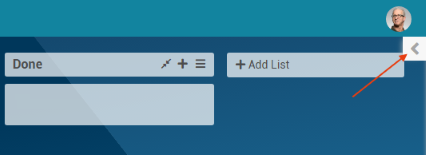
- Open the sidebar by clicking on the << arrow symbol at the right board margin.
- The board members are listed in the Members section. At the leftmost position there is Georg Harts avatar and next to it the avatars of the employees who have been assigned to Sprint 1.1 in PLANTA project as resources.
- Since Georg Hart is registered in PLANTA project as the manager of the project, he was automatically set as the board administrator during synchronization. This is indicated by a blue A in the upper right corner of the avatar image.
- All other employees are regular board members.

See also: Detailed description of the roles and permissions of board members and of the board interface |
Adjust Team
Task
- Georg Hart wants to grant administrator rights to project member Ronja Koch so that she can assist him in project management.
Procedure
- Open the right sidebar.
- Open a menu by clicking on Ronja Koch’s avatar in the Members section and selecting the Change permissions entry.
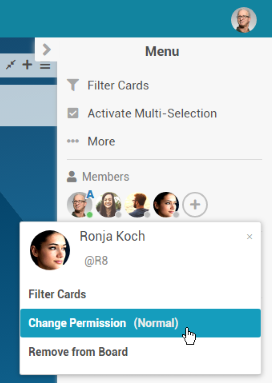
- Select the Admin entry.
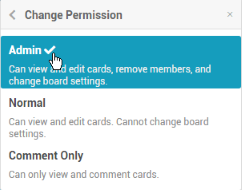
- Result: Ronja Koch is now registered as a board administrator just like Georg Hart.
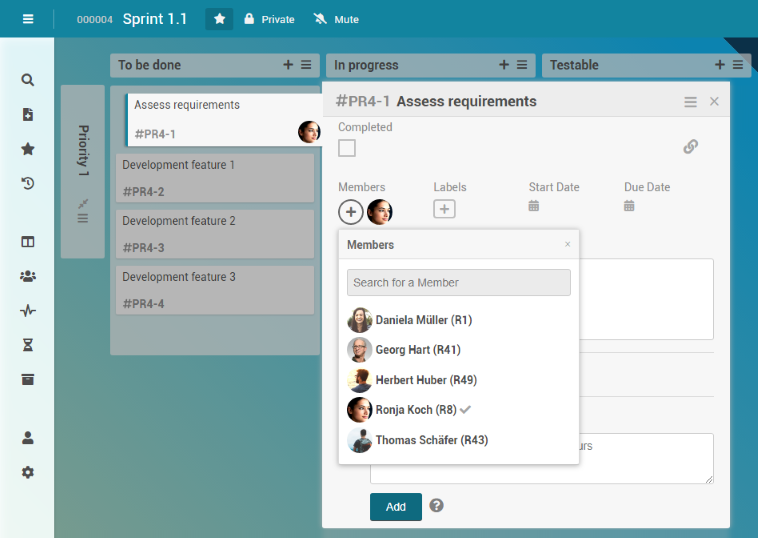
Task
- Georg Hart wants to invite another employee, Thomas Schaefer, to the board as a new team member.
Procedure
- Click on the
 button in the right sidebar in the Members section.
- A pop-up box is opened. Enter the name or code of Thomas Schaefer (R43) or select it from the listbox.
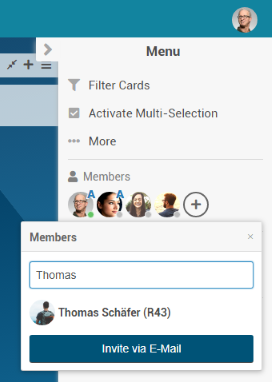
- Dispatch the invitation by clicking on Thomas Schaefer’s listbox entry or on the Invite via e-mail button.
- Thomas Schaefer is informed about the invitation via e-mail and his avatar is displayed in the Members section of the board.
- He receives access to the board as soon as he accepts the invitation.
Details
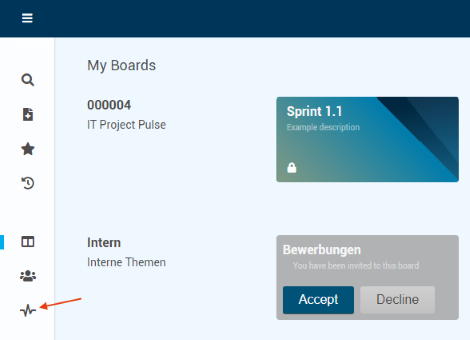
- The next time Thomas Schaefer opens PLANTA pulse, he sees the board of Sprint 1.1 to which he was invited in the Boards tab of the IT Project Pulse project.
- The board card has a gray background and shows a note saying You have been invited to this board.
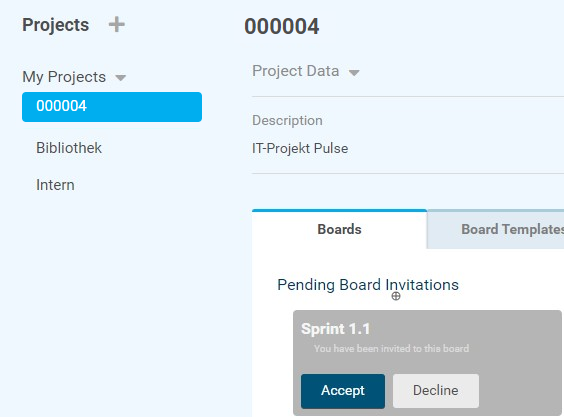
- By clicking on the Accept button he accepts the invitation.
- The board card is now colored and Thomas Schaefer can access the board.
Note
- As soon as a new member has been added to the board in PLANTA pulse, he or she is also displayed as a task resource in project due to the automatic data synchronization between PLANTA project and PLANTA pulse.
- The newly assigned resource becomes visible in PLANTA project in the Schedule of the project after you click on the Update/reset button.
Adjust Board Structure
Information
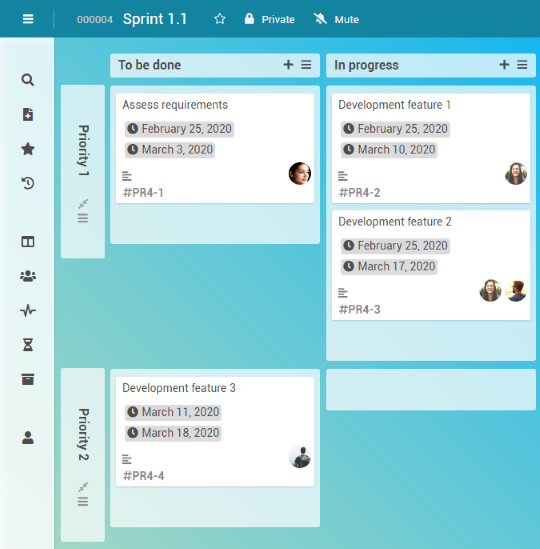
- Due to a stored template, the Sprint 1.1 board contains defined lists by default: Backlog for this sprint, To be done, In progress, etc.
- Swimlanes are not displayed yet.
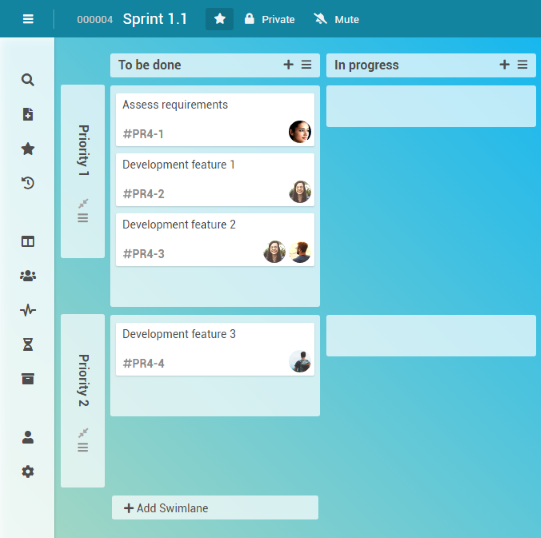
Task
- Georg Hart wants to adjust the structure of the Sprint 1.1 board as follows:
- Delete the Backlog for this sprint list as it is not required for Sprint 1.1,
- Unhide swimlanes,
- rename the first swimlane Priority 1 and insert a swimlane named Priority 2.
Procedure
- Click on the
 button in the heading line of the Backlog for this Sprint list to open the list menu.
 - Select the Delete list entry.
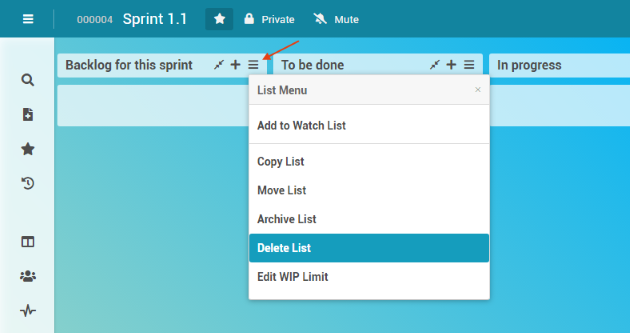
- Confirm the Delete list? message by clicking on the Delete button.
- Result: The list has been removed.

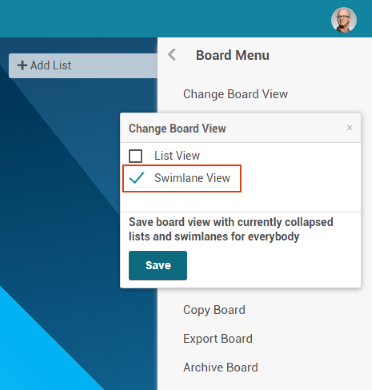
- In order to have swimlanes displayed, open the sidebar at the right board margin and select the More entry.
- The board menu is opened.
- Select the Change board view entry.
- Activate the checkbox on the Swimlane View entry.
- Save.
- Result: The heading of the existing Default swimlane and the + Add swimlane button are displayed.

- Click on the heading of the Default swimlane.
- Enter the new name Priority 1.
- Save.
- Click on the + Add swimlane button.
- Name the newly added swimlane Priority 2.
- Save.
- Result:
Create Cards for Individual Tasks
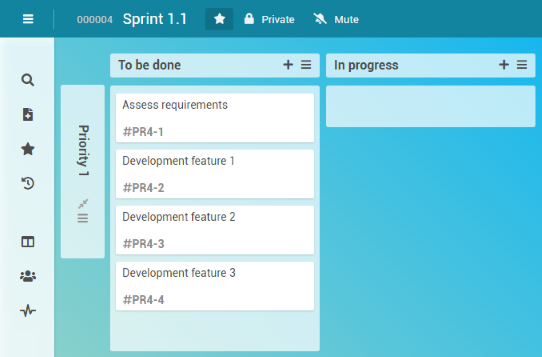
Task
- In the To be done list on the Sprint 1.1 board, Georg Hart wants to create cards for the following tasks and assign board members to them:
- Assess requirements
- Development feature 1
- Development feature 2
- Development feature 3
Procedure
- Click on the + symbol next to the To be done list name. Alternatively, you can click on the + Add card button which is displayed in the lower area of the list as soon as the mouse is moved over it.
- Allocate a card name, e.g. "Assess requirements".
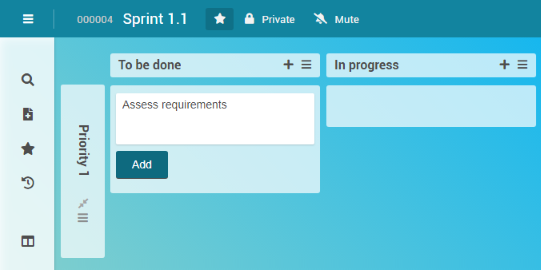
- Click on the Add button or press the ENTER key.
- Create further cards for the development of features 1-3 in the same way.
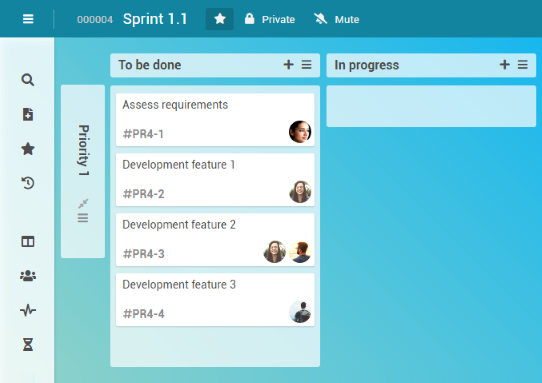
Task
- Georg Hart now wants to assign board members to the cards who are to be responsible for the completion of the respective tasks:
- Ronja Koch for Assess requirements
- Daniela Mueller for Development feature 1
- Daniela Mueller and Herbert Huber for Development feature 2
- Thomas Schaefer for Development feature 3
Procedure
- Open the detail view by clicking on the Assess requirements card.
- Click on the button in the Members section of the card and select Ronja Koch.
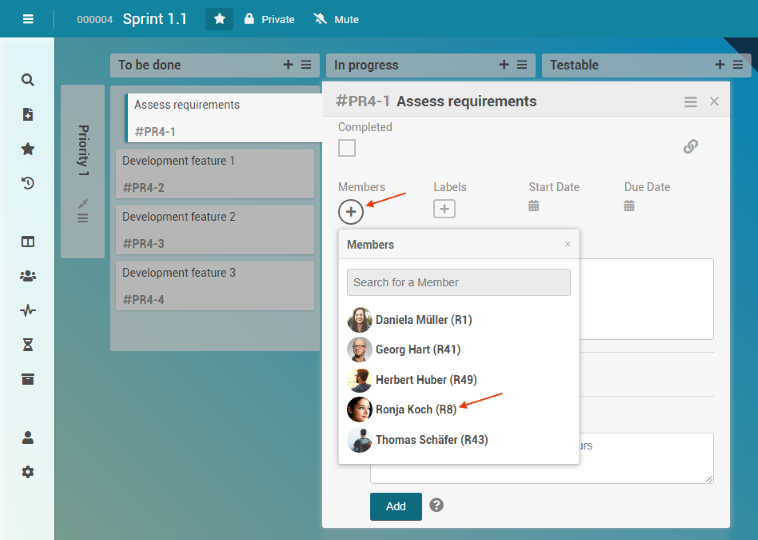
- A checkmark is displayed behind Ronja Koch’s name and her avatar is displayed in the detail view of the card.
- Assign the respective board members to the other cards.
A board member can also be assigned to a card by dragging his/her avatar from the sidebar to the card via Drag&Drop.
- Result:
Task
- Georg Hart decides that feature 3 in the Sprint 1.1 project task has a low priority. In order to have this represented in the board, he moves the Development feature 3 card to the Priority 2 swimlane.
Procedure
- Move the Development feature 3 card to the Priority 2 swimlane by holding down the left mouse button (Drag&Drop).
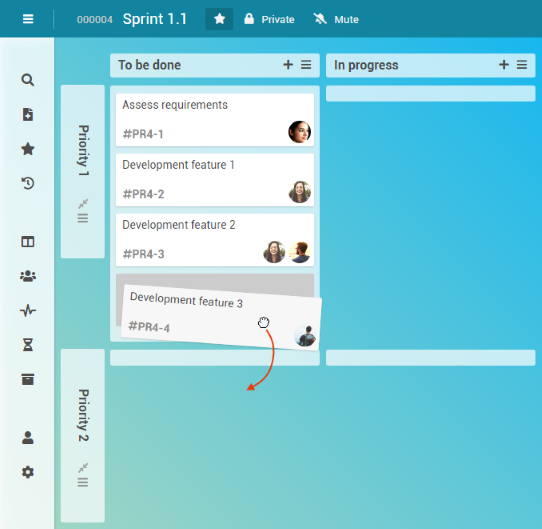
- Result:
Task
- Georg Hart wants to describe the defined tasks in more detail and define start and due dates for the tasks.
Procedure
- Open the Assess requirements card.
- Describe the task in more detail in the Description field.
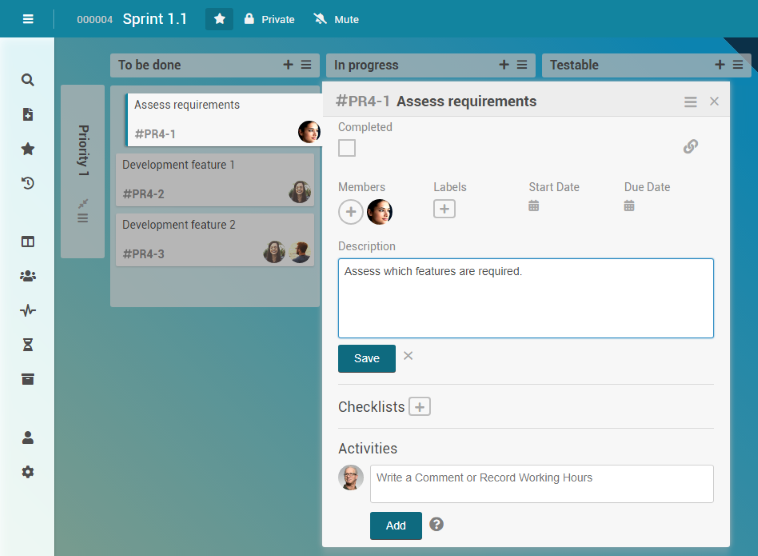
- Click on the Save button or press the CTRL + ENTER keys to save the description.
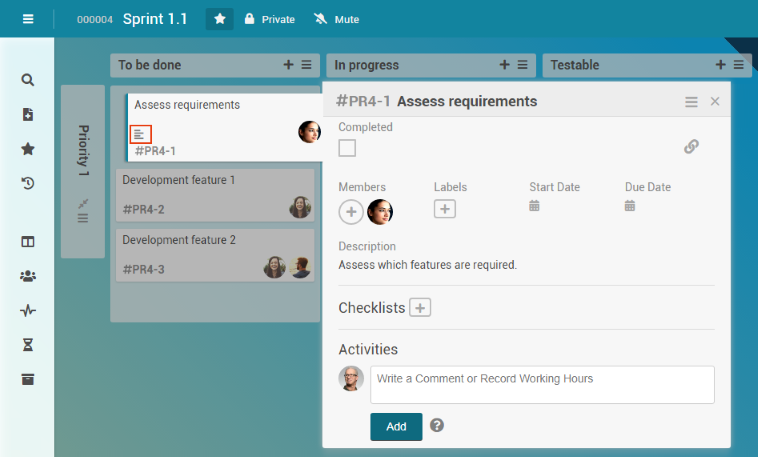
- The
 symbol is displayed on the card’s thumbnail. It indicates that this card has a description.
- The
Procedure
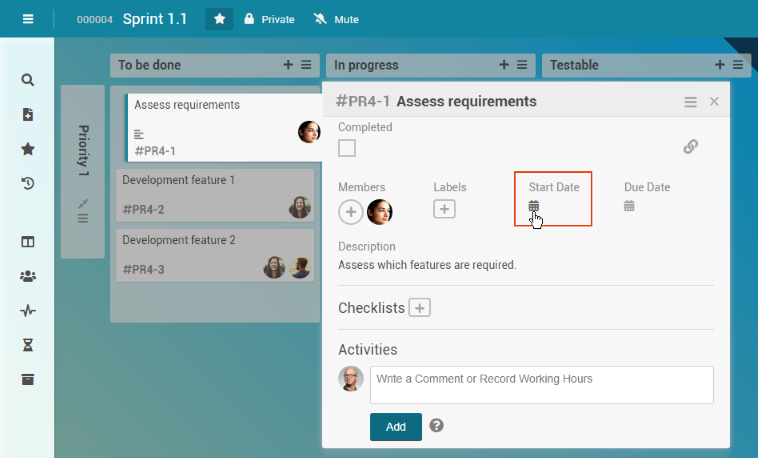
- Open the detail view of the Assess requirements card.
- Click on the
 symbol with the Start heading to set a start date for the task.
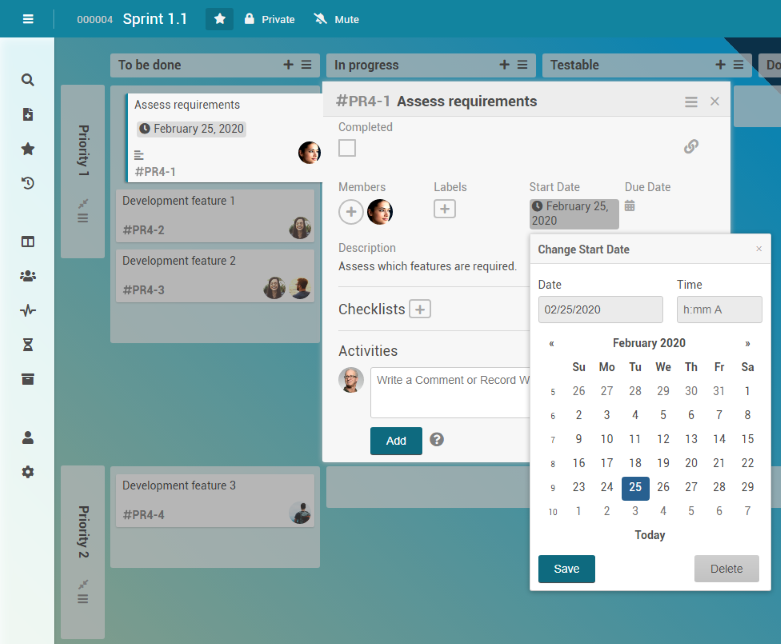
- The Change start date dialog box is opened.
- Select a start date, e.g. today’s date.
- Save. The selected date is displayed on the thumbnail of the card.
- Click on the symbol with the Due heading in the detail view to define a due date.
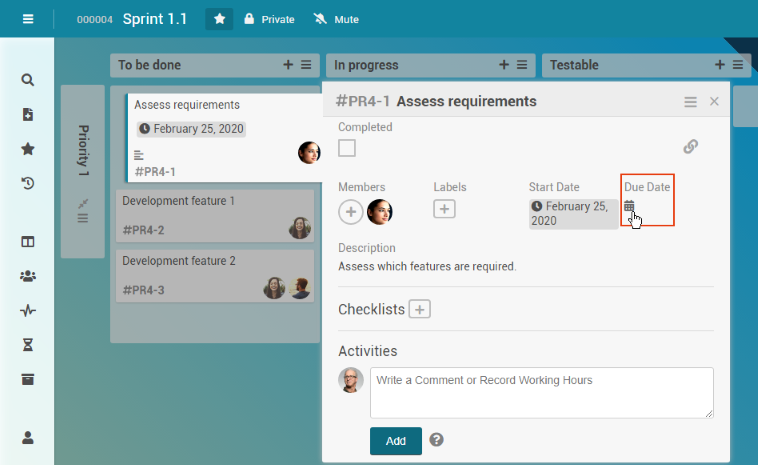
- The Change due date dialog box is opened.
- Select a due date, e.g. in one week from now.
- Save.
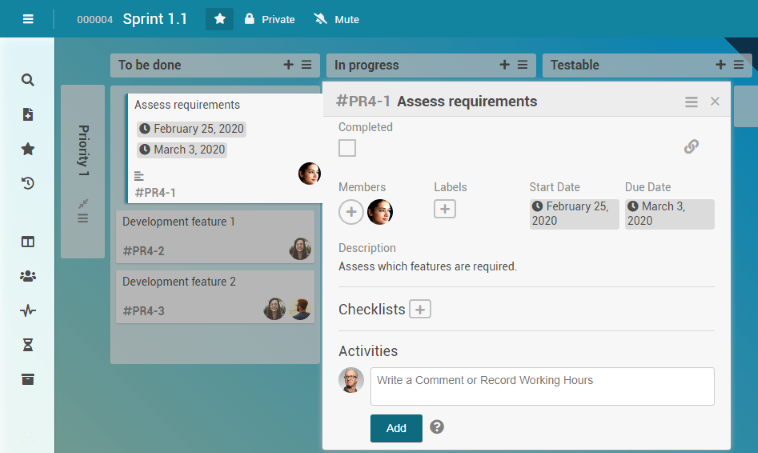
- Add descriptions and dates to the other cards in the same way.
- Result:
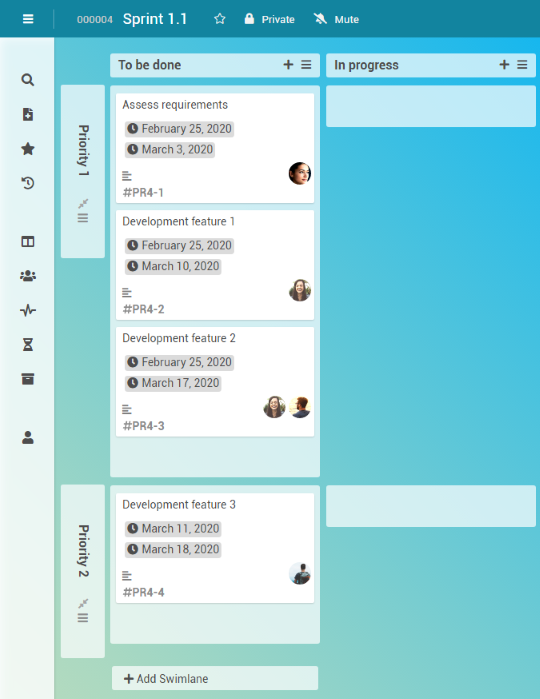
- Georg Hart has thus completed the preparation of the board.
- The employees can view the tasks and carry them out.
PLANTA pulse: Complete Tasks and Record Hours Worked
Task
- Employee Daniela Mueller wants to look at her tasks in the Dashboard PLANTA pulse panelPanel Dashboard.
Procedure
- Open your internet browser and enter the IP address of the PLANTA pulse system which was created beforehand.
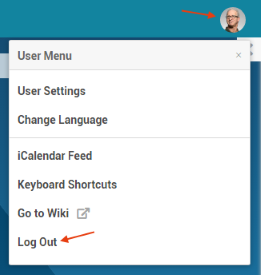
- Or directly switch from the pulse widget in PLANTA project to PLANTA pulse by clicking on the change app symbol and then clicking on Georg Hart’s avatar in the Home-Leiste.
- Select the Log out entry to log Georg Hart out.
- Log in with Daniela Muellers code "r1" and the password "123456".
- Click on the
 dashboard symbol in the menu at the left margin of the window.
- The Dashboard pulse panel is opened.
- Click on the Add Widget + button and select Add new filter widget.
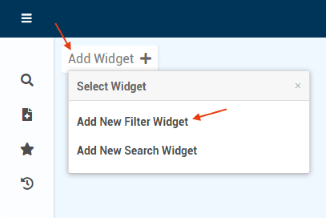
- Select the My pending tasks criterion from the listbox.
- A table is displayed which shows all cards which contain Daniela Mueller’s pending tasks.
- In the table section of the Sprint 1.1 board, the tasks that Daniela Mueller is supposed to carry out are displayed.
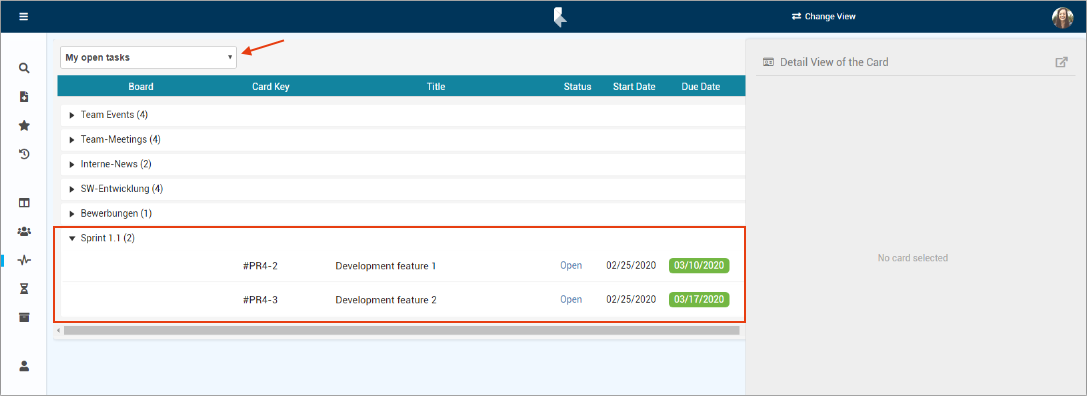
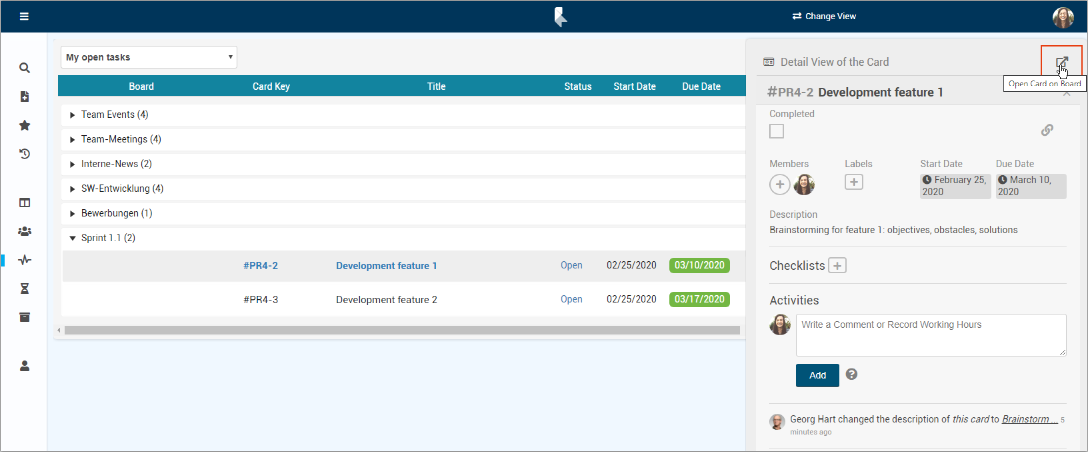
- When you click on the Development feature 1 name, the detail view of the corresponding card is opened.
- Daniela Mueller wants to open the card on the respective board, so she clicks on the Open card on board button in the detail view of the card.
Task
- Daniela Mueller starts with the completion of her tasks. She moves the Development feature 1 and Development feature 2 cards to the In progress list in order to indicate that they are in process.
Procedure
- Drag the Development feature 1 card to the In progress list via Drag&Drop.
- Move the Development feature 2 card as well.
- Result:
Task
- Daniela Mueller wants to record the hours she has already worked for this task.
Information
- Board members can record hours worked directly on the corresponding cards.
- If hours worked are recorded in PLANTA pulse, the data is automatically synchronized with PLANTA project. There, load records are created in the respective project task for the corresponding resource assignments.
Procedure
- Click on the Development feature 1 card to open its detail view.
- Enter the number of hours worked in the Worked field in the Time Recording area, e.g. "4".
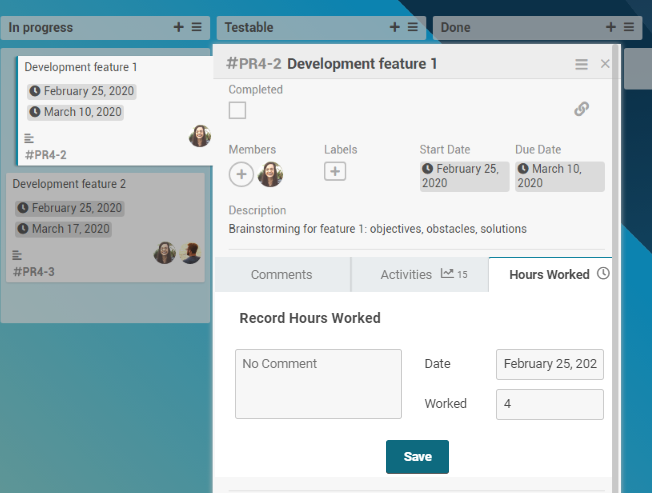
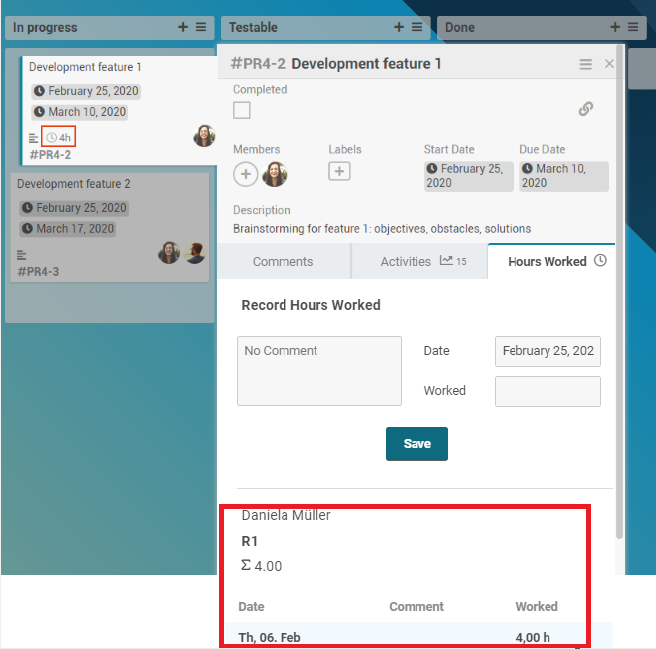
- Click on the Save button.
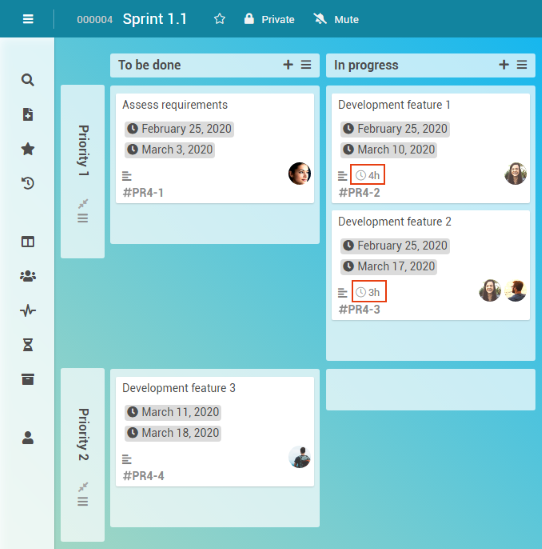
- Result: Daniela Mueller can see her recorded hours on the thumbnail and in the activity history of the card.
- Record hours on the Development feature 2 card in the same way, e.g. "3 h".
Note
- Cards on which hours are recorded can no longer be deleted. You can only remove them from the board by archiving them.
Details
- The recorded hours are also displayed in Daniela Mueller’s Time Recording pulse panel, which can be opened via the
 symbol in the menu bar.
- The panel provides an overview of the time recording of the user in PLANTA pulse. Here, all cards are listed to which Daniel Mueller has been assigned, provided that the cards have a due date or working hours have been recorded to them.
- In this panel you can also change hours already worked or enter new hours worked.
- For information on how to record, change, or delete hours worked in the Time Recording panel, please refer to the Tutorial: Time Recording with PLANTA Hybrid.
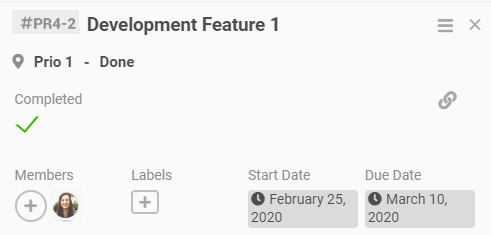
Task
- Daniela Mueller has completed the Development feature 1 task and wants to mark the respective card as completed.
Procedure
- Click on the Development feature 1 card to open its detail view.
- Activate the Completed checkbox.
- Result: The checkbox has turned into a large green checkmark and the start and due dates have been grayed-out.
PLANTA project Monitor Progress
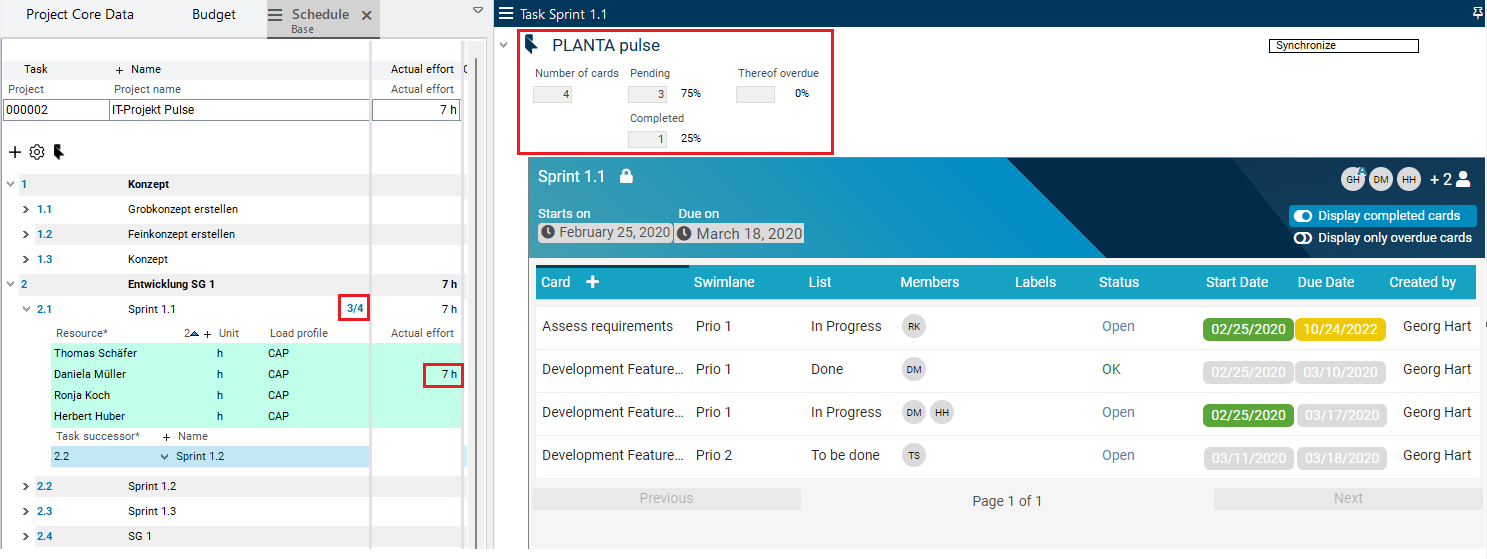
Task
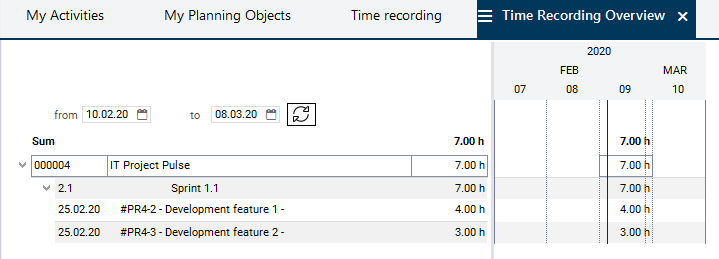
- Manager Georg Hart wants to look at the hours worked recorded by the project team in PLANTA project in order to be able to estimate the work progress of the Sprint 1.1 project task.
Procedure
- Go to PLANTA project.
- Open the Schedule module of the IT Project Pulse project and click on the
 Calculate schedule button.
 - The 7 hours which Daniela Mueller has recorded to her cards in the Sprint 1.1 board in PLANTA pulse are now displayed in PLANTA project.
- In the line of the Sprint 1.1 task, statistics on the cards of the board are displayed. They contain both the total number of board cards (second number) and the number of pending cards (first number).
- By clicking on the link on the ID of the task, Georg Hart can switch to the Task Data Sheet which contains both complete statistics on the board cards and a pulse widget with the pulse view of the board which allows you to check further card specifications and edit cards without having to swith to the pulse application.
- If Georg Hart wants to get more detailed specifications on recorded hours worked, e.g. how many hours were recorded on which cards, he can view the respective data in the Progress module (to be opened via the Further... intermediate module).
- Here, unfold the Sprint 1.1 task record and Daniela Mueller’s resource record.
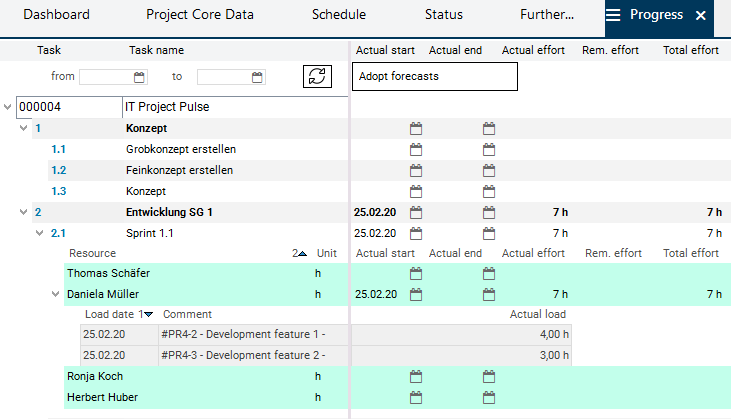
Note
- The hours recorded in PLANTA pulse are automatically adopted in the time recording modules of the corresponding employee in PLANTA project, e.g. in the Time Recording and Overview: Time Recording modules.