Custom Fields
What Are Custom Fields?
Information
- Custom fields are fields which can be used to extend PLANTA pulse and adapt it to your own needs.
- They can be used to collect further information on projects, boards or cards.
- The fields can be created globally, i.e. for the entire system, or for individual projects or individual boards.
Which Custom Fields Are There?
Information
- In PLANTA pulse, there are different custom field types available:
- Text
- Number
- Checkbox
- Date
- Listbox
- Link
- Card Color
- Votings
- User Picker
| Field Type | Available on | Details |
|---|---|---|
Text | Project Boards Cards | Adds a text field. |
Number | Project Boards Cards | Adds a listbox for picking a number. |
Checkbox | Project Boards Cards | Adds a checkbox. |
Date | Project Boards Cards | Adds a calendar listbox. |
Listbox | Project Boards Cards | Adds a listbox with listbox values.
|
Link | Project Boards Cards | Adds a field for saving a link.
|
Card Color | Cards | Adds a listbox with color values.
|
Votings | Project Boards Cards | Adds a vote. The members of the object can vote with Thumbs Up or Thumbs Down .
|
User Picker | Project Boards Cards | Adds a field for selecting a user.
|

Where Can I Use Custom Fields?
- In PLANTA pulse, we differentiate between two levels when talking about custom fields:
- Definition level: Where are the fields defined?
- Custom fields can be defined globally, per project or per board.
- Usage level: On which objects can the fields be used?
- Custom fields can be used on projects, boards and cards.
- A field can not be used on several object types at the same time.
- Definition level: Where are the fields defined?
- In the following sections, the individual levels are described in more detail.
Projects
| How can I use custom fields for projects? |
|
|---|---|
| How can I create custom fields for projects? | Global:
Project:
|
Boards
| How can I use custom fields for boards? |
|
|---|---|
| How can I create custom fields for boards? | Global:
Project:
Board:
|
Cards
| How can I use custom fields for cards? |
|
|---|---|
| How can I create custom fields for cards? | Global:
Project:
Board:
|
Use Cases
Information
- Custom fields can be used for various purposes:
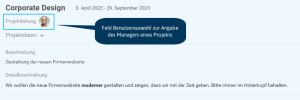
- User Picker field for entering the manager of a project
- Link field on a board for linking to the external repository
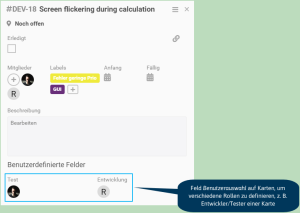
- User Picker field on cards for defining different roles, e.g. the developer/tester of a card
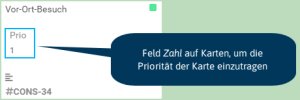
- Number field on cards for entering the effort or priority of the card
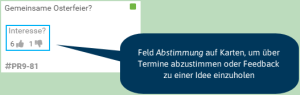
- Voting field on cards to vote on dates or to collect feedback on an idea
- Text field on a project or board to enter the customer
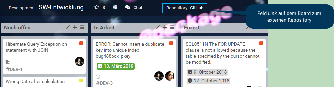
- Card Color field for swimlanes with different priorities, in which the cards are colored green, orange or red
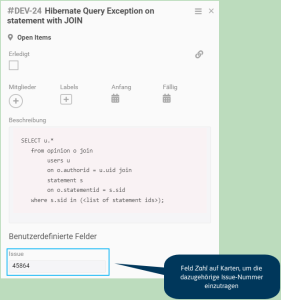
- Number field on cards to enter the related issue number
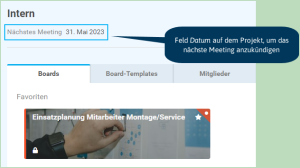
- Date field on a project to announce the next meeting
|
|
|
|
|
|
|
|
Administration
Creation
Create custom fields on projects
- Click the at the required position (depending on the required availability).
- Enter a title for the new field.
- Select the Project option from the Available on listbox.
- In the Type listbox, select the desired field type.
- Click Save.
Create custom fields on boards
- Click the at the required position (depending on the required availability).
- Enter a title for the new field.
- Select the Board option from the Available on listbox.
- In the Type listbox, select the desired field type.
- If needed, change the visibility settings.
- Display Field in Preview: Defines whether the field is to be displayed on the board card once a value has been entered.
- Click Save.
Create custom fields on cards
- Click the at the required position (depending on the required availability).
- Enter a title for the new field.
- Select the Card option from the Available on listbox.
- In the Type listbox, select the desired field type.
- If needed, change the visibility settings.
- Display Field: Defines whether the field is displayed in the detail view of all cards by default.
- When deactivated, the field first needs to be added to the card via the card menu.
- Display Field in Preview: Defines whether the field is to be displayed on the card preview once a value has been entered.
- Display Field: Defines whether the field is displayed in the detail view of all cards by default.
- Click Save.
Administration
Global
Information
- Custom fields which are created globally are listed in the Administration panel → Settings → Custom Fields.
- A field can be edited by clicking on it.
- The type of a field cannot be changed after the field has been created.
- The fields can be deactivated by clicking the sliders.
- Deactivated fields are not available for usage anymore.
- Values already filled in are being kept, but not displayed anymore.
- By clicking , fields can be deleted.
- Deleted fields and all values entered are deleted from all elements.
In the Project
Information
- In the Projects panel → Settings → Custom Fields area, all fields available in the project are listed.
- Globally defined custom fields are listed in a separate area.
- They cannot be edited, but only (de-)activated.
- Deactivated fields are not available for usage anymore.
- Values already filled in are being kept, but not displayed anymore.
- They cannot be edited, but only (de-)activated.
- Custom fields which have been created in the project are displayed in the In this Project area.
- A field can be edited by clicking on it.
- The type of a field cannot be changed after the field has been created.
- The fields can be deactivated by clicking the sliders.
- Deactivated fields are not available for usage anymore.
- Values already filled in are being kept, but not displayed anymore.
- By clicking , fields can be deleted.
- Deleted fields and all values entered are deleted from all elements.
- A field can be edited by clicking on it.
- Globally defined custom fields are listed in a separate area.
On the Board
Information
- In the board menu → Custom Fields, all fields available on the board are listed.
- Global custom fields and fields which were defined in the project are listed together in a separate area.
- They cannot be edited, but only (de-)activated.
- Deactivated fields are not available for usage anymore.
- Values already filled in are being kept, but not displayed anymore.
- They cannot be edited, but only (de-)activated.
- Custom fields which have been created on the board are displayed in the On this Board area.
- A field can be edited by clicking on it.
- The type of a field cannot be changed after the field has been created.
- The fields can be deactivated by clicking the sliders.
- Deactivated fields are not available for usage anymore.
- Values already filled in are being kept, but not displayed anymore.
- By clicking , fields can be deleted.
- Deleted fields and all values entered are deleted from all elements.
- A field can be edited by clicking on it.
- Global custom fields and fields which were defined in the project are listed together in a separate area.