Projects Panel
Information
- In the Projects panel, users can, depending on their permissions, view and edit existing projects and create new projects.
Access path
- Menu → Projects
- Click the PLANTA logo in the Home Bar
- Click on the project title in the Boards panel to open a specific project directly in the Projects panel.
- Click on the project title in the board bar of a board to open the project of the board directly in the Projects panel.
Details
- When starting PLANTA pulse, the Projects panel is opened by default.
- The home page can be configured in the User Settings → General or in the Administration panel, if needed.
Example
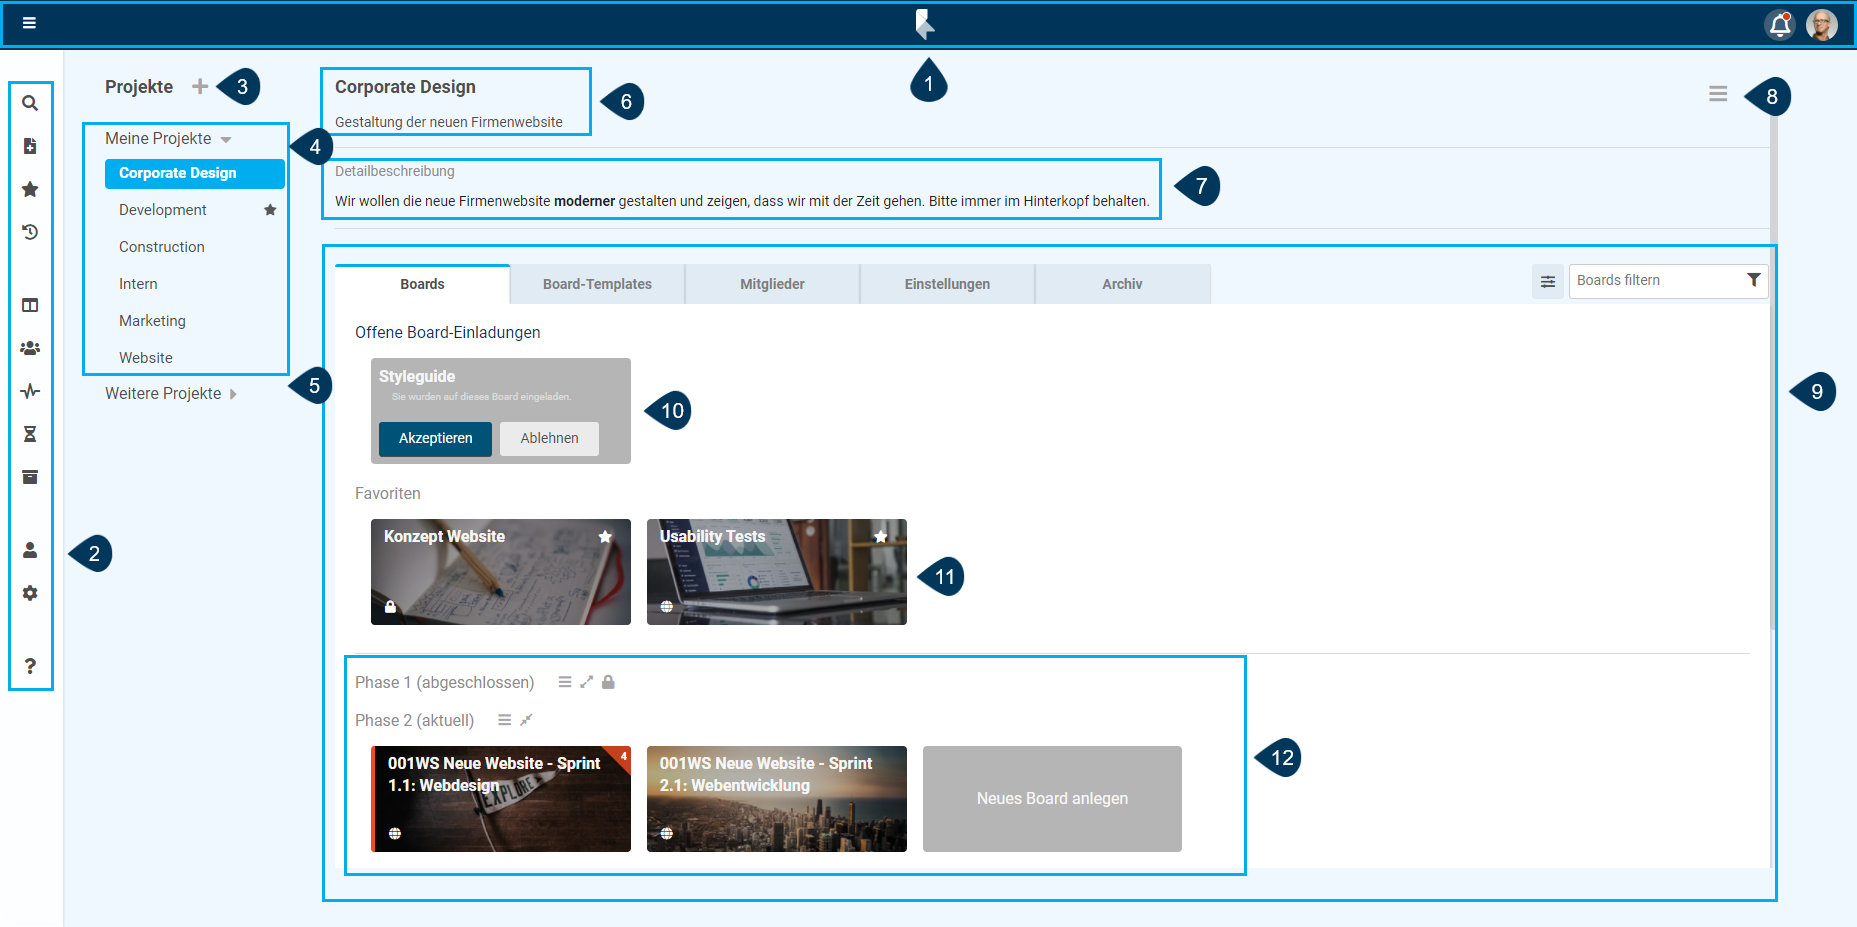
- The Projects panel as seen by a global admin:
Details
- Home Bar (1)
- Menu (2)
- Button to add a new project (3)
- List of projects of which I am a member (4)
- List of projects with public boards of which I am not a member (5)
- Title and description of the project (6)
- Detailed description of the project (7)
- Project menu (8)
- Tab area (9) to manage the
- Area for pending board invitations in the project (10)
- Favorite boards in the project (11)
- Board Groups (12)
Details
- The Projects panel contains two project lists:
- In the My Projects area, all projects of which the currently logged-in user is a member are listed.
- When a user is a member on a board of the project, he/she is considered a member of the project as well.
- Projects can be viewed, edited or created depending on the permission.
- Projects in this list can be added as favorites. These are displayed at the top of the list.
- In the Further Projects area, all projects are listed of which the currently logged-in user is not a member, but who do contain public boards the user could join.
- The list is collapsed by default and can be expanded, if needed.
- The setting is saved.
- The projects in the Further Projects area can only be viewed.
- If the user joins a board of the project, he/she becomes a member of the project and the project is moved into the My Projects list.
- The list is collapsed by default and can be expanded, if needed.
- In the My Projects area, all projects of which the currently logged-in user is a member are listed.
- By clicking the project title, the project view of the project can be opened.
- By default, the last viewed project is loaded when the panel is opened.
Add a project to favorites
- Open the Projects panel.
- With the mouse, hover over the project which is to be added as favorite.
- The icon appears.
- Click on the star.
- Next to the project title, the icon is now displayed and the project is moved to the top of the My Projects list.
Note
- By clicking again, the project is removed from the favorites.
Project Menu
Menu → Projects → Select project →
Information
- The project menu is displayed in the upper right corner and contains options for archiving and deleting the project.
- The project menu is only displayed for project admins.
Archive Project
Information
- A project can be archived so that it will not be displayed in PLANTA pulse anymore, but the related data and information will not be lost.
- Archived projects are displayed in the Archive, where they can be viewed and restored, if needed.
Procedure
- Open the project in the Projects panel.
- Click the in the upper right corner to open the project menu.
- Select the Archive Project option.
- Confirm the dialog message.
- The project is archived.
- All child objects, including boards and board templates of the project, are archived as well.
- Only project admins can archive and restore projects.
Delete Project
Information
- A project can be deleted, which will also delete all related objects (e.g. boards, lists, cards) and information.
Procedure
- Open the project in the Projects panel.
- Click the in the upper right corner to open the project menu.
- Select the Delete Project option.
- Confirm the dialog message.
- The project is deleted.
- All child objects, including boards and board templates of the project, are deleted as well.
If a project in PLANTA pulse is only to be hidden instead of deleted, so that the related data will be kept, it can also be archived.
Note
- Only project admins can delete projects.
Project Boards (Boards Tab)
Menu → Projects → Select project → Boards tab
Information
- In the Boards tab, the Boards of the currently opened project are displayed.
- They can be arranged in board groups.
- Via the placeholder board card Create New Board, new boards can be created within a project and within a board group.
Search/Filter Boards
- Menu → Projects → Select project → Boards tab
- Enter a search term into the filter field in the upper right corner in order to display only boards which contain the search term.
- The search term will be searched for in board titles and board descriptions.
- Boards which don’t belong to a board group will not be filtered, but are always displayed.
- By clicking , the filter options can be opened.
- Here, you can define whether public boards of which the user is not a member are to be displayed.
- By default, the setting is activated. Changes are saved per project.
- For PLANTA Hybrid projects, you can also define whether unsynchronized boards are to be displayed.
- Here, you can define whether public boards of which the user is not a member are to be displayed.
Pending Board Invitations
Menu → Projects → Select project → Boards tab
Information
- If there are pending board invitations in a project, they are displayed at the top in the Pending Board Invitations area.
- The Pending Board Invitations area is displayed only when there are board invitations in a project.
Favorites
Details
- If the currently logged-in user has added boards of the project to their favorites, they are displayed outside of their board group in the Favorites area.
- This area is always displayed above the board groups.
- The Favorites area is displayed only when there are board favorites in a project.
Board Groups
Information
- By default, an empty board group Boards is displayed for new projects.
- If needed, new board groups can be created to sort the boards (e.g. by project stages or departments).
- The board groups as well as the boards themselves can be arranged in the Projects panel using Drag&Drop.
- By clicking and selecting one of the options, the boards within a group can be sorted by title or creation date.
- In the Boards panel, the sorting is not displayed. Here, all boards are sorted alphabetically.
Example for boards sorted in board groups

Create a New Board Group
- Menu → Projects → Select project → Boards tab
- Click Add New Group.
- Enter a title for the board group.
- Click Create.
Edit Board Group
- Menu → Projects → Select project → Boards tab
- Via , the board group menu with further options can be opened.
- Via Always Hide/Display Boards, the boards of the board group can be displayed/hidden by default.
- Boards can still be moved into a collapsed board group using Drag&Drop.
- Via , the boards of a board group can be hidden and via , they can be displayed again.
- In the Settings area, the title of the board group can be edited. The board group can also be locked.
- No boards can be added to locked board groups.
- By clicking Delete Board Group, a board group can be deleted.
- You will be asked which other board group the boards of the group should be assigned to instead.
- The last board group cannot be deleted.
Notes
- Board groups can only be created and edited by global admins or by project admins.
Project Templates (Board Templates Tab)
Menu → Projects → Select project → Board Templates tab
Information
- In the Board Templates tab, the templates of the currently opened project are displayed.
- They are labelled as board templates with the icon .
- On the icon, there is a tooltip which indicates how many boards have already been created out of the template.
- The board templates can be sorted into template groups.
- Via the placeholder board card Create New Template, new templates can be created within a project and within a template group.
Template Groups
Information
- By default, an empty group Templates is displayed for new projects.
- If needed, new template groups can be created to sort the board templates (e.g. by project stages or departments).
- The templates groups as well as the board templates themselves can be arranged in the Projects panel using Drag&Drop.
- By clicking and selecting one of the options, the templates within a group can be sorted by title or creation date.
Create a new template group
- Menu → Projects → Select project → Board Templates tab
- Click Add New Group.
- Enter a title for the template group.
- Click Create.
Edit template group
- Menu → Projects → Select project → Board Templates tab
- Via , the template group menu with further options can be opened.
- Via Always Hide/Display Templates, the board templates of the template group can be displayed/hidden by default.
- Templates can still be moved into a collapsed template group using Drag&Drop.
- Via , the board templates of a template group can be hidden and via , they can be displayed again.
- In the Settings area, the title of the template group can be edited. The template group can also be locked.
- No templates can be added to locked template groups.
- By clicking Delete Template Group, a template group can be deleted.
- You will be asked which other template group the board templates of the group should be assigned to instead.
- The last template group cannot be deleted.
Filter board templates
- Menu → Projects → Select project → Board Templates tab
- Enter a search term into the filter field in the upper right corner in order to display only board templates which contain the search term.
- The search term will be searched for in board template titles and board template descriptions.
- Board templates which don’t belong to a template group will not be filtered, but are always displayed.
Notes
- Template groups can only be created and edited by global admins or by project admins.
Project Members (Members Tab)
Menu → Projects → Select project → Members
Information
- In this area, members can be added to or removed from the project and the permissions of the individual members can be edited.
Note
- The members of the projects will automatically be added to all newly created boards of the project.
Project Settings (Settings Tab)
Menu → Projects → Select project → Settings
Information
- In the Settings tab, the settings and the custom fields of the project can be managed.
Notes
- The Settings tab is only available for project admins and global admins.
- The other members of the project cannot access the Settings tab.
- Projects can also be edited in the Administration panel.
- Only global admins can access the Administration panel.
- In the Administration panel, existing boards can be assigned to a project.
Details
| Title | Title of the project |
Project Key | Project key of the project
|
| Comment Format Template | The comment format template defines in which format time recording comments will be synchronized from PLANTA pulse to PLANTA project.
|
| Description | Description of the project |
| Detailed Description | Detailed description of the project |
| Dates | Start and due date of the project |
| Hide Project in the Time Recording Panel | Defines whether the cards and hours worked of the project are hidden in the Time Recording panel.
|
| Enable Linking of Boards and Cards | Defines whether linking boards and cards will be allowed in the project.
|
Custom Fields
Menu → Projects → Select project → Settings
Information
- In this area, the custom fields of the project can be created and managed.
- Custom fields can be used to add further individual fields to projects, boards and cards.
Create custom field
- Click the .
- Enter a title for the new field.
- In the Available on listbox, select the objects on which the field is supposed to be available.
- In the Type listbox, select the desired field type.
- If needed, change the visibility settings.
- For fields on boards:
- Display Field in Preview: Defines whether the field is to be displayed on the board card once a value has been entered.
- For fields on cards:
- Display Field: Defines whether the field is displayed in the detail view of all cards by default.
- When deactivated, the field first needs to be added to the card via the card menu.
- Display Field in Preview: Defines whether the field is to be displayed on the card preview once a value has been entered.
- Display Field: Defines whether the field is displayed in the detail view of all cards by default.
- For fields on boards:
- Click Save.
Details
- Custom fields can be used on the project or on the boards or cards of the project.
- A field can not be used on several object types at the same time.
- Custom fields on the project can be filled in the Settings tab and are then displayed in the Projects panel below the project title.
- Custom fields on boards can be filled in the dialog box on the board title and are then displayed in the board bar.
- Custom fields on cards can be filled in the detail view of the card and are then, depending on the setting, also displayed in the preview of the card.
- Custom fields which are created in the project are available on all boards of the project.
- A field can be edited by clicking on it.
- The type of a field cannot be changed after the field has been created.
- By clicking , a field can be deleted.
- When a field is deleted, it is removed from all objects.
- Via the sliders, the individual fields can be (de)activated.
- Deactivated fields are not available for usage anymore.
Custom fields can be created globally in the Administration panel, per project in the Projects panel or per board via the board menu. More Information
Notes
- Custom fields can only be created, edited and deleted by project admins.
- A custom field of the card color type can only be created once per project.
Project Archive (Archive tab)
Menu → Projects → Select project → Archive
Information
- In the Archive tab, the archived boards and board templates of a project can be viewed.
Details
- In the upper table, any the archived boards of the project are listed with the following information:
- Title
- Members
- Labels
- Added on
- Archived on
- Owner
- Synchronized
- In the lower table, any archived board templates of the project are listed with the following information:
- Title
- Members
- Labels
- Added on
- Archived on
- By clicking , the board (template) can be viewed in reading mode.
- By clicking or , the board (template) can be restored or deleted.
- Only the admins of the object can delete or restore the board/template.
Reading mode
- In the reading mode, all cards of the board/board template are listed in a table with the following information:
- Card key
- Title
- List
- Swimlane (if applicable)
- Members
- Labels
- Start
- Due
- Created by
- Status
- By clicking on a row, the card can be opened and viewed.
Note
- The archived objects can be viewed by the following users:
- Public boards: All project members
- Private boards: All board members
- Board templates: All project members