Lists and Swimlanes
Information
- Lists are used to structure the Cards on a board vertically, while swimlanes are used for horizontal structuring.
Details
- By clicking the option Change Board View in the sidebar, board admins can configure whether the cards in a board should be sorted only in lists or also in swimlanes.
- Lists and swimlanes can be rearranged within a board using Drag&Drop.
Board with lists: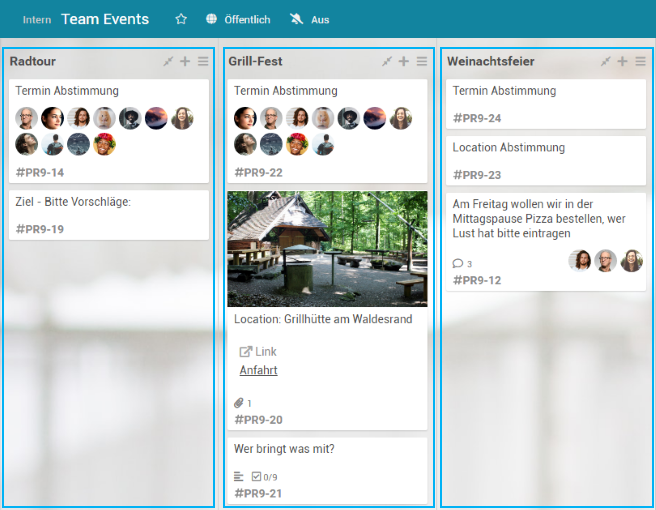
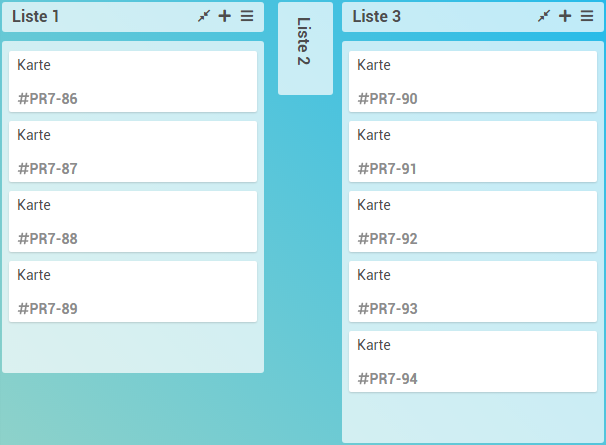
Board with lists (light blue) and swimlanes (dark blue):
Lists
Information
- Lists are used to structure boards vertically.
- Within lists, Cards can be created.
Create New List
Procedure
- Open Board
- On the board, click on Add List.
- If there are already lists on the board, the button is displayed to the right of the last list.
- In order to add a list between two existing lists, click on the which appears when hovering between the list headers.
- Enter a list title.
- Click Save.
- The list is added at the desired position.
Rename Lists
Procedure
- Open board → Select list
- In the list header of the list, click on the list title.
- Rename the list.
- Click Save.
Collapse Lists
Procedure
- Open board → Select list
- By clicking the button in the symbol area of the list header, a list can be collapsed.
- The list title is displayed vertically, the cards of the list are not displayed anymore:
- By clicking the list title, the list can be opened again.
Notes
- Via the Board View, the selected view can be saved by the board admin so that collapsed lists will stay collapsed when the board is reopened.
- If the view is not saved, all lists will be opened when the board is reopened.
- Lists can only be collapsed in the list view. If the swimlane view has been selected as Board View, lists cannot be collapsed.
Add Cards
Information
- Within a list, new Cards can be created.
Procedure
- See Create Cards
List Menu
Information
- The list menu can be found in the symbol area of the list header with the symbol and contains further options for the selected list.
Add to Watch List/Remove from Watch List
Information
- A list can be added to the watch list, so that the user will be notified when there are changes in the list.
- Which notifications (e-mail, in-app or Telegram) will be sent, can be configured in the Notification Settings for the watch list.
Procedure
- Open board → Select list → Open list menu via
- In the list menu, select the option Add to Watch List.
Details
- Lists on the watch list are marked with in the list header.
- If the user does not want to receive notifications on changes in the list anymore, he/she can select the option Remove from Watch List in the list menu.
- If a list is on the watch list, the user will receive notifications about changes in the list.
- If needed, individual cards or entire boards can be added to the watch list as well.
Copy List
Information
- A list can be copied on the original board and to another board. In both cases, the source list stays on the original board.
Procedure
- Open board → Select list → Open list menu via
- In the list menu, select the option Copy List.
- If needed, enter a new title for the copy of the list.
- In the listbox, select the board to which the list should be copied.
- Current means the board the user has opened at this moment.
- Select whether card comments are to be copied.
- Click Copy.
- The board to which the list was copied is opened. The list is added to the right.
- If the Allow Moving and Copying of Cards to Other Projects parameter has been activated in the Administration panel, lists can also be copied to boards of other projects.
Move List
Information
- Lists can be moved to other boards. The source list can now not be found on the original board anymore.
Procedure
- Open board → Select list → Open list menu via
- In the list menu, select the option Move List.
- In the listbox, select the board to which the list should be moved.
- Click Move.
- The board to which the list was moved is opened. The list is added to the right.
- If the target board is not to be opened, this setting can be changed in the User Settings → Board Settings.
Note
- If the Allow Moving and Copying of Cards to Other Projects parameter has been activated in the Administration panel, lists can also be moved to boards of other projects.
Archive List
Information
- A list can be archived so that it will not be displayed in PLANTA pulse anymore, but the related data and information (cards) will not be lost.
Procedure
- Open board → Select list → Open list menu via
- In the list menu, select the option Archive List.
Details
- Via the board menu → Board Archive, archived lists can be accessed and restored, if needed.
Delete List
Information
- A list can be deleted, which will also delete all related objects (cards) and information.
Procedure
- Open board → Select list → Open list menu via
- In the list menu, select the option Delete List.
- In the dialog box, click Delete.
Details
- If a list in PLANTA pulse is only to be hidden instead of deleted, so that the related data will be kept, it can also be archived.
Notes
- A deleted list and all related data cannot be restored anymore.
- If cards of the list were archived earlier, they will be deleted as well.
- Lists with cards on which working hours have been recorded cannot be deleted anymore but only archived.
Edit WIP Limit
Information
- It is possible to limit the number of cards in a list, so that not too many cards are in progress at the same time.
- The limit can be configured via the WIP Limit (Work in Progress).
Procedure
- Open board → Select list → Open list menu via
- In the list menu, select the option Edit WIP Limit.
- To activate the option, click Activate.
- Define the number of cards in the corresponding field.
- Click Apply.
- The defined number of cards for the list is now displayed in the list header in brackets.
Example for the display of the WIP limit

Details
- Once the limit has been reached, no new cards can be added to the list. The button for adding a new list is removed from the list header.
- By activating the checkbox Soft Limit in the WIP limit dialog box, a “soft limit” can be defined. New cards can still be added, even if the limit has been reached. The current number of cards will then be marked in red:
Example for the display of the WIP soft limit

Select All Cards in List
Information
- By using the selection option, all cards of a list can be selected and then copied, moved, archived or deleted together.
Procedure
- Open board → Select list → Open list menu via
- In the list menu, click Select All Cards in List.
- All cards of the list are ticked on the left and the sidebar opens on the right with the selection menu of the multi-selection.
- The selected cards can now be copied, moved, archived or deleted together.
Details
- If not all cards of the list should be selected, they can be deselected manually.
- In addition, cards from other lists can be added to the selection as well.
Swimlanes
Information
- Swimlanes are used to structure boards horizontally.
- Swimlanes are displayed only if the option Swimlane View is activated in the Board View (Board sidebar → ...More → Change Board View).
- In order for swimlanes to be displayed always and for all members, the board admin can save the swimlane view, by clicking Save in the Board View.
Create New Swimlane
Procedure
- Open Board
- In the left board area, click Add Swimlane.
- If there are already swimlanes on the board, the button is displayed below the last swimlane.
- Enter a swimlane title.
- Click Save.
Note
- In order for the swimlane option to be available, the swimlane view needs to be configured in the Board View (Board sidebar → ...More → Change Board View).
Rename Swimlane
Procedure
- Open board → Select swimlane
- In the swimlane header, click on the title of the swimlane.
- Rename the swimlane.
- Click Save.
Collapse Swimlane
Procedure
- Open board → Select swimlane
- By clicking the button in the symbol area of the swimlane header, a swimlane can be collapsed.
- The swimlane title is displayed horizontally, the cards of the swimlane are not displayed anymore.
- By clicking the swimlane title, the swimlane can be opened again.
Note
- Via the Board View, the selected view can be saved by the board admin so that collapsed swimlanes will stay collapsed when the board is reopened.
- If the view is not saved, all swimlanes will be opened when the board is reopened.
Swimlane Menu
Information
- The swimlane menu can be found in the symbol area of the swimlane header with the symbol and contains further options for the selected swimlane.
Note
- The menu items Archive Swimlane and Delete Swimlane are only displayed if there is more than one swimlane.
Archive Swimlane
Information
- A swimlane can be archived so that it will not be displayed in PLANTA pulse anymore, but the related data and information (cards) will not be lost.
Procedure
- Open board → Select swimlane → Open swimlane menu via
- In the swimlane menu, select the option Archive Swimlane.
Details
- Via the board menu → Board Archive, archived swimlanes be accessed and restored, if needed.
- If there is only one swimlane, it cannot be archived.
Delete Swimlane
Information
- A swimlane can be deleted, which will also delete all related objects (cards) and information.
Procedure
- Open board → Select swimlane → Open swimlane menu via
- In the swimlane menu, select the option Delete Swimlane.
- In the dialog box, click Delete.
Details
- If a swimlane in PLANTA pulse is only to be hidden instead of deleted, so that the related data will be kept, it can also be archived.
Notes
- A deleted swimlane and all related data cannot be restored anymore.
- If there is only one swimlane, it cannot be deleted.
- If cards of the swimlane were archived earlier, they will be deleted as well.
Select Color for Cards
Information
- A color can be defined for the cards of a swimlane.
Details
- Selecting a color for the cards of a swimlane is only possible if a custom field of the Card Color type has been created on the board or within the project and one or more colors have been created for this field.
- Via Settings and via the board menu, the colors for swimlanes can be configured.
Procedure
- Open board → Select swimlane → Open swimlane menu via
- In the swimlane menu, select the option Select Color for Cards.
- Select a color.
- Click Save.
- All cards of the swimlane are displayed in the selected color.
- If a card is now moved into the swimlane, it will automatically be colored as well.
-
Page:
-
Page:
-
Page:
-
Page: