The following workflow provides an overview of the basic knowledge about PLANTA's own configuration tool (PLANTA customizer) for creating and adjusting the user interface of PLANTA project.
The Project Tutorial provides technical basic knowledge of PLANTA project.
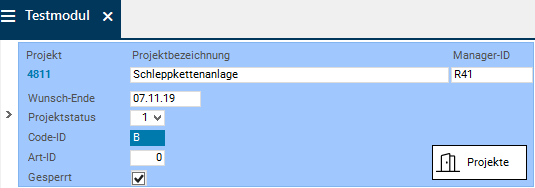
The screenshots used in this tutorial are mere examples of functions and their layout may deviate from the actual layout in the program.
Requirements
Basic requirements for carrying out this workflow are a substantial knowledge of the PLANTA software as well as of its structure, operation, and operating principles. For information on this, please refer to the Introduction and Operation help area.
General Customizing Information
Data Structure
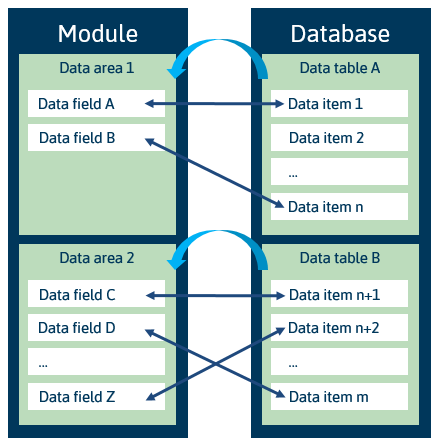
PLANTA project records are edited in data fields of the modules.
A module (MOD) consists of data areas.
A data area (DA)
corresponds to a data table (DT).
consists of data fields (DF).
A data field corresponds to a data item (DI).
A data item belongs to a data table.
The data items of a data table form a record.
Module details
A module
must have at least one data area assigned to it.
can have any number of data areas.
A data area
can be used multiple times, i.e. be assigned to several modules.
must have at least one data item assigned to it as a data field.
can have any number of data items assigned to it as data fields..
When you save, all the parameters of the source module as well as its subobjects (submodules, data areas, module variants) are copied to the new module.
Create Data Area
Objective
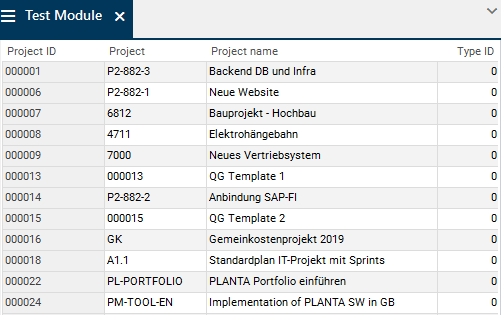
To create a data area for the newly created Test Module module.
Procedure
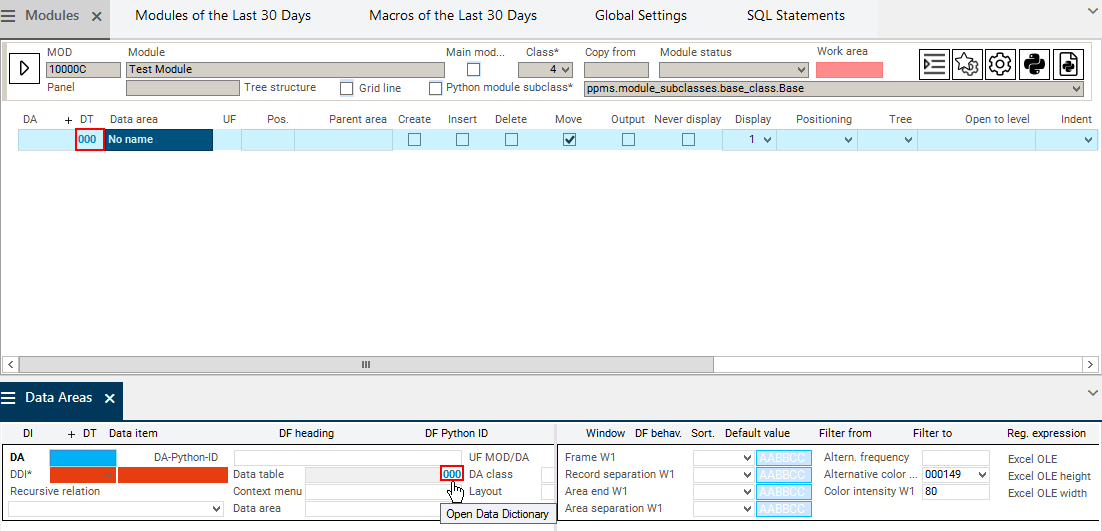
Right-click in the area of the new Test Module module in the Modules module.
Select Insert → Data area assignment from the context menu.
A blank data area record will be inserted.
Click on the No title link in the Data area field.
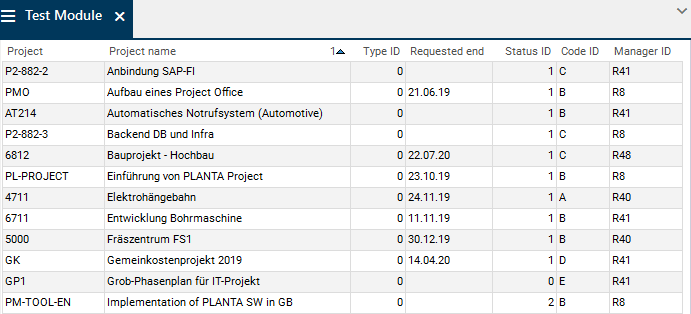
For the Project data table, enter value 461 in the DT data field or select the data table 461 from the listbox.
All data items of data table 461 Project are displayed.
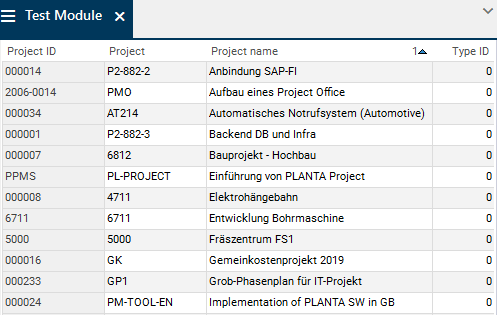
By clicking on a column heading, you can sortby that column.
Copy the ID number of the Project ID data item to the DDI data field in the Data Areas module by using Drag&Drop copy.
A new data area ID is created automatically.
Save.
Assign Data Fields to a Data Area
Objective
To assign data fields to the newly created data area
Procedure
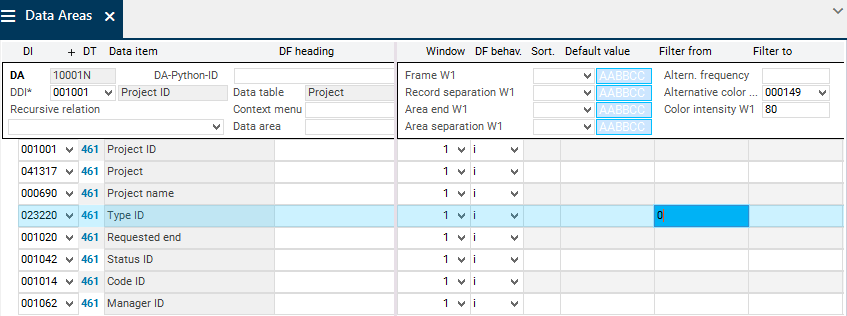
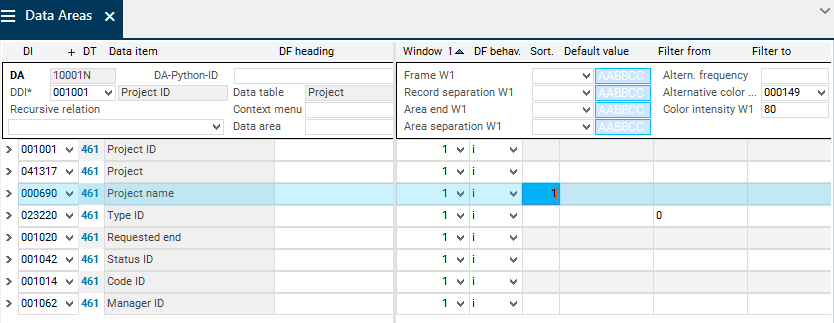
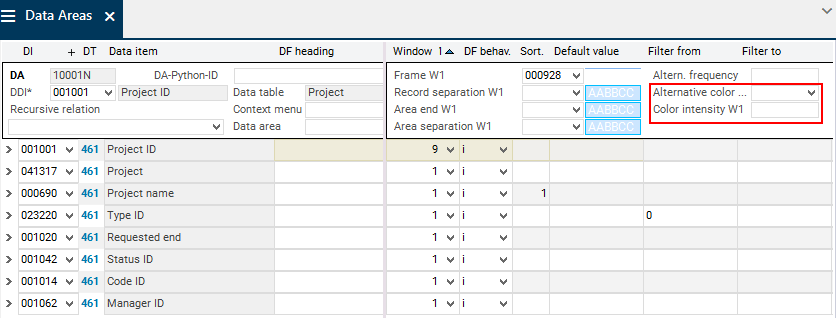
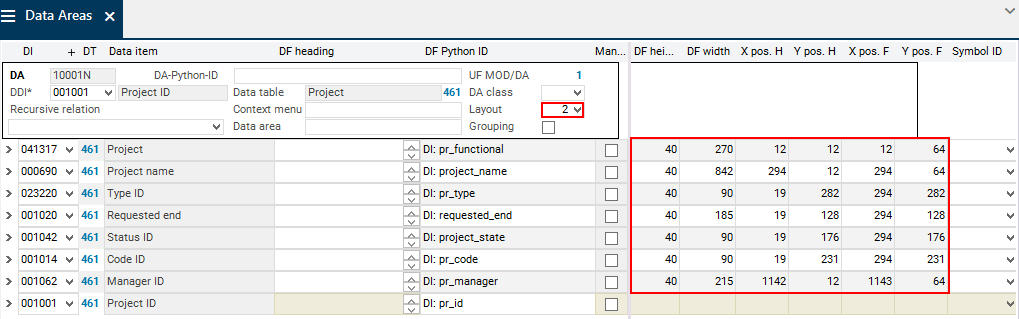
Insert a subordinate record for the data fields in the Data Areas module by right-clicking and selecting Insert → Data field.
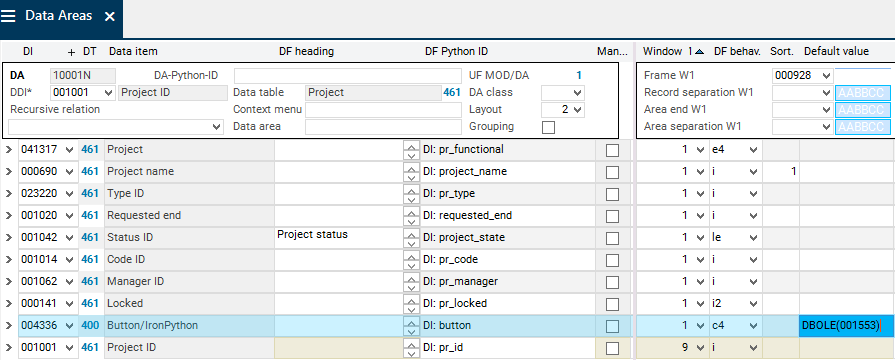
Copy the ID number (001001) of the Project ID data item to the inserted data field by using Drag&Drop copy or select it via the listbox in the DI field.
Activate the Project ID data item by clicking on it and insert seven more data fields by right-clicking or clicking on the Insertbutton in the toolbar.
Use Drag&Drop copyto copy the ID number of the following data items from DT461 Project in the Data Dictionary module to the DI field or select it via the listbox on the DI field.
041317 Project
000690 Project name
023220 Type ID
001020 Requested end
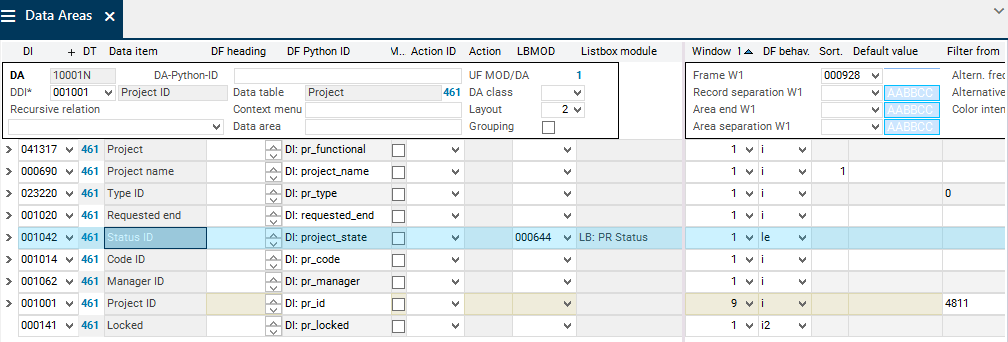
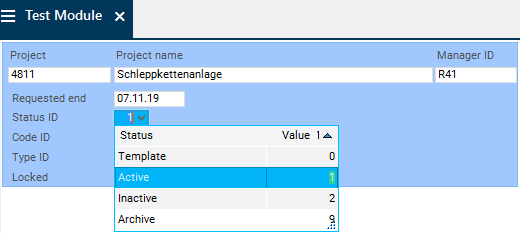
001042 Status ID
001014 Code ID
001062 Manager ID
The listbox contains all the data items from the data table to which the DDI also belongs.
Save.
Details
PLANTA project distinguishes between functional ID and technical ID.
They are both generated automatically when a project, proposal, idea, or program is created and are equal at that point.
The functional ID is visible in various modules and can be changed if required for certain reasons.
The technical ID must not be changed. It is not visible in the module and remains unchanged even if the functional ID is changed.
The technical ID is data item 001001 Project ID, the functional ID is data item 041317 Project.
Tip: Create a data area via a context menu command
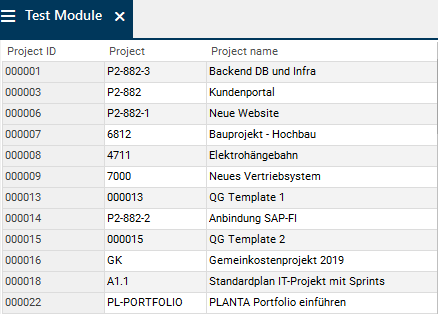
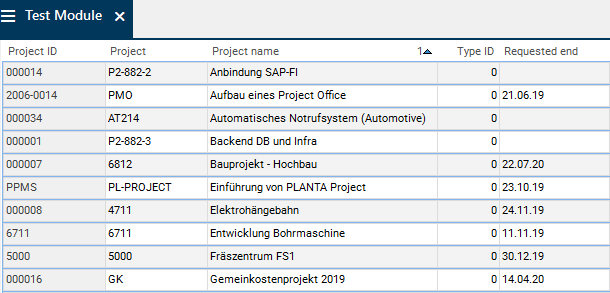
Click on the 000 link in the DT field in the Modules module.
All projects, plans, ideas, and requests that exist in the database are displayed with the assigned data fields.
Note
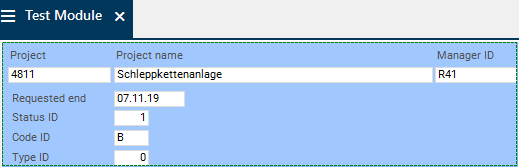
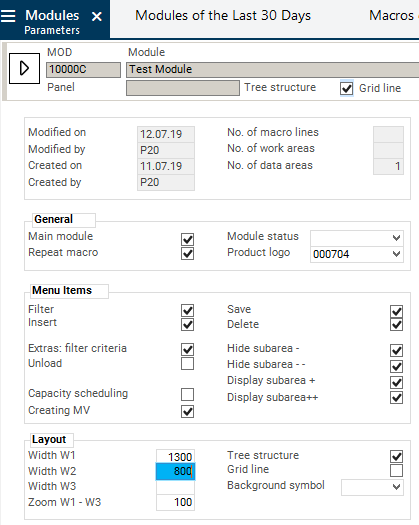
When the newly created Test Module module is opened, it is displayed as a submodule in the customizing panel. In order to open the module in its own panel, activate the Main module parameter.
The template contains the mod_obj.menu(11) command in the on_initial_focusPython function. This command refers to menu item 11 Insert, i.e. a blank project record is inserted when the module is opened. A project number can be entered in the record.
Since the Filter(menu item 12) function is to be executed instead of the Insert function when the module is opened in the macro, mod_obj.menu(11) must be replaced by mod_obj.menu(12).
Save via CTRL + S or by clicking on the menu item.
Module test
When you open the module the next time, all projects, plans, ideas, and requests are searched and displayed.
The Python macros can also be edited in an editor which can be opened via the Edit Python macro in editor button.
The editor is opened and the above mentioned macro can be copied in and edited.
Caution: In the py_editorglobal setting, the correct editor must be set, otherwise the following error messages will be displayed when you click on the button:
Please define an editor! or
Error executing python script: The system cannot find the specified file.
You can save these settings via Tools → Save module customizing or by clicking on the Save module customizing button in the toolbar and confirming the Do you want to save modifications in the base module variant? message.
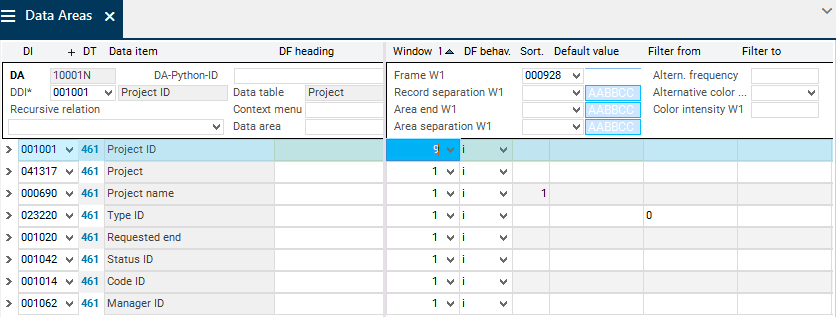
The tab sequences depend on the sequence of data field records in the Data Areas module.
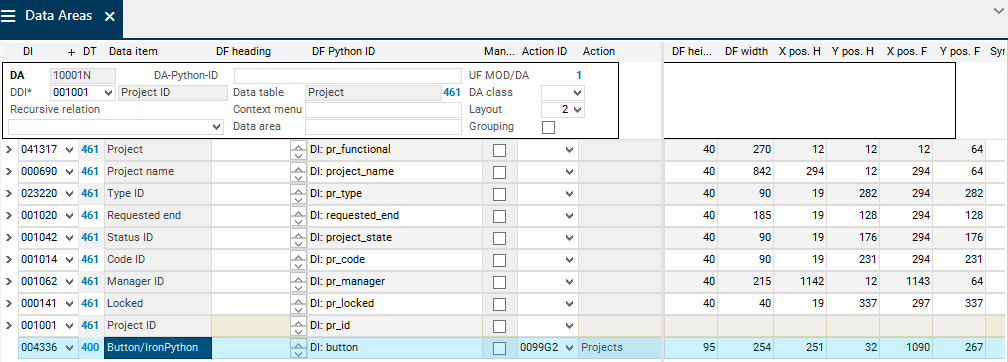
The X/Y positions, data field widths, heights, and headings can be edited manually in the Data Areas module; the corresponding parameters can be found in the Layout module variant.
Define Data Field Behavior
Checkboxes
Objective
To add a checkbox field with input option in the Test Module module
Procedure
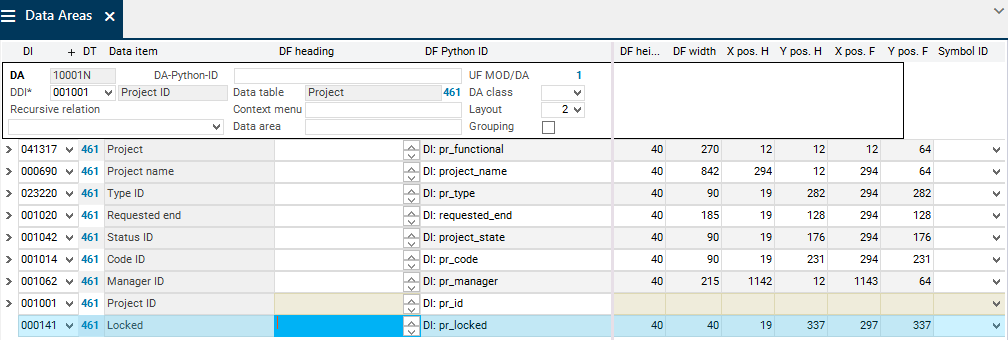
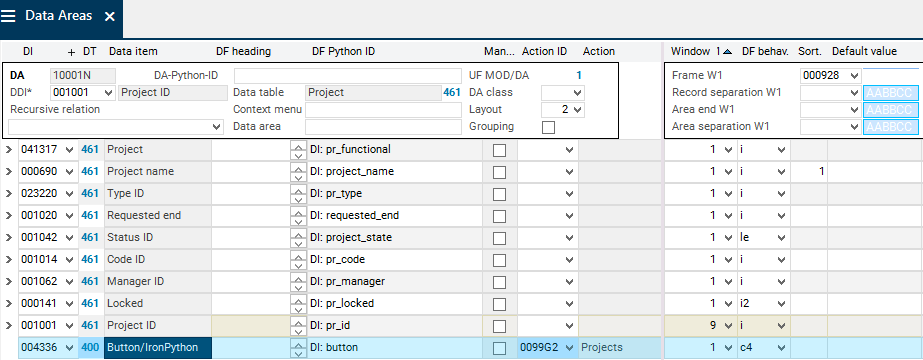
Open the Project data area.
Select a new data item (with Column type = Yes/No) from DT461Project, e.g. 000141 Locked, and add it to the data area.
In the DF behavior field, value i2 is automatically entered which means that the checkbox is an input checkbox.
If the checkbox is to be an output checkbox, select value o2 from the listbox.
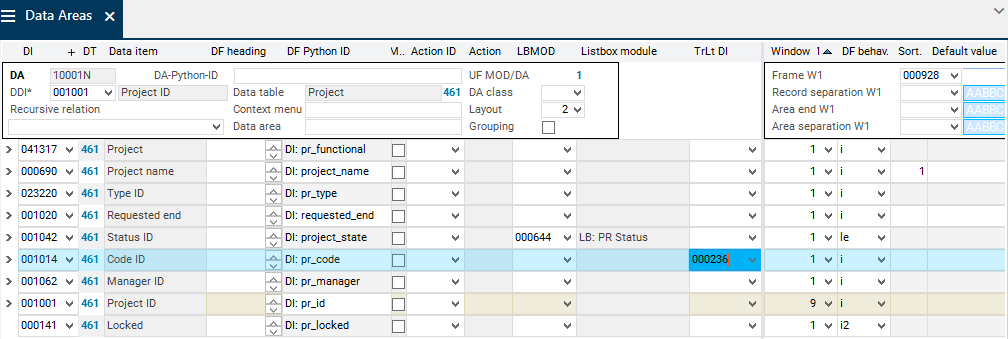
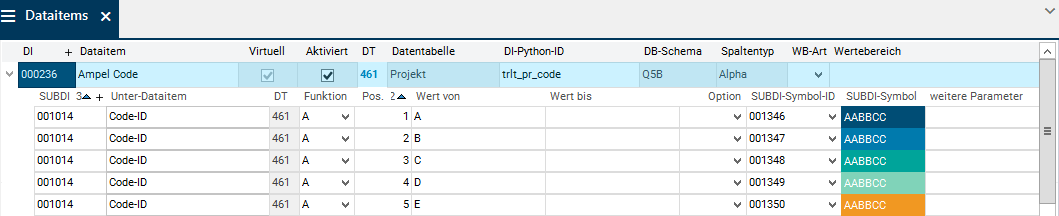
select a traffic light DI from the listbox, e.g 000236
or assign a traffic light DI if an individual one has been customized.
Save.
Notes
The data field to which the traffic light is assigned, and the traffic light DI itself, must originate from the same table. This must be considered when an existing or a newly customized traffic light DI is assigned.
Traffic lights can be assigned to all normal (including background) or projected data fields.
Traffic lights cannot be assigned to bars as the bar design already includes a type of traffic light function as part of its own construction. Traffic lights can, however, be used on auxiliary bar fields.
When all data fields in the data area (i.e. the entire record in the module) are highlighted in color, the traffic light needs to be set in all data fields.
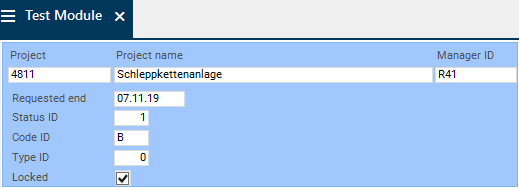
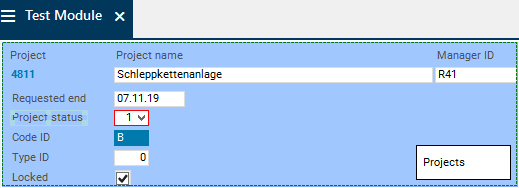
Module test
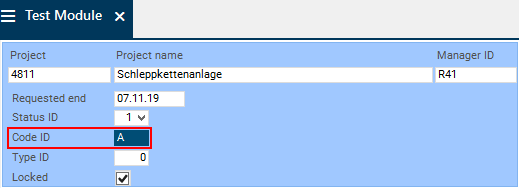
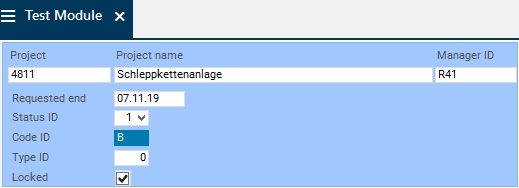
After you restart the module, the traffic light function is displayed on the Code ID data field.
To test the traffic light, you can also enter another project code in the Code ID field (e.g. “B”).
If an invalid value is entered (e.g. "b"), the field will be displayed without traffic light.
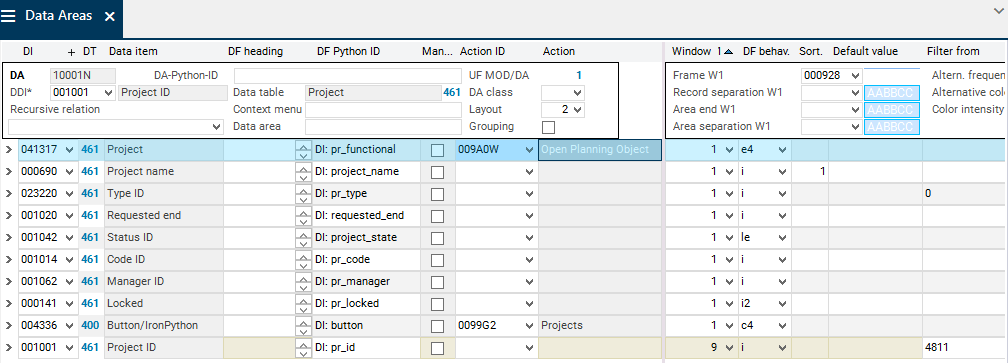
Enter a macro number in the Action ID parameter, e.g. 009A0W Open Planning Object. The module is opened via the macro. This macro defines which data is to be displayed in the module.
If you enter the ID of the module to be opened in the Action ID parameter (here: 0099JT), the module will be opened but no data will be displayed.
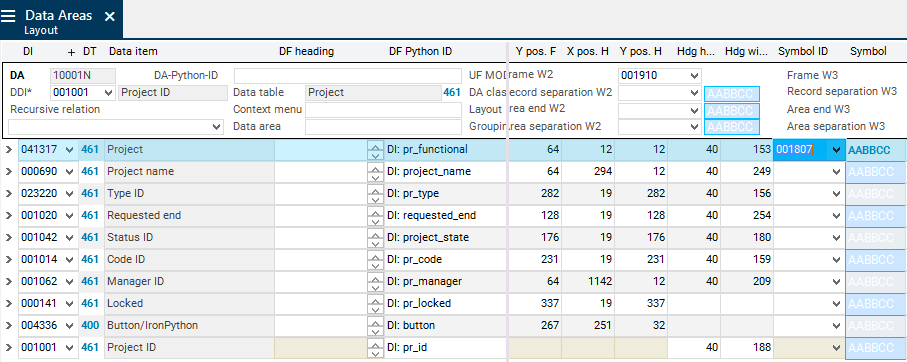
Define the Project data field as a link.
Switch to the Layout module variant and enter value 001807 in the Symbol ID parameter.
Switch back to the base module variant.
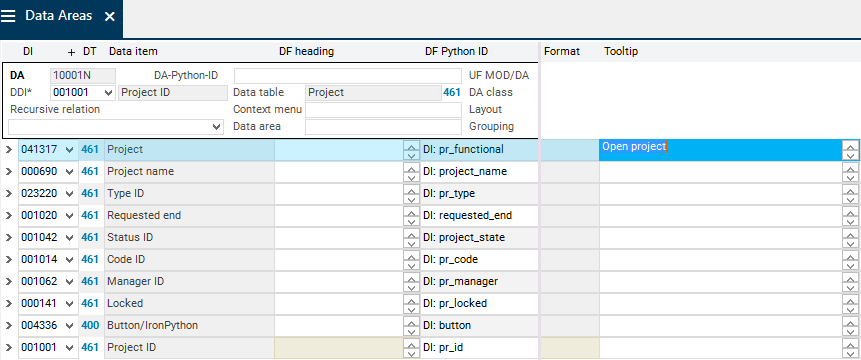
In the Tooltip parameter, enter the text which is to be displayed in the tooltip of the link.
Save.
Module test
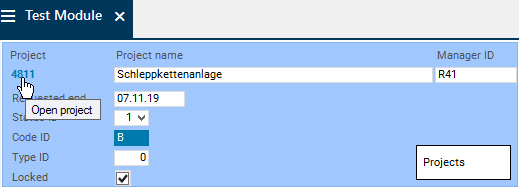
After you restart the module, the Project data field is defined and displayed as a link.
Click on the Open project link.
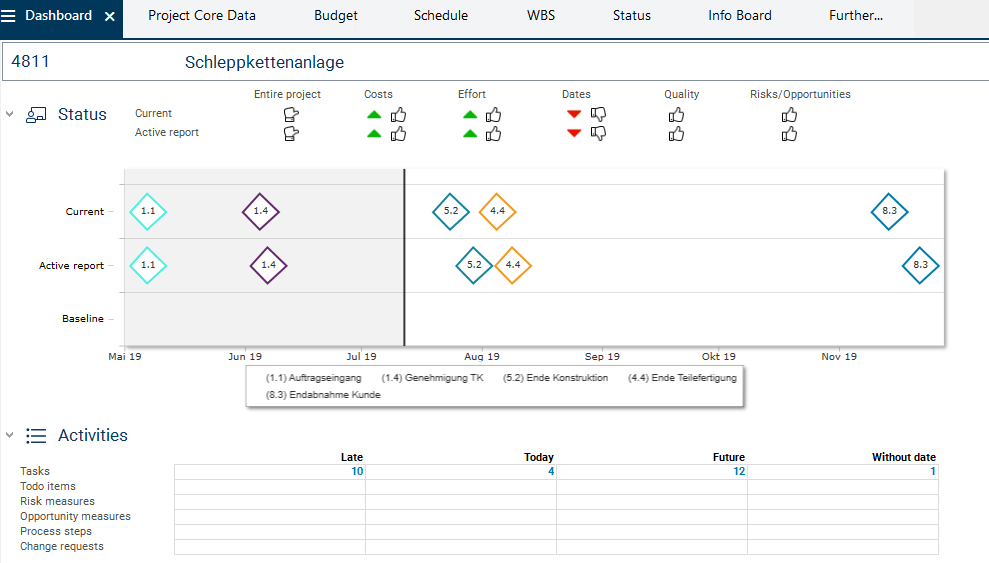
The Dashboard module is opened and the project data is displayed.
In the Test Module module the Status ID field is to be renamed.
Information
It is possible to use individual titles for data fields in each data area.
They are displayed in all modules in which the corresponding data area is used.
Procedure
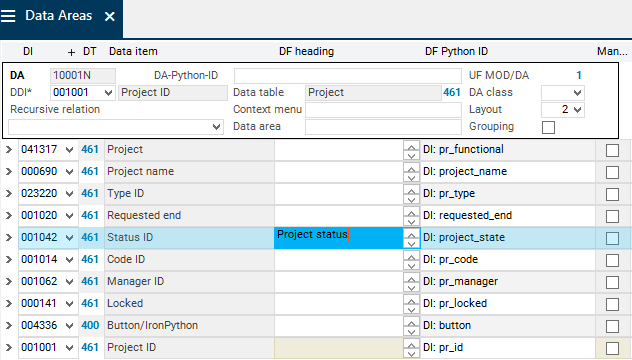
Open the Project data area.
Enter a new heading (e.g. Project status) in the DF heading parameter for the Status ID data field.
Save.
Module test
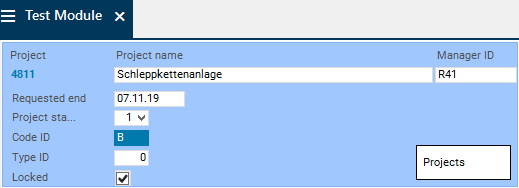
Restart the Test Module module.
Instead of Status, Project status is displayed as title.
Since the field now requires more space, you have to switch to customizing mode and adjust the size.
Save the changes via the Save module customizing button.
Embed OLE Objects
Embed Variable OLE Objects
Objective
In the Test Module module, an OLE is to be displayed on the button.
Procedure
Select the requested OLE object in the OLEs module and note down the ID.
Open the Project data area.
In the Project data area for DI004336 Button/IronPython in the Standard value parameter, enter the prefix DBOLE and the ID of the chosen OLE object in brackets, e.g.: DBOLE(001553).
Save.
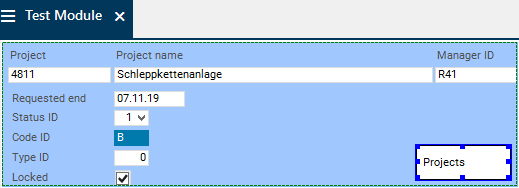
Module test
After you restart the module, the selected OLE object will be displayed on the button.
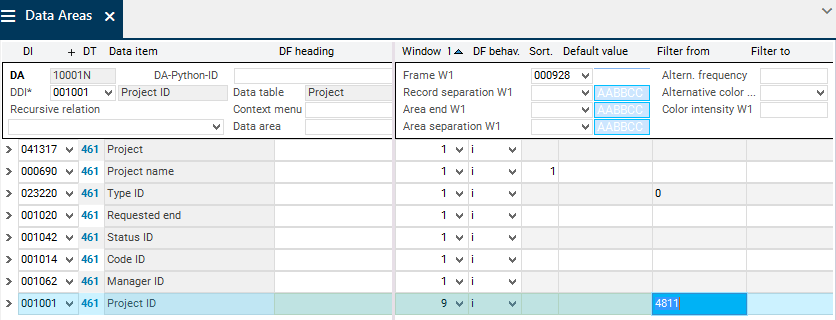
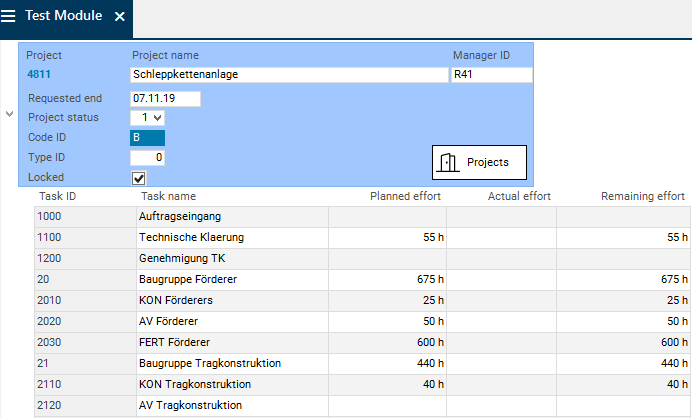
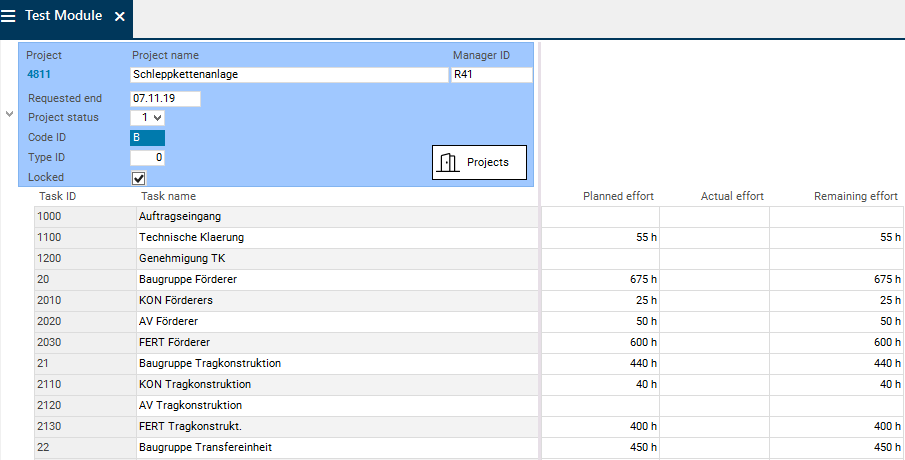
If the module is now opened, project 4811 will be displayed in the project area and the tasks of all projects will be shown in the task area.
The data areas must be structured so that only tasks of project 4811 are displayed in the task area.
Structure Data Areas
Objective
To have data of the Task data area displayed below the corresponding project
Procedure
At the moment, both areas are at the same level. They are to be structured in such a way that the new Task data area is subordinated to the Project data area.
To do so, drag the Task data area to the Project data area by using SHIFT + holding down the left mouse button and then release the mouse button. As a result, the Task area is subordinated to the Project area. In the Tasks area, value 1 is automatically entered in the Parent area field.
Save.
Note
You can also structure data areas by filling the Parent area parameter manually.
To do so, enter the Pos. of the higher level data area in the Parent area parameter of the data area that is to be subordinated.
Module test
Restart the Test Module module.
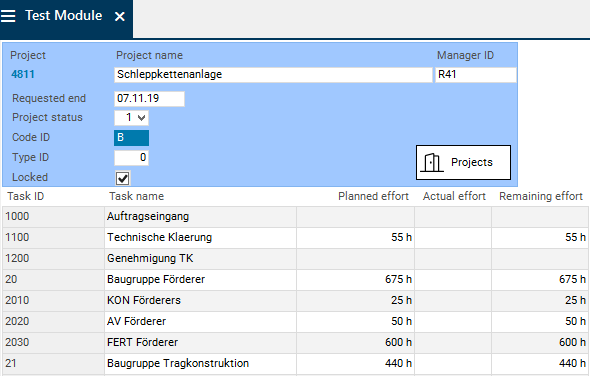
The Task area is displayed below the project form.
Data displayed in the Task data area belongs to the corresponding project.
Notes
Data areas can only be structured in a meaningful manner if they are connected via relations. This can either be achieved via a relation in the data table or via the Relation to recursive child area or Relation to parent area data fields.
If the data areas are structured incorrectly (i.e. the Pos. and Parent area parameters have been set incorrectly), the following message is usually displayed when you open the module: MCU: Unable to create search path..
If a module is technically correct, but incorrectly constructed with regard to application logic, the module provides incorrect data.
Example: If the Parent area parameter is not filled, all tasks (of all projects) will be displayed at the same level below the Project data area.
Show Tree Structure
Objective
In the Test Module module, the tasks of the project are to be displayed in a tree structure.
Due to the tree structure, tasks are indented below the project. As a result, the hierarchy (tasks are subordinated to the project) is visible.
Additionally, the arrow symbol is displayed in the project data area and can be used to display or hide the tasks.
Procedure
In the Tree field in the Modules module on the module data area assignment level for the Task and Project data areas, select in which window you want the arrow symbol to be displayed (here: 1).
In the Project data area, the arrow symbol is displayed and can be used to display or hide the tasks.
The project tasks are indented below the project.
Note
Tree structures for data areas with activated Next to parent area parameter and across several windows must be avoided in customizing as this leads to an incorrect display.
Split Data Fields Across Several Windows
Objective
In the Test Module module, the task effort data fields are to be displayed in window 2.
Procedure
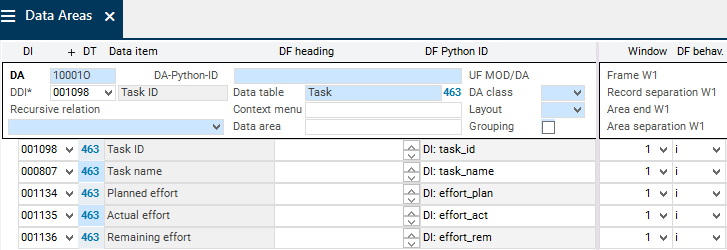
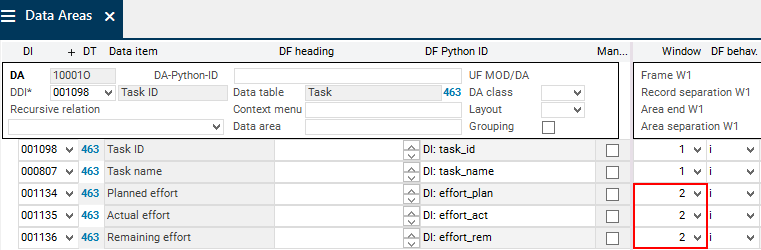
Open the Task data area.
For the Planned effort, Actual effort, and Remaining effort data fields, select value 2 in the Window field.
In the Modules module, select the Parameter module variant.
In the Width W2 field, enter a width for window 2, e.g. 800.
Save.
Note
In the user module, the window width can be optimized subsequently and saved via the Save module customizing menu item.
Module test
Restart the Test Module module.
The task effort data fields are displayed in window 2.
Customize Invisible Fields for Displaying
Objective
In the Test Module module, duration fields are to be assigned to the Task data area that is to be hidden when the module is opened but can be unhidden if necessary.
Procedure
Open the Task data area.
Assign data items to the data area from DT463 Task:
001131 Planned duration
001132 Actual duration
001133 Remaining duration
For the new data fields, select value 9 in the Window field.
Activate the DF options checkbox for the new data fields.
Save.
Module test
Restart the Test Module module.
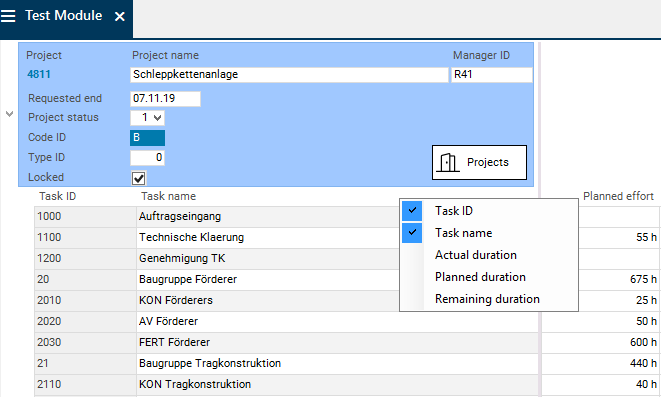
The new duration fields are hidden in the module.
They can be unhidden if necessary. To do so,
right-click on the heading of the requested (data field) column
set a checkmark next to the respective entry in the context menu. Here, checkmarks are set next to all three duration data fields.
The new columns (data fields) are inserted to the left of the column from which the context menu was opened.
Enable Creation, Insertion, and Deletion of Records in the Module
Objective
To enable the creation, insertion, and deletion for the Task data area in the Test Module module.
Procedure
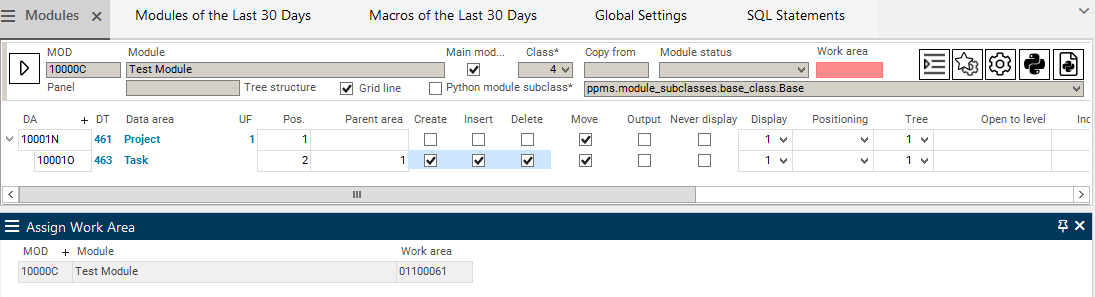
Set the following parameters in the Task data area in the Modules module:
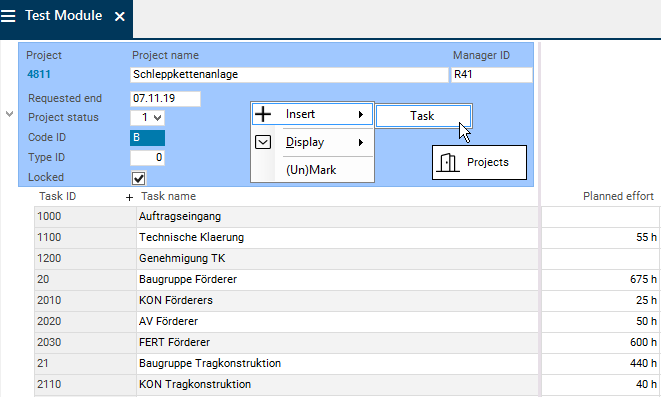
The Insert context menu is generated automatically and contains the following two parts:
The fixed Insert entry and
the table name (the decisive factor here is from which data table the DDI originates) of the data area(s); the second part may contain the following subparts:
The first section is always identical, regardless of the data area from which the context menu is opened. Here, the data area(s) of the highest level for which insertion is allowed are displayed.
Whether the second section will be displayed and which areas will be shown there depends on whether insertion is allowed for focused data areas and/or its child data areas.
The text displayed in the second subpart of the context menu (table name) can be edited by means of an entry in the Context menu text data field in the Data Areas module.
For the Project data area, the context menu looks as follows (the DDI originates from DT461 Project and the data area contains a Task subarea for which the Insert and Create parameters are activated): Insert → Task.
Module test
Restart the Test Module module.
Insert a new task via the Insert → Task context menu.
Allocate a name for the task.
Save.
Mark the task and delete it again via the button.
Assign Module to Work Area
Objective
The Test Module module is to be assigned to a work area.
Information
According to PLANTA project rights controlling, modules are not directly assigned to a user. This assignment is done via the assignment of a module to a work area, which is then assigned to a role, which is finally assigned to a user.
Procedure
In the Modules module, right-click and select Assign Module to Work Area.
Select the required work area in the Assign Work Area module (here: 01100061 Planning) from the listbox on the Work area field.
Save.
Note
After reloading, you can see how many work areas the module is already assigned to in the in the No. of work areas field in the Modules module. On this field, a traffic light is stored which signalizes whether the module has already been assigned to a work area (green) or has not yet been assigned (red).
By clicking on the link in the field or by selecting the Use module variant you switch to the module variant of the same name. There, the work areas and roles the module is assigned to are displayed.
Test assignment
Log in with the user the requested work area is assigned to via a role assignment (here: R8).
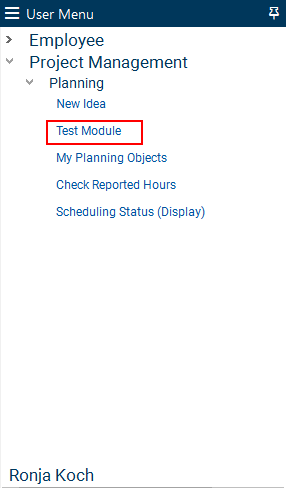
The Test Module module is visible in the user menu in the requested work area and can be opened.
Assign Submodule to Panel
Objective
To assign another module as a submodule to the panel in which the Test Module module is the main module.
Procedure
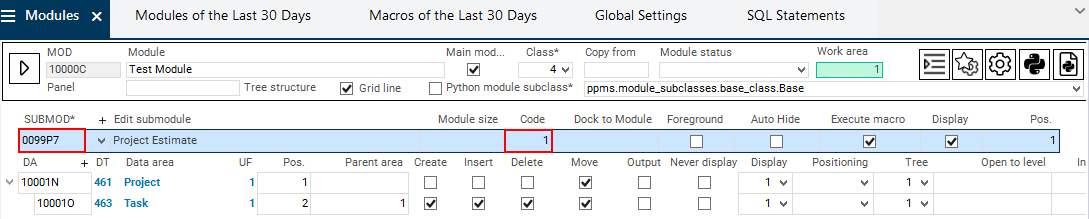
In the Modules module, insert a record for a submodule by right-clicking and selecting Insert → Submodule.
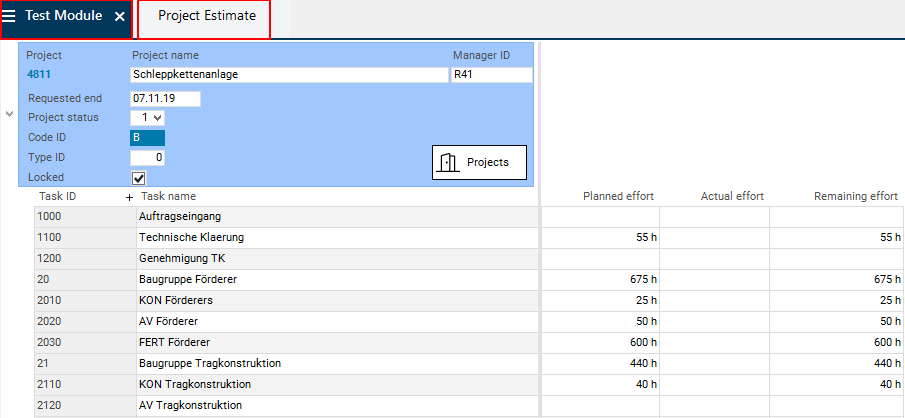
Enter the ID of the module which is to be added to the panel in the SUBMOD field, e.g. module 0099P7 Project Estimate.
Please take note of the descriptions below, however, do not carry out the procedure if you intend to proceed with the Customizing Tutorials for Level 2 and 3, since the procedure of these tutorials is based on the module created here.
In the MOD data field, enter the module ID number of the module to be edited.
Mark the requested data area via CTRL + click.
Click on the menu item button in the toolbar.
Only the data area assignment will be deleted, the data area itself will be retained. If it is not assigned to a module it is displayed in the Data Areas Without Assignments module and can be deleted either there or in the Data Areas module.
Notes
Before deleting a data area assignment, you must check whether the position of the data area is assigned to one or more subsequent data area(s) as a parent area.
After deleting a data area assignment, you should adjust the Pos. and Parent area data fields accordingly.