edit records by using arithmetical operations while copying via Drag & Drop, using PLANTA’s own Drag&Drop mimic.
PLANTA Drag&Drop
Copy: CTRL + left-click and drag to the required position while holding down the left mouse button and subsequently release the mouse button
Move: SHIFT + left-click and drag to the required position while holding down the left mouse button and subsequently release the mouse button
As an alternative, you can also use the arrow buttons as well as the page up/page down and Pos1/End keys.
If the position to which records are to be copied or moved is not visible, the bar scrolls to that area automatically when dragging with the mouse.
Drag & Drop Copying of Data
Video Tutorial
Information
Output and input fields may be used as a source for Drag&Drop operations.
You cannot copy to output fields.
The database type of source and target object determines whether you can copy from one object (field/column) to another.
You can, e.g., copy from a currency field to a text field, but not vice versa.
If copying is not permitted, the Unable to copy message will be displayed after you have released the left mouse button.
Field to Field
Objective
To copy an entry from one field to another.
Procedure
Drag the content of the source field to the target data field by pressing CTRL + holding down the left mouse button.
As a result, the source field is colored green and the destination field is colored blue.
The cursor display is changed and the copying type is graphically displayed.
As soon as the cursor is on the target field, release the left mouse button.
The value of the source field is copied to the target data field.
Note
The Field to Field copy type is set by default.
If you have changed the copy type while copying, you can change to the Field to Field type again using the Edit → Drag&Drop copy →Field to field menu item or via shortcut CTRL + 1.
You cannot only copy field content between records within a module but also between two modules.
You can copy, e.g., the resource ID from the Resource Structure module to the Resource Data Sheet module.
Field to Column
Definition
It is distinguished between data logical and layout related columns.
A data logical column contains the same data field in all records of a data area.
In the horizontal layout, a visual column is equivalent to a data logical column.
Compare: columns in Microsoft Excel.
In the vertical layout, a line is equivalent to a data logic column (the record is a column here).
In forms there are no visual lines or columns. A data field in all form records is equal to a data logic column.
The following examples are explained on the basis of a module with a horizontal layout.
Objective
To fill the marked fields in a column with a particular value.
Result: Task 1 is marked in bold and hence visualized as summary task.
Click on the Generate WBS code button next to the project name.
Result: The new structure is displayed.
Outdent
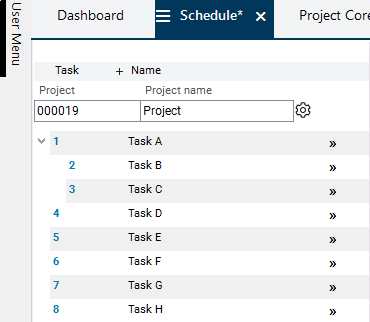
Task 1.1 is to be outdented (it is no longer to be a child of task 1).
You can outdent the task by moving the child record above or below the required parent record. A parent record can be the parent record of the required child record or every other parent record, depending on the position to which the child record is to be moved.
The task is placed at the position to which it is moved with the mouse.
By pressing SHIFT and holding the left mouse button, drag task 1.1 above task 3 so that a dark blue line appears above task 3.
Release the left mouse button.
Result: Task 1.1 is positioned on the highest level above task 3. Thus, it is no longer a child of task 1.
Click on the Generate WBS code button next to the project name.
Result: The new structure is displayed.
Moving without Structuring
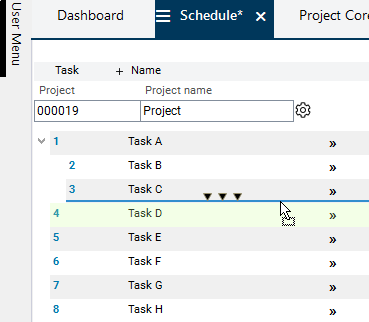
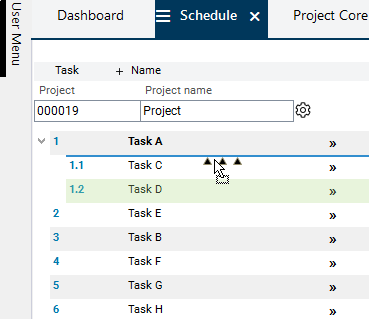
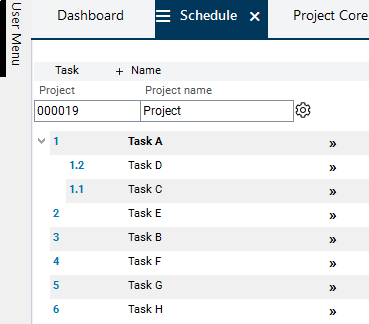
Task 1.2 is to be positioned above task 1.1.
By pressing SHIFT and holding the left mouse button, drag task 1.2 above task 1.1 so that a dark blue line appears above task 1.1.
Release the left mouse button.
Result:
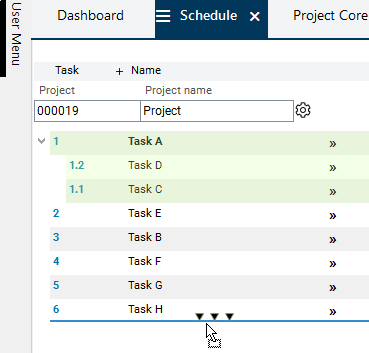
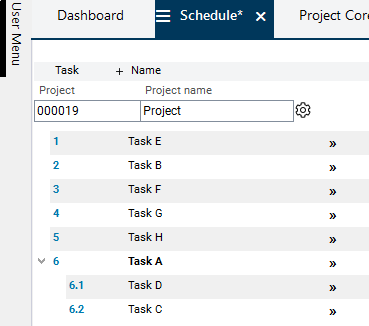
Summary task 1 and its children are to be positioned below task 6
By pressing SHIFT and holding the left mouse button, drag task 1 below task 6 so that a dark blue line appears below task 6.
Release the left mouse button.
Result:
Save and click on the Generate WBS code button below the project bar.
Result: The new structure is displayed.
Copy
Notes
When records are copied, the IDs of the target objects will be newly created.
Other IDs in the target object may be adjusted too.
Values of the output fields are not included when copying.
Values of the source object input fields, also those of hidden input fields, will not be included when copying.
Only visible records will be copied. I.e. if you copy a record that has some of its child records hidden in the module via filter criteria, only the visible child records will be included.
Structure by copying
Information
In order to copy entire records, the following setting must be made:
Select Edit → Drag&Drop copy → Record/s in the menu bar or use the CTRL + 4 shortcut.
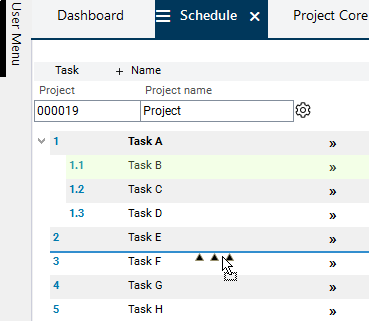
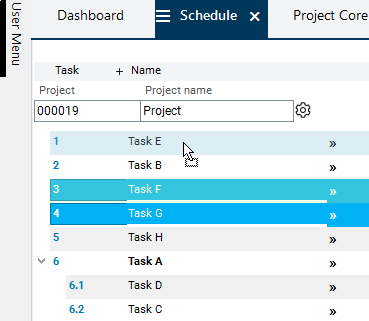
Copies of tasks 3 and 4 are to be created and to be subordinated to task 1 at the same time
Mark tasks 3 and 4 and drag them to task 1 by pressing STRG + holding down the left mouse button.
Release the left mouse button.
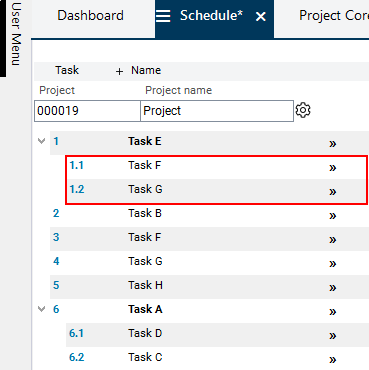
Save and click on the Generate WBS code button.
Result: Tasks 1.1 and 1.2 have been created automatically with data from tasks 3 and 4 and have been assigned to task 1.
Furthermore a copy of task 5 is to be created and to be subordinated to task 1 as well.
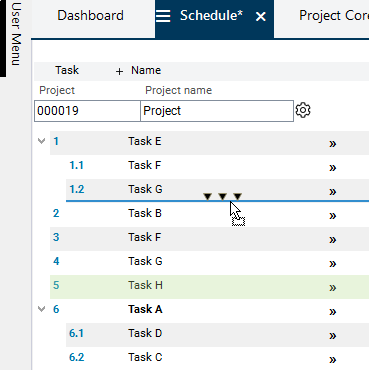
Drag task 5 below task 1.2 by pressing CTRL and holding down the left mouse button.
Release the left mouse button.
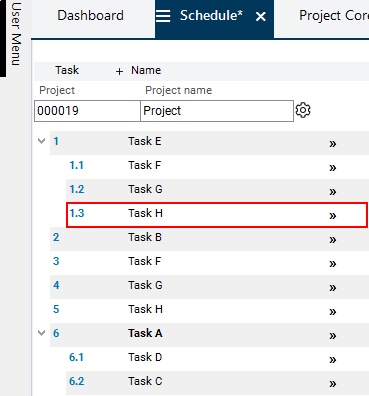
Save and click on the Generate WBS code button.
Result: Task 1.3 has been created automatically with data from task 5 and has been positioned below task 1.2.
Save and click on the Calculate schedule button in the toolbar.
Result: Parent task 5 is displayed in bold.
Copying without Structuring
Information
In order to copy entire records, the following setting must be made:
Select Edit → Drag&Drop copy → Record/s in the menu bar or use the CTRL + 4 shortcut.
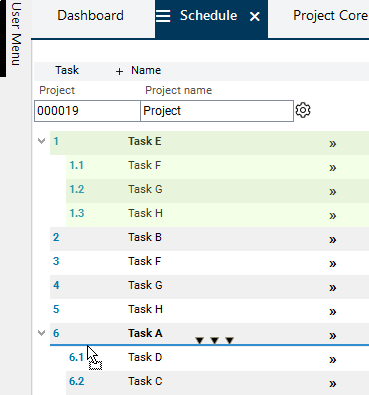
A copy of summary task 1 should be created and positioned below task 6 too.
By pressing CTRL and holding the left mouse button, drag task 1 below task 6 so that a dark blue line appears below task 6.
Release the left mouse button. If CTRL is released too soon, the record will not be not copied.
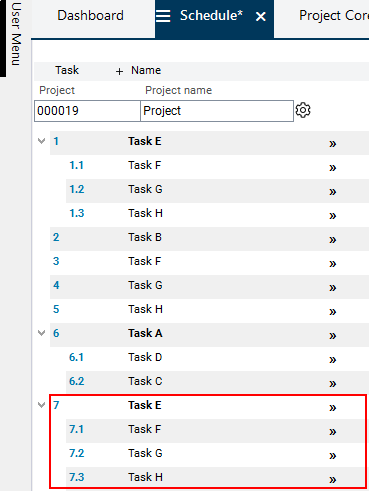
Save and click on the Generate WBS code button.
Result: Task 7 is created with the data from task 1 and positioned below task 6.
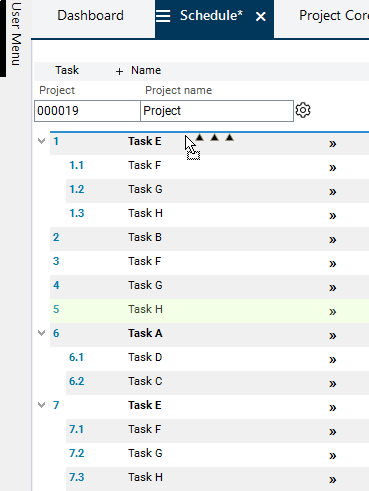
A copy of task 5 should be created and positioned below task 1 as well.
Drag task 5 above task 1 while pressing CTRL and holding down the left mouse button, so that a dark blue line appears above task 1.
Release the left mouse button.
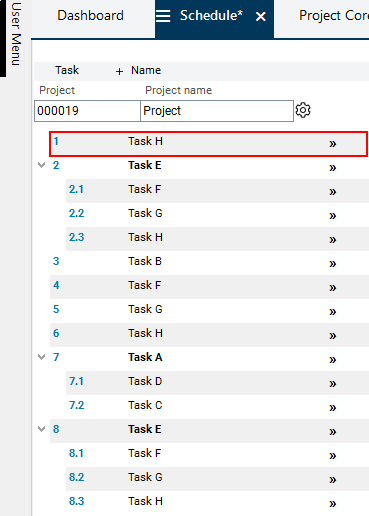
Result: A new task has been created with the data from task 5 and has been positioned above task 1.
Save and click on the Generate WBS code button.
Result: Due to its top position, the new task becomes task 1.
JavaScript errors detected
Please note, these errors can depend on your browser setup.
If this problem persists, please contact our support.