General Information on Printing
Information
- You can print modules in the following formats:
- A4 (portrait or landscape format)
- A3 (portrait or landscape format)
- Print layout
- The following objects are not visible in print preview and print layouts:
- Buttons
- Calendar control symbols
- Highlighting saved changes using color
- Tree structure symbols (grid lines and +/- symbols)
- Listbox symbols
- Scroll bars
- Continuous text fields are displayed in a way that the entire text is visible even if the continuous text fields have a fixed height in the module.
- The following objects are not visible in print preview and print layouts:
Tip
- In order to increase the quality of effects (e.g. background gradients) you have to set the grid mode in the printer to super fine.
Notes for customizers
- In module customizing in the Other Module Parameters module, the customizer presets print parameters for each module, e.g. Paper format, Margins etc. and defines which print areas (header and footer) a particular module contains.
Print from a Module
Procedure
- Open the required module.
- If necessary, change the print settings (e.g. printer, page number, etc.) via the Data → Print via options menu item or pressing CTRL + P.
- Initiate the print process
- by clicking on the Print directly button in the toolbar or
- via the Data → Print directly menu item.
- During printing, the following message will be displayed: Page x of print y: Module name:
Print Preview
Information
- The print preview will be displayed in a separate panel. This panel only contains the print preview with the corresponding toolbar.
- The customizer can use the Toolbar parameter to define which buttons are displayed in the toolbar.
Procedure
- Open the required module.
- Switch to the print preview via the Data → Print preview menu item.
Details
- You cannot switch back to the module while the print preview/page break preview is open.
- If you want to, e.g., display additional columns, you will have
- to close the print preview/page break preview,
- to display columns, and
- to open the print preview/page break preview again.
Print Preview Functions
Information
- The functions described below are available in a toolbar intended for print and page break preview.
- The toolbar is opened along with the print or page break preview via the Data → Print preview and Data → Page break preview menu items.
- Some zoom functions are not available via toolbar buttons but only via shortcuts.
| name | Button | Shortcut | Description |
|---|---|---|---|
| Print directly |  | Sends the module data with the current settings to the printer. | |
| Print via options |  | CTRL + P | Here you can change print options before printing. |
| Edit Margins |  | Shows the margins as continuous lines which can be dragged to the required position with the mouse. Further information. This menu item is only available in print preview. | |
| Text Marker |  | Marks the required area in the print preview like a text marker. Further information. This menu item is only available in print preview. | |
| Insert Comment |  | Inserts a comment in the required area in the print preview. Further information. This menu item is only available in print preview. | |
| Zoom = 100 % |  | CTRL + 0 | Zooms the module content to 100 %. |
| Zooms to page width |  | Zooms the module content to page width. | |
| Zoom + |  | CTRL + scroll up with the mouse | Enlarges the module content. Margins, header and footer remain unchanged. When you use this type of zooming, you can spread the module content over several pages and the number of pages may vary. |
| Zoom - |  | CTRL + scroll down with the mouse | Reduces the module content. Margins, header and footer remain unchanged. When you use this type of zooming, you can change the splitting of the module content over several pages and the number of pages may thus vary. |
| Zoom |  | You can enter the required zoom degree. The displayed value is refreshed automatically if you zoom using the Zoom + or Zoom -buttons. | |
| Format |  | Here, the required paper format can be selected from the listbox. The changed format immediately becomes visible.
| |
| Portrait/landscape format |  | Switch directly between portrait and landscape format. | |
| Reset changes |  | All changes made to the print preview with regard to zoom, margin width, etc., will be reset to their default settings. | |
| Extend module title |  | Extends the module title.
Notes
| |
Open PLANTA Online Help | Opens the Print page of the PLANTA Online Help which contains information on printing and on print and page break preview. |
Further Zoom Functions of the Print Preview
| Zoom Function | Key combination | Description |
|---|---|---|
| General zoom | ALT + scroll | Zooms the entire page, comparable to MS Word Zoom. |
| Horizontal scale zoom | SHIFT + scroll | Enlarges or reduces the time scale and all objects below the time scale horizontally. This will change the scale and possibly the interval of the time scale. When you use this type of zooming, you can spread the module content over several pages and the number of pages may vary. |
| Vertical scale zoom | CTRL + SHIFT + scroll | Enlarges or reduces the histogram scale and all objects in the histogram scale vertically. As a result, the scale is changed. When you use this type of zooming, you can spread the module content over several pages and the number of pages may vary. |
Special Functions of Print Preview
Information
- All changes performed using the following functions can be reset via the Reset changes menu item.
Pen
Procedure
- Switch to the print preview via the Data → Print preview menu item.
- In the toolbar, click on the Pen button.
- Mark the required area in the print preview like with a pen.
- Deactivate the menu item again by clicking on the button once more.
Example

Text Marker
Procedure
- Switch to the print preview via the Data → Print preview menu item.
- In the toolbar, click on the Text marker button.
- Mark the required area in the print preview like with a text marker.
- Deactivate the menu item again by clicking on the button once more.
Example
Insert Comment
Procedure
- Switch to the print preview via the Data → Print preview menu item.
- In the toolbar of the print preview, click on the Insert comment button.
- Click on the required area in the print preview.
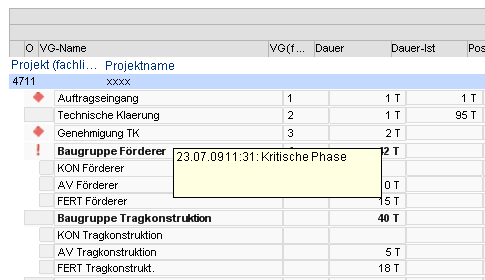
- A text field with a time stamp will be displayed.
- Insert a comment.
- Deactivate the menu item again by clicking on the button once more.
Example

Note
- If you have activated this menu item, you can delete a non-activated comment by right-clicking on it.
Edit Margins
Procedure
- Switch to the print preview via the Data → Print preview menu item
- In the toolbar of the print preview, click on the Edit margins button.
- The margins are displayed as continuous lines.
- Drag the lines to the required position using the mouse.
- Deactivate the menu item by clicking on the button once more.
Note
- The margins can be defined and changed in the Other Module Parameters in the Margin: Left, Margin: Right, Margin: Top, Margin: Bottom fields.
Page Break Preview
Information
- The page break preview will be opened in a separate panel. This panel only contains the page break preview and its corresponding toolbar.
- The customizer can use the Toolbar parameter to define which buttons are displayed in the toolbar.
- In the page break preview, only the main print area (module content) is displayed.
- When you open the page break preview, page breaks will be set automatically.
- They can then be changed manually by the user.
Details
- You cannot switch back to the module while the print preview/page break preview is open.
- If you want to, e.g., display additional columns, you will have
- to close the print preview/page break preview,
- to display columns, and
- to open the print preview/page break preview again.
Page Break Preview Functions
Information
- Functions which are available for both print and page break preview via the menu items or shortcuts can be found in the Print Preview Functions and Page Break Preview chapters.
Special Page Break Preview Functions
Automatic Page Breaks
Information
- Automatic page breaks are set as soon as
- records do not fit on one page.
- the Page break parameter is activated in the customizer.
- a record and the manual page break line overlap.
- In order to change automatic page breaks in the print preview,
- drag the page break line (blue) to the required position.
- Both horizontal and vertical page breaks are allowed.
- If the text in continuous fields is longer than the field itself, the field will be enlarged to the size of the text in the print layout.
- If the continuous field does not fit on one page in the print layout, a horizontal page break will be set automatically.
Change Column Width
Information
- You can change the column width of data fields in the page break preview.

