The objective of this tutorial is to show users with administrator rights how to register employees in the PLANTA system and enable them to work with the PLANTA software.
Information
In order for the employees of a company to be able to work with the PLANTA software, the administrator must register and define them in the program as persons, users, resources, and stakeholders.
All modules that are necessary for entering and managing employee data and rights can be found in the Users, Roles, Resourcesmodule panel which belongs to thePM Administrationrole. For the creation of resource data, multi-project management rightsare required.
Notes
All exercises are based on the PLANTA demo data. This demo data must be installed beforehand.
The screen shots used in this tutorial are mere examples of functions and may differ from the actual layout in the program.
Create Persons
Task
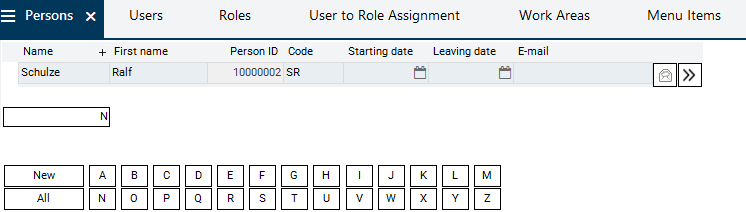
Create the new employee, Ralf Schulze, as a person in PLANTA project in order to enable him to work with the program.
Information
Persons are basic elements in the PLANTA software.
Procedure
Log in with user R41.
Open PM Administration → Master Data in the user menu.
The ID of the new person is generated automatically as soon as you have filled one of the above-mentioned fields and jumped to the next field.
Save.
Result:
Create Person Attributes
Task
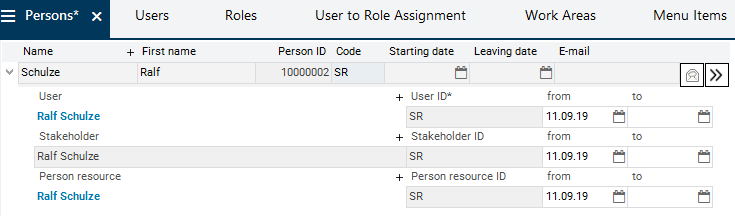
Assign a user name to Ralf Schulze so that he can log in to the program.
Furthermore, Ralf Schulze has to be defined
as a stakeholder so that he can join project teams and
as a resource so that he can be scheduled into projects and report the hours he worked to the appropriate projects.
Information
In PLANTA, three person attributes must be defined for each person:
User: required for the respective person to log in to the PLANTA program
Stakeholder: required for assembling project teams
Person resource: required for assigning the respective person to a project as a resource
Procedure
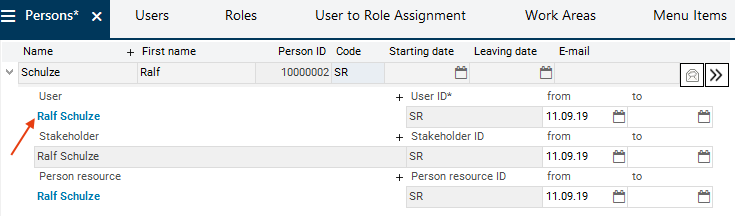
In the Persons module, click on the Create person attributes button in the data record for Ralf Schulze and save.
Three attributes (User, Stakeholder and Person resource) and the corresponding code are automatically assigned to the person of Ralf Schulze.
The code for all three attributes is the same as the person code.
Define a Person as a Resource
Task
Although Ralf Schulze has been given a resource code when the classifications were created, this is not sufficient in order to schedule him into projects as a resource. Further settings are required.
Define Ralf Schulze as a resource.
Procedure
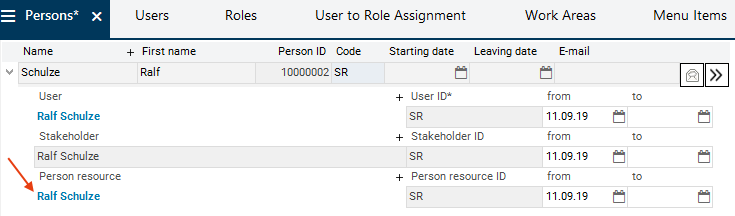
In the Persons module, in the person resource data record for Ralf Schulze, click on the link on the name in the Person resource field.
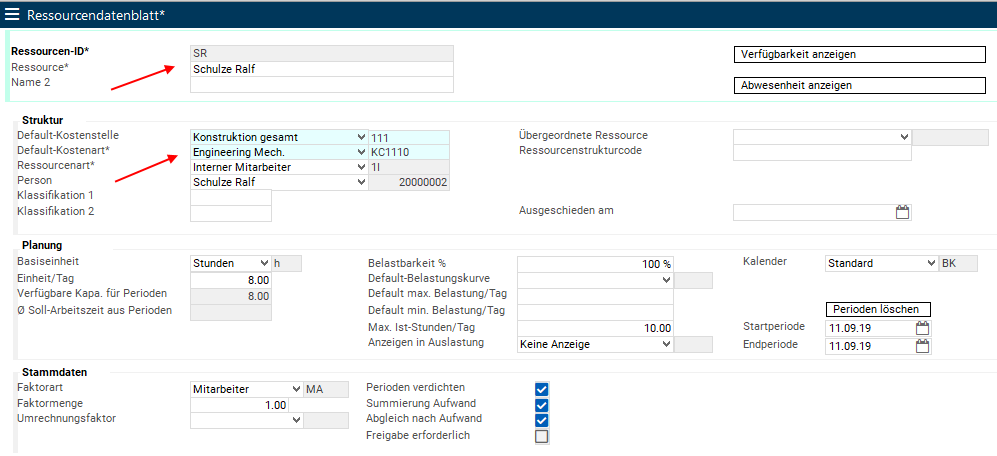
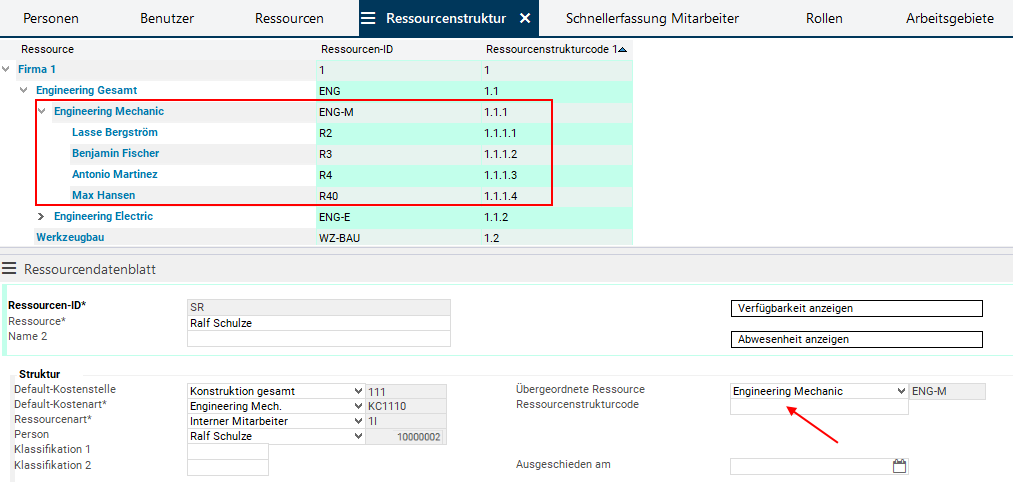
Now, the new resource must be included in the existing structure and the resource structure code must be defined for it. The resource structure code is required for controlling resource access in PLANTA project.
To see the existing resource structure, activate the Resource Structure tab.
Ralf Schulze is to be included in the Engineering mechanics department. To do so, select this resource in the Parent Resource field in the Resource Data Sheet.
Enter the code of the parent resource in the Resource structure code field and define the order of the resources in the department by specifying an additional digit; in this case: 1.1.1.5
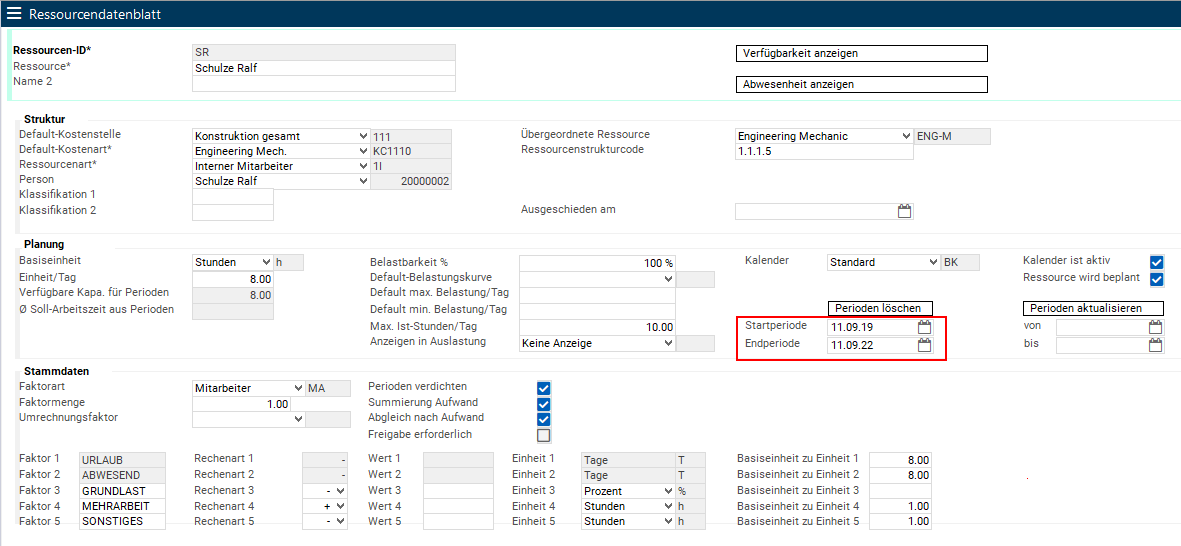
When you open the module, Start and End period will automatically be preset with today’s date and must be adjusted according to the definition of the resource planning horizon.
Additional specifications can be added at a later point in time if required.
Details
By clicking on the Display availability button you switch to the Availability module, where the resource's availability per day can be defined.
Define User Data
Note
The user data of the persons is not defined and edited directly in the Persons module, but in the Users module.
To define and edit user data, click on the link on the name in the User field in the user data record of the corresponding person.
As a result, you switch to the Users module and go directly to the record of the required user.
User Password
Note
Ralf Schulze, the newly created user, requires a password in order to be able to log in to the program.
When creating a user, a blank default password is saved in the data base.
Upon his/her first login, the user must immediately replace it by a proper password. Only then can the user log in to the system again.
If blank passwords are not allowed for security reasons, the administrator can alternatively create a temporary password for each new user. This temporary password must be entered when logging in for the first time and must immediately be changed by the user as well.
Assign Roles to the User
Task
In company X, Ralf Schulze is to assume the role of project manager for project Y.
To be able to do this, the project manager role must be assigned to Ralf Schulze in PLANTAproject.
Information
Via the role assignment the user is given access rights to certain objects (modules or menu items that have been grouped into work areas).
At least two roles have to be assigned to each user. One of them controls access to menu items and the other(s) control(s) access to modules.
The standard roles defined by PLANTA are included in the scope of supply of the software. They can be modified or adjusted according to individual company requirements, or individual roles can be created in the Roles module.
Please read this information carefully as the following tasks presuppose your understanding of the PLANTA role and rights concept.
Procedure
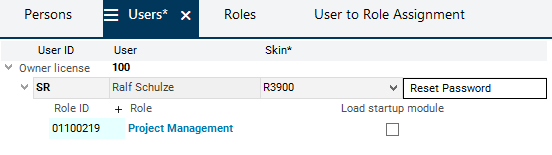
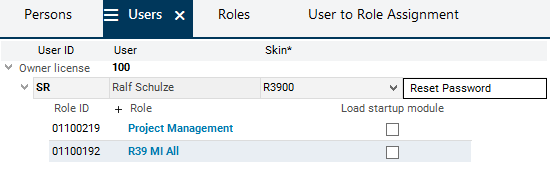
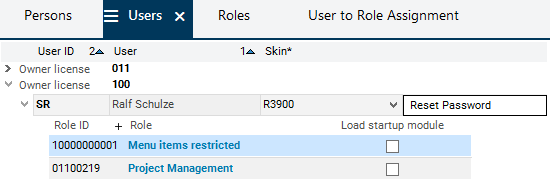
In the Users module, right-click on the user data record of Ralf Schulze and select Insert → Role.
A role record is inserted.
Select the role of the project manager (01100219 Project Management in the standard system) from the listbox in the Role ID field.
Insert another role record and select one of the standard roles for menu items, e.g. 01100192 R39 All MI, from the listbox.
The assignment of a menu item role to each user is mandatory. Without such a role, the user is unable to start the program. When attempting to log in with a user who does not have access to menu items, the following message is displayed: IEmenu_send(): menu items couldn't be fetched. Closing application. (See log file for further information).
Save.
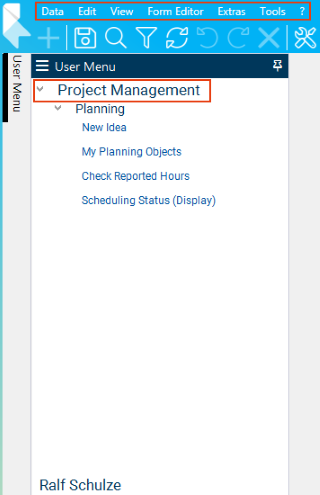
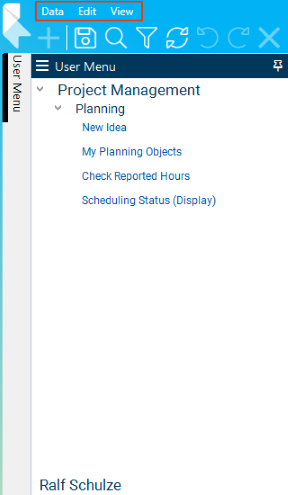
After Ralf Schulze has logged in to the system, he can see the menus that have been assigned to him and the corresponding menu items in his menu bar. In his user menu, he can see the role assigned to him.
Note
In case the PLANTA standard roles Project Manager and R39 MI All do not meet with the requirements of company X, the user with administration rights can create new roles.
Right-click and select Insert → Work Area, then select the required work area from the listbox.
Save.
Standard work areas are available for selection. If an individual work area is to be assigned, it must first be created and defined in the Work Areas module.
In the Work Areas module, only new work areas for modules are created and compiled. New work areas for menu items are created in the Menu Item module. For further information, please refer to the Restrict Access to Menu Items chapter.
Automatically, a blank work area record appears.
Assign a name to the new work area in the Work area field.
After you have confirmed your input, a number is generated automatically in the Work area ID field.
Select the GR module grouping value from the listbox in the Category field.
Assign modules to the work area. For this purpose:
Right-click on the work area record and select the Insert → Module command.
The module data record is inserted.
Select the number of the required module from the listbox in the MOD field or enter it manually.
The listbox only shows modules which were recently created by the user.
Save.
Assign further modules to the work area in this way.
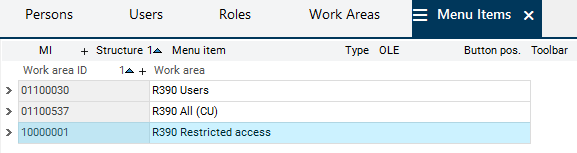
Restrict Access to Menu Items
Task
The multi-project manager of company X thinks that Ralf Schulze should only have access to certain menu items, namely the Data, Edit and View menu items. He therefore wants Ralf Schulze’s access to menu items to be changed.
For comparison: Previously, Ralf Schulze also had access to the Form editor, Extras, Tools, and ? menu items.
In doing this, a new work area is automatically created and all records (in this case menu items) are copied from the source work area to the new one. Roles assigned to the source work area are not copied.
Assign a name to the new work area, e.g. R39 Restricted access.
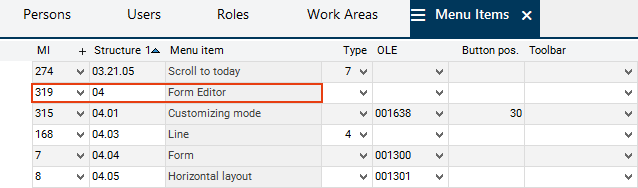
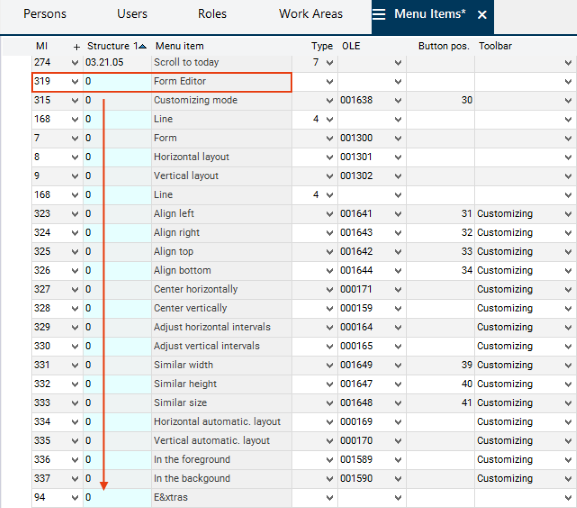
In the new work area, menu items can be deleted or deactivated according to requirements. There are two options for deactivating menu items:
Normal menu items
are hard-coded and cannot be deleted from the work area.
In order to deactivate these menu items, enter 0 in the Structure field.
Menu items for calling up macros and modules (marked with the number 0001).
can be created and deleted individually per work area or be deactivated like normal menu items.
To deactivate them, enter 0 in the Structure field or delete the menu items from the work area.
Consequently, in the case of Ralf Schulze, enter 0 in the Structure field for all menu items starting from Structure number 04 (menu item 319 Form Editor).
Do not change the entries in the records of the Data (structure numbers 01, 01.01, etc.), Edit (02, 02.01, etc.) and View (03, 03.01, etc.) menus here.
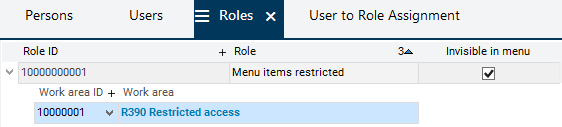
Right-click on an existing role and select the Insert → Role command to create a new role data record.
Assign a name to the new role in the Role field (here: Menu items limited).
Activate the Invisible in user menu checkbox for this role.
Save.
Right-click and select Insert → Work area to assign the new R39 Restricted access work area to this role.
Save.
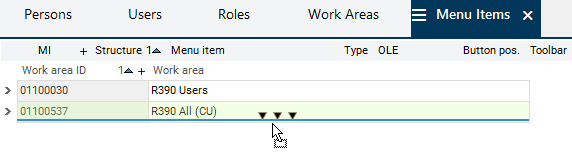
Switch to the Users module and assign the new role to Ralf Schulze manually.
Delete the R39 All (CU) standard menu item role.
After Ralf Schulze has logged in to the system, he can see the Data, Edit, and View menus and the selected menu items in his toolbar.
Note
You can deactivate single menu items within menus in the same way.
Define User Startup Module
Define Startup Module for Standard Role
Task
Define a startup module for Ralf Schulze’s role which is to be opened automatically when he logs in to PLANTAPLANTAproject.
Information
By default, all PLANTAprojectstandard roles contain certain startup modules.
It is possible to choose for every user whether any startup module opens, and which.
Procedure
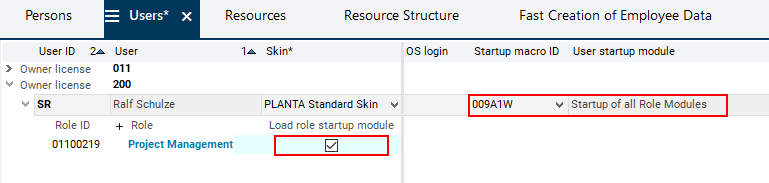
In theUsersmodule, go to Ralf Schulze’s record and select the Startup of all Role Modulesitem from the listbox in theStartup of all Role Modules field.
When assigning the role, activate theLoad startup modulecheckbox in the line of theProject Managementrole.
Result: At Ralf Schulze’s next login, theMy Planning Objectsmodule will load automatically because it is the default startup module for theProject Managementrole. Caution: Since the new user does not have any planning objects, the module is empty at first.
Define an Individual User Startup Module
Information
PLANTA already offers a selection of modules which can directly be assigned to users in the MOD field (as described above) using appropriate macros.
To define a different module as startup module, a new startup macro must be created and assigned to the user. This applies to the storage of both PLANTA standard modules and customer-specific modules. For the procedure, please refer to the description of the Users module.
To record an individual startup macro, the executing administrator/user needs additional customizing modules and rights.
JavaScript errors detected
Please note, these errors can depend on your browser setup.
If this problem persists, please contact our support.