Tutorial: Task Management with PLANTA pulse
Introduction
Objective
- This tutorial is intended to show first-time users how to use the software and its functions on the basis of typical use cases.
Please note:
- The following exercises are based on the PLANTA demo data.
- The screenshots are examples and the screenshot layout may deviate from the actual layout.
- Should the demo user Georg Hart not currently be logged in at PLANTA pulse, please log out the currently logged-in user by clicking on the user avatar in the upper right corner→ Log Out in order to start with the tutorial.
Login Project Manager (Georg Hart)
Task
- Georg Hart wants to plan the designing of the new company website with PLANTA pulse.
Procedure
- In your browser, enter
xxx.plantapulse.de(replacexxxwith your own domain). - The login screen is displayed:
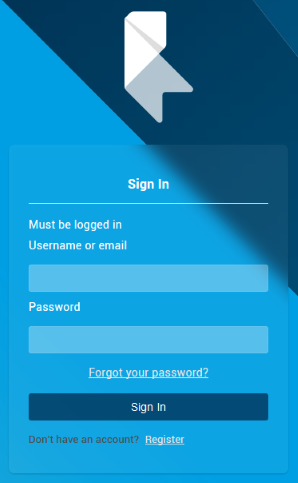
- In the upper input field, enter the user name
r41and the password123456. - Click Sign In.
- TheBoards panel opens.
Details
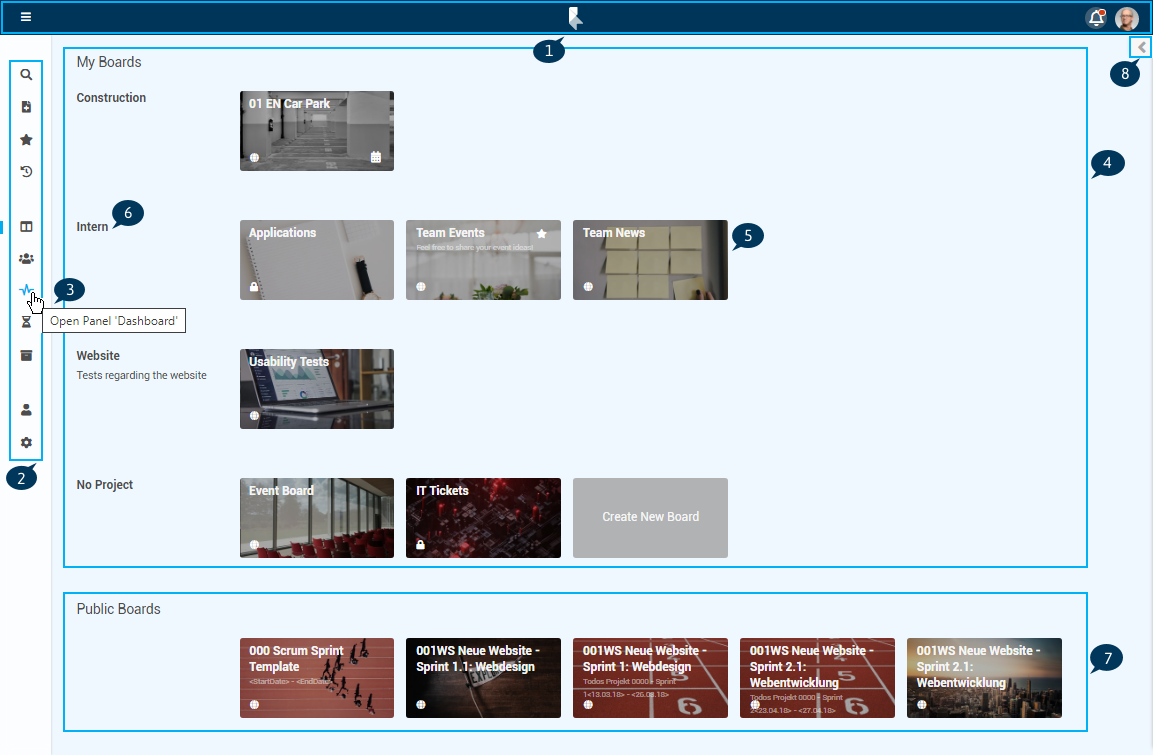
- On the top, theHome Bar (1) can be found which contains the bell symbol forin-app notifications and the user avatar which can be used to access theUser Menu .
- Themenu (2) is on the left and can be opened via .
- If you move your mouse over a menu item, a tooltip (3) appears, so that the menu doesn’t need to be opened.
- In the upper areaMy Boards (4), Georg Hart sees allBoards(5) of which he is a member.
- On the left side, next to the boards, theprojects (6) the boards belong to are listed.
- In the lower areaPublic Boards (7), public boards Georg Hart could join, if needed, are displayed.
- These boards are not sorted by projects.
- Via the arrow (8) on the right, thesidebar can be opened. Here, the newest activities on the user’s boards are shown.
Add Project
Task
- For the designing of the new company website, Georg Hart wants to create a new project.
Procedure
- Open theProjects panel via the menu on the left.
- Below the list of projects, click on Add Project.
- In the pop-up window, enter a title for the project (e.g. “Company Website”).
- Enter a project key (e.g. “WBS”) and, if needed, a description.
- The two fields Comment Format Template and Enable Linking of Boards and Cards are not relevant for the project at this moment.

- The new project is displayed in the list on the left and can be opened by clicking on the title:
Add Members
Task
- Georg Hart wants to add all the employees who will be working on the new company website as members of the project.
- He and Daniela Müller are supposed to be the administrators of the project.
- Lasse Bergström, Kate Simpson and Holger Kaufmann are to be added as employees. Alexandra Hoffmann is to keep track of the project’s progress, but she is not actively involved.
- Georg Hart can therefore add the members to different project permission groups and define their permissions like this.
Procedure
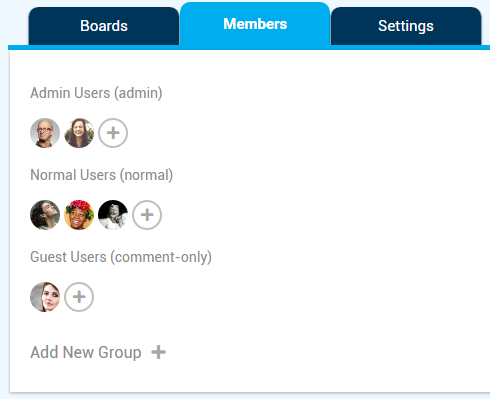
- Open theMembers tab.
- In the "Company Website" project, so far only an empty form is displayed for thepermission groups.
- If needed, Georg Hart could add new project permission groups by clicking on Add New Group and assigning certainpermissions to them.
- In his case, the three default groups Admin Users Normal Users and Guest Users will be sufficient.
- Click on the in the Admin Users area.
- First, enter "Georg Hart" and then "Daniela Müller" in the pop-up window and select the two users.
- Click on the in the area Normal Users and add Lasse Bergström, Kate Simpson and Holger Kaufmann.
- Add Alexandra Hoffmann in the area Guest Users.
Create New Board
Task
- The project will consist of several stages.
- At first, a concept for the new website needs to be created.
- In PLANTA pulse, the stages can be represented byBoards, on which the tasks which need to be completed during the stages can be collected.
- For this reason, Georg Hart wants to create a board, where he can then collect the tasks and assign them to his team.
Procedure
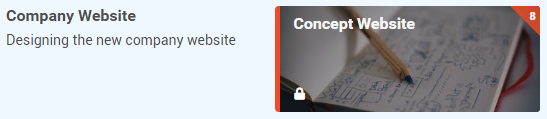
- In the project "Company Website", click on the placeholder board card Create New Board in theBoards tab.

- Enter a title (e.g. "Concept Website").
- By default, the board will be created as aprivate board, which means that onlyboard members can see the board. Keep this setting.
- Click Create.
- The new board opens.
- Thesidebar is on the right and might need to be opened via .
- Via User → Board Settings → Show Sidebar by Default, the sidebar can be set to open by default.
- Here, alllabels,members andactivities of the board are displayed and theBoard Menu can be accessed.
- Themembers of the project have automatically becomemembers of the board:
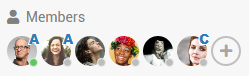
- The letters on the avatars symbolize theboard permissions of the members (A for members with "admin" permission, C for users who can only write comments).
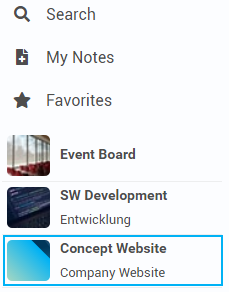
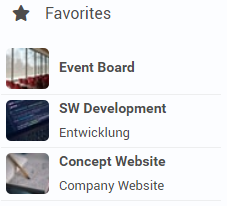
- Since Georg Hart created the board, it is automatically added to hisfavorites. For this reason, a colored star is displayed next to the board title:

Design Board
Task
- Georg Hart wants to improve the board’s design.
- In order to do this, he can choose aboard background in PLANTA pulse.
- Furthermore, he can adjust the board theme to match the selected background image.
Procedure
- On the board in thesidebar, click ... More to open theboard menu.
- Click on Edit Background Image.
- Select one of the images shown below or search for an image via a search term (e.g. “concept”) and select the image by clicking on it.
 |  |
- Back on the board, click onEdit Board Theme in thesidebar.
- Select a theme.
Adjust Labels
- In this stage of the project, the project members are supposed to prioritize the single tasks in order to find a useful workflow.
- To make this easier, Georg Hart wants to create a few individual labels for the board, which the members can then assign to their tasks later.
Procedure
- On the board, in theLabels area in thesidebar, click on a color (e.g. red) or on the in order to select another color.
- Enter a title for the label (e.g. "Prio1").
- Click Save.
- Create more labels in the same way.
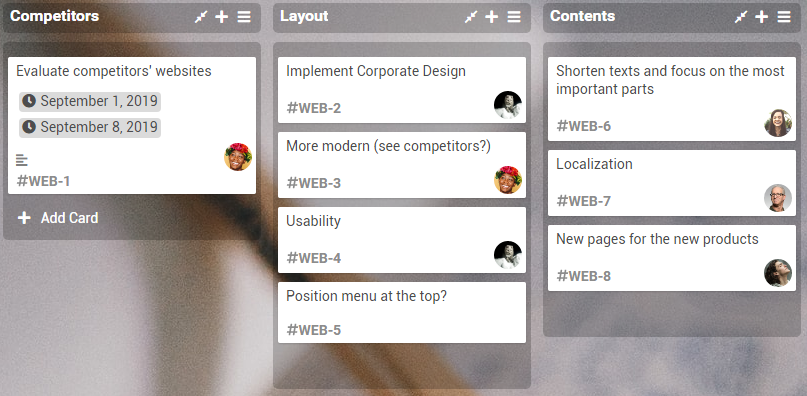
Add Lists
Task
- Georg Hart later wants to be able to sort the tasks by topic.
- To do so, he can create severallists in order to be able to sort the tasks into the corresponding topics.
Procedure
- On the left, click on Add List.
- Enter a title (e.g. "Ideas").
- Click Save or press Enter.
- Create more lists in the same way.

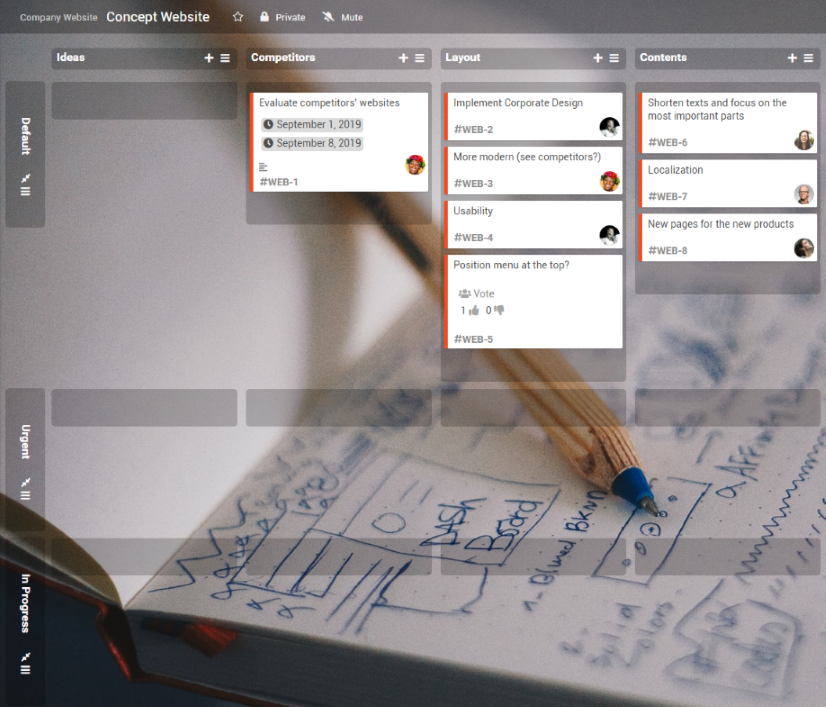
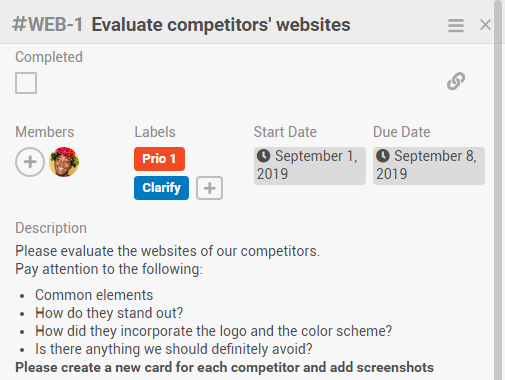
Create Cards
Task
- In the lists he previously created, Georg Hart now wants to add the first tasks in the form of cards. He then wants to assign them to his team.
Procedure
- Click Add Card in the "Competitors" list.
- Enter a title (e.g. "Evaluate competitors’ websites").
- Press CTRL + Enter in order to switch directly into the detail view of the newcard.
- Allkeyboard shortcuts in PLANTA pulse can be accessed by pressing ? or via the user avatar → Keyboard Shortcuts.
- Georg Hart wants to assign this task to Kate Simpson, which is why he adds her to the card by clicking the in theMembers area.
- To make sure that the instructions are clear, he enters adescription.
- Via thecalendars for Start Date and Due Date, he selects when the task is supposed to be done.
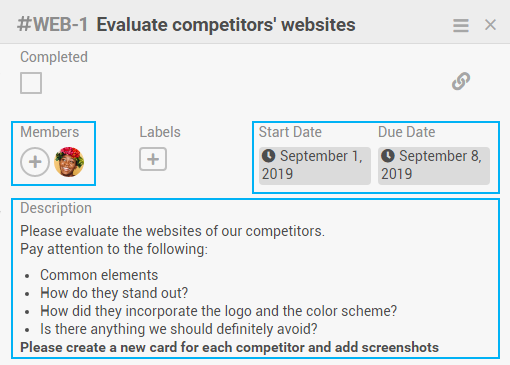
- Georg Hart creates several new cards in the same way. Using Drag&Drop he drags theboard members from thesidebar onto the cards in order to assign their tasks to them.
- Georg Hart doesn’t assign anyone to the card "Position menu at the top?", since he later wants the team to vote on this question.
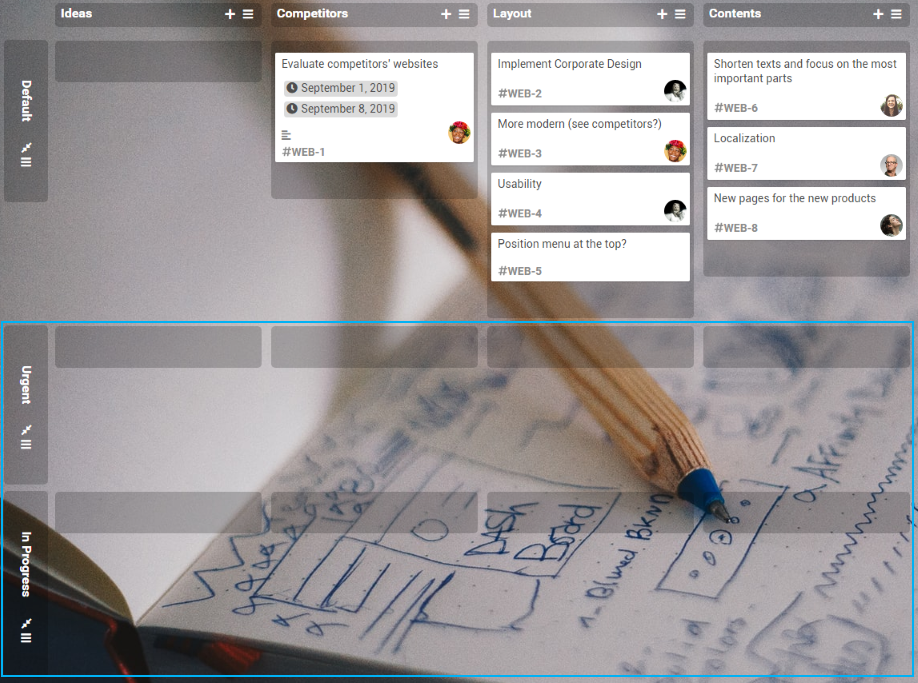
Add Swimlane
Task
- So far, the board is only structured vertically with lists. Georg Hart would like to add a horizontal structure in order to separate current and urgent tasks from the other tasks.
- To do so, he can work withswimlanes in PLANTA pulse.
- He wants to create a swimlane for urgent tasks and a swimlane for current tasks in addition to the standard swimlane.
Add swimlanes
- If needed, open thesidebar on the board by clicking .
- ClickChange Board View .
- Select the Swimlane View.
- To save the current view for all members, click Save.
- In the lower area, click on Add Swimlane.
- Enter a title (e.g. "Urgent").
- Click Save or press Enter.
- Add anotherswimlane (e.g. "In Progress").
Color Swimlane
Task
- To make the swimlane structure clearer, Georg Hart wants to color them.
- This option is not available by default, which is why Georg Hart first needs to create a new field.
- For these individual adjustments, he can use the optionCustom Fields in PLANTA pulse.
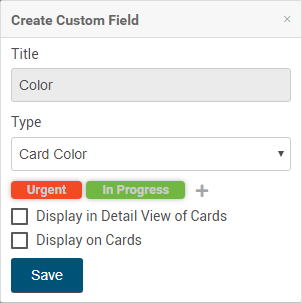
Define card colors
- In the sidebar, select ... More → Custom Fields.
- Click Create Field.
- Enter a title (e.g. "Color").
- Select the optionCard Color from the Type listbox.
- Add new colors by clicking .
- Then, enter a title and select a color.
- Click Create.
- Create another color in the same way.
- Since Georg Hart wants to use the card color for a swimlane, the two checkboxes are not relevant for him at this point.
- Click Save.
Color swimlane
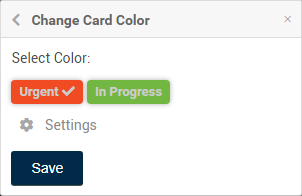
- Open theswimlane menu by clicking below the swimlane title.
- Click Select Color for Cards.
- Select one of the colors previously created (e.g. red for the swimlane “Urgent”).
- Click Save.
- Color the second swimlane.
- If cards are now moved into the swimlane, they will automatically be colored as well.
Vote
Task
- On the old website, the menu was always positioned on the left. Georg Hart would like the project members to vote whether the menu is instead supposed to be at the top on the new website.
- For this option, he will also need to create a custom field first.
Procedure
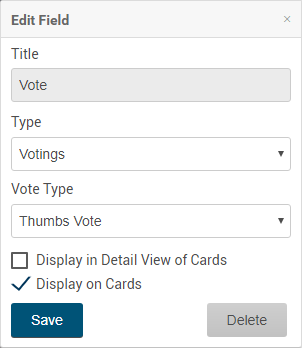
- In the sidebar click ... More → Custom Fields → Create Field klicken.
- Enter a title (e.g. "Vote").
- In the Type listbox, select the field typeVotings .
- The Display in Detail View of Cards checkbox controls, whether the custom field is displayed in thedetail view of all cards, even if no value has been selected.
- Since Georg Hart wants the team to vote on only one card, he does not activate the Display in Detail View of Cards checkbox.
- When the checkbox Display in Preview of Cards is activated, the custom field is shown on the preview of a card as soon as a value has been selected. It will first need to be added to the card via thecard menu.
- Activate this checkbox.
- Click Save.
- Open the card "Position menu at the top?".
- Since Georg Hart didn’t activate the checkbox Display in Detail View of Cards, he now needs to manually add the custom field to the card.
- In the upper right, open thecard menu by clicking and select Custom Fields.
- Select the previously created field for voting.
- The form for the vote is now displayed in thedetail view of the card.
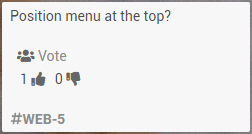
- Georg Hart wants to change the position of the menu on the website and therefore votes with a thumbs up.
- The result of the vote is now also shown in the preview of the card:
- Georg Hart has completed the first part of the planning.
- He informs the team about the new project and asks all members to have a look at their tasks.
- In the upper right corner, click on the user avatar → Log Out.
Login Project Member (Kate Simpson)
Task
- Kate Simpson now wants to know which tasks have been assigned to her for the designing of the new company website.
- Since she is a member of several projects, she would like to be able to see changes on boards immediately.
- To do so, she can use theHighlight Recently Modified Cards option in PLANTA pulse.
Procedure
- In the login screen, enter the user name
r60and the password123456. - Click Sign In.
- TheBoards panel opens.
- In the menu on the left, click on User to open theUser Settings.
- In theBoard Settings , activate theHighlight Recently Modified Cards option.
- The additional optionShow Number of Recently Modified Cards appears. If activated, it is shown in theBoards panel how many cards have been changed on the boards since Kate Simpson last visited them.
- Switch back to theBoards panel via the menu on the left. Kate Simpson notices the new board immediately.
- Because of the changes, it is highlighted in red:
- She opens the board and can now see the planning by Georg Hart.
- Since the plan is still new, all cards are highlighted in red. In the future, the highlights will show Kate Simpson which cards have changed on the board.
- The red highlights disappear once Kate Simpson has opened a card.
- All highlights are removed, when Kate Simpson leaves the board.
Excursion: Filter Cards
Task
- So far, only a few cards have been added to the board. Because of the avatars, Kate Simpson can therefore see quite quickly which cards she has been assigned to.
- There is, however, also the option of filtering the cards so that she only sees her own cards.
Procedure
- If needed, open the sidebar on the board by clicking .
- ClickFilter Cards or press F.
- In the Members area, select the option Me.
- Kate Simpson now sees the two cards Georg Hart assigned to her.
- She ends the filter mode by clicking on the X next to Filter is on in the upper right corner or by pressing X.
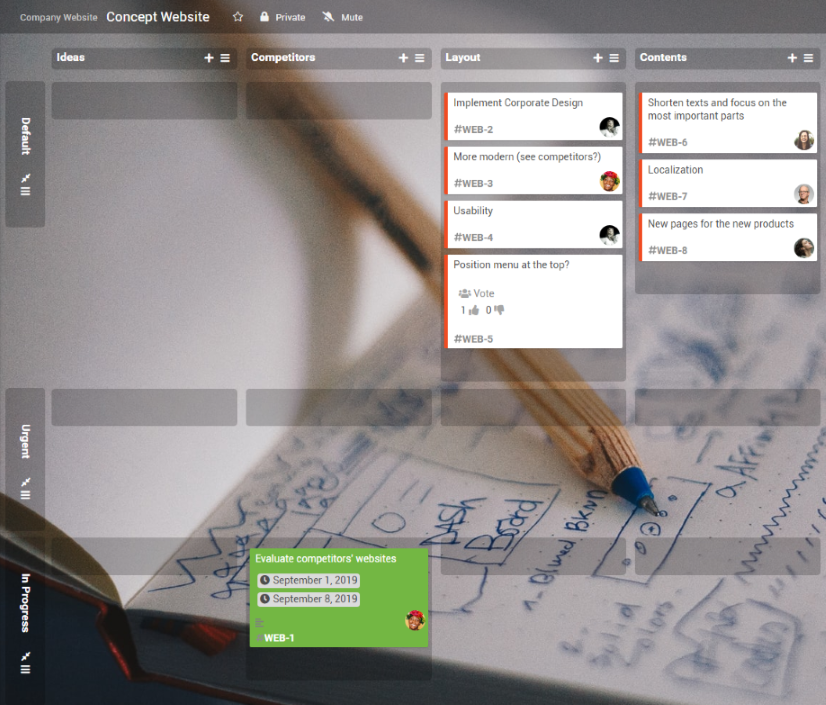
Sort Cards
Task
- Kate Simpson now knows that two tasks have been assigned to her.
- Since the card "Evaluate competitors' websites" has a due date, she decides to start with this task.
- To show the rest of the team that she is now working on the task, she drags the card into the corresponding swimlane.
Procedure
- Drag the card into the "In Progress"swimlane using Drag&Drop.
- The card is colored automatically.
Edit Card
Task
- Kate Simpson now wants to start working on her task.
- At first, she wants to make a list of other competitors and then inform the team about her progress and the priority of her task.
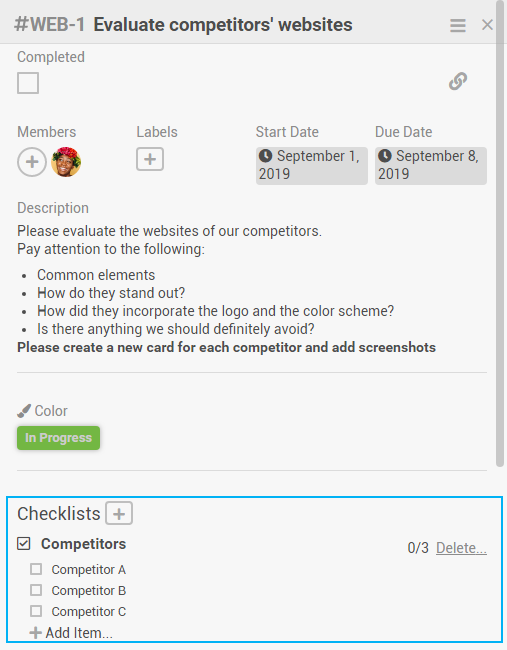
Create Checklist
Task
- Kate Simpson reads the description of the card and decides to create a list of potential competitors.
- In PLANTA pulse, she has the option to create achecklist directly on the card.
- She can then later also tick off the competitors she already worked off.
Procedure
- Click on the card.
- Click on the next to Checklists.
- Enter a title (e.g. "Competitors").
- Click Save or press Enter.
- Add checklist items.
- Click Save or press Enter.
Excursion: Add Attachments
Task
- Kate Simpson also got the task from Georg Hart to upload screenshots for the competitors.
- To do so, she could now add attachments to the corresponding cards.
Procedure
- Click on the card.
- In the upper right, open thecard menu by clicking and selectAdd Attachment .
- Select the option Computer to upload a file from a local directory.
OR - Select the option Clipboard or Drag&Drop to copy or drag a file into the field.
- Select the option Computer to upload a file from a local directory.
- The attachment is now shown in the Attachments area and can also be added as cover.
- As cover, the attachment is shown in preview on the card.
Write Comment
Task
- Kate Simpson isn’t sure whether she thought of all the competitors. She wants to ask the team to add more competitors to the checklist, if needed.
- Therefore, she would like to add a comment on the card.
Procedure
- Enter acomment in the field below Activities.
- Click Add or press CTRL + Enter.

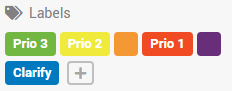
Assign Labels
Task
- Kate Simpson notices that Georg Hart has created individual labels for the board.
- She wants to use those to facilitate communication within the team.
Assign label to a card
- In the detail view of the card, in theLabels area, click on the .
- Select the required labels (e.g. "Prio1" and "Clarification").
OR
Assign label via Drag&Drop
- Select a label from thesidebar and drag it to the card using Drag&Drop.
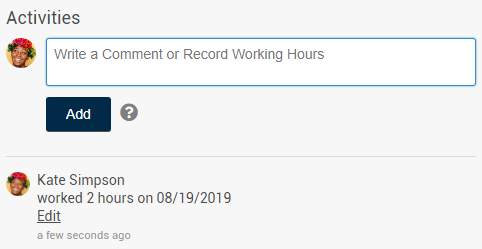
Record Hours Worked
Task
- Kate Simpson has now worked on the task for 2 hours and wants to record her working hours.
Procedure
- Open the card.
- Enter "2 h" in the field belowActivities .
- The entry turns blue, since it is recognized as recorded hours worked.
- Click Record Working Hours or press CTRL + Enter.
- The working hours are now also shown in the activity stream of the card:
- The card can now not be deleted anymore, since working hours have been recorded on it.
- Kate Simpson can see an overview of her working hours in theTime Recording panel.
| See also :Glossary for PLANTA pulse,Feature overview |