Functions on the Card Interface
Information
- Several functions are available in the detail view of the card.
Card Key and Title
Information
- When creating a card, a card title is assigned.
- As soon as the card is created, it receives a card key automatically:
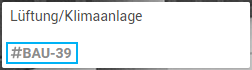
- It consists of the project key (if the board belongs to a project) and an automatically generated number.
- Cards on boards which don’t belong to a project receive a numerical card key only.
- With this card key, the card can be opened directly via the browser address bar:
domainname/show/'Card key'- Via the button in the detail view of the card, the URL of the card can also be copied to the clipboard directly.
Note
- Via the board menu, the card keys can be hidden on all cards of the board.
Rename Card
Procedure
- Open board → Select list → Open detail view of the card
- Click on the card title.
- Rename the card.
- Click Save or press Enter.
Card Menu
Information
- The card menu can be opened in the detail view of the card via the button in the symbol area of the card header and contains further options for the selected card.
More information on the functions in the card menu
Completion Status
Information
- If the work on a card is finished, it can be marked as Completed.
Procedure
- Open board → Select list → Open detail view of the card
- In the upper left of the detail view of the card, activate the Completed checkbox.
- The preview as well as the detail view of the card are marked with a green tick.
Details
- By clicking the green tick in the detail view of the card again, the Completed status can be removed again.
Note
- Cards which have not been completed yet or whose Completed status has been removed are called Open.
Copy Card URL to Clipboard
Open board → Select list → Open detail view of the card
Information
- Via the button in the detail view of the card, the URL of the card can be copied to the clipboard.
- If the URL is opened, the detail view of the card is opened.
Members
Information
- In order to see which board member is responsible for which task, the members can be assigned to individual cards.
- The avatars of the assigned members are displayed on the preview and in the detail view the card.
Assign members via button
- Open board → Select list → Open detail view of the card
- In the detail view of the card, click on the in the Members area and select the member by clicking on it.
- Via the Search for a Member field, the board members can be searched.
- Select the member by clicking on it.
- The member name is ticked and the user is assigned as a member to the card.
Assign members via Drag&Drop
- From the sidebar, move the member avatar to the card using Drag&Drop.
Remove members from card
- Open board → Select list → Open detail view of the card
- In the detail view of the card, click on the in the Members area.
- Select the member by clicking on it.
- The member is now not ticked anymore and the avatar is not displayed on the card anymore.
Assign/Remove yourself as member
- Open board → Select list → Open detail view of the card
- Press the space bar to assign yourself as a member of the card.
- By pressing the space bar again, the user can remove him/herself from the card.
Note
- Only board members can be added as card members.
Labels
Information
- Labels can be assigned to cards.
- Assigned labels are displayed as colored squares on the preview and in the detail view the card.
Use
Add labels to a card
- Assign labels via the button
- Open board → Select list → Open detail view of the card
- In the detail view of the card, click on the in the Labels area and select the label by clicking on it.
- The label is ticked.
- By clicking on it again, the label can be removed from the card again.
- Assign labels via Drag&Drop
- From the sidebar, move the label onto the card using Drag&Drop.
Remove label from a card
- Open board → Select list → Open detail view of the card
- In the detail view of the card, click on the in the Labels area.
- Select the label by clicking on it.
- The label is now not ticked anymore and the smybol is not displayed on the card anymore.
Administration
The following tasks can only be performed by board admins.
Create new label
- Open board → Select list → Open detail view of the card
- In the detail view of the card, click on the in the Labels area.
- Click Create Label.
- If needed, enter a title and a description and select a color.
- If a description is added, it is displayed as a tooltip at the label.
- Click Create.
Edit an existing label
- Open board → Select list → Open detail view of the card
- In the detail view of the card, click on the in the Labels area.
- Click on next to the label.
- Edit the label.
- Click Save.
Delete label
- Open board → Select list → Open detail view of the card
- In the detail view of the card, click on the in the Labels area.
- Click on next to the label.
- Click Delete.
- The label is now not available on the board anymore and is removed from all cards.
Details
- The colors which are available for labels can be edited by global admins in the Administration panel.
- If the option Allow Custom Board Labels has been activated in the Administration panel, users can create labels with individual colors directly on the boards.
Create new color
- Open board → Select list → Open detail view of the card
- In the detail view of the card, click on the in the Labels area.
- Click Create Label.
- Click New Color.
- Enter a title and a hexcode for the color.
- Click Create.
- The new label color is created only on the current board.
More information on custom colors
Start and Due Date
Information
- A start and a due date can be defined for cards.
- These dates are marked with different colors, depending on the distance of the start and due dates to today’s date.
- If needed, reminders for the dates can be configured.
Procedure
- Open board → Select list → Open detail view of the card
- In the detail view of the card, select the dates via the date listboxes Start Date or Due Date.
- If needed, enter a time in the format
(H)H:mm(e.g. 9:00 or 13:00). - In the Activate Reminder listbox, select whether a reminder is to be configured:
- None (Default)
- At time of event
- 5 minutes prior
- 15 minutes prior
- 1 hour prior
- 1 day prior
- Reminders are displayed to all users who are also being informed about the other activities of the card.
- In the Notification Settings, users can configure which cards they want to be notified about.
- The dates are displayed on the preview and in the detail view of the card.
Details
- Once the dates have been defined, they can also be edited directly on the preview of the card, without accessing the detail view.
- Cards with dates can be displayed in the Calendar View.
- When a card is marked as Completed, the dates are displayed in grey.
- The scheme for the color highlightings:
 | Start date is tomorrow or further in the future |
 | Start date is today or earlier in the past |
 | Due date is within 8 days or later |
 | Due date is within 2 -7 days |
 | Due date is today or tomorrow |
 | Due date is yesterday or earlier in the past |
Note
- Via an iCalendar Feed, the dates of the cards of a board (start and due date) can also be exported into other calendars. More Information
Description
Information
- Further information on a card can be provided in the description in the detail view of the card.
Add description
- Open board → Select list → Open detail view of the card
- In the detail view of the card, click into the description field.
- Add the required information.
- Click Save.
- The description can also be saved via the keyboard shortcut CTRL/SHIFT + Enter.
Edit description
- Open board → Select list → Open detail view of the card
- In the detail view of the card, click into the description field.
- Edit the description.
- Click Save.
- If no changes are to be performed, the editing mode can be exited without saving any changes by clicking .
- If the editing mode is exited by clicking out of the description field, any changes made will be saved in a buffer.
- Below the description, the message You have unsaved changes. appears.
- By pressing View, the changes in the buffer can be viewed, by pressing Discard, the changes can be discarded directly.
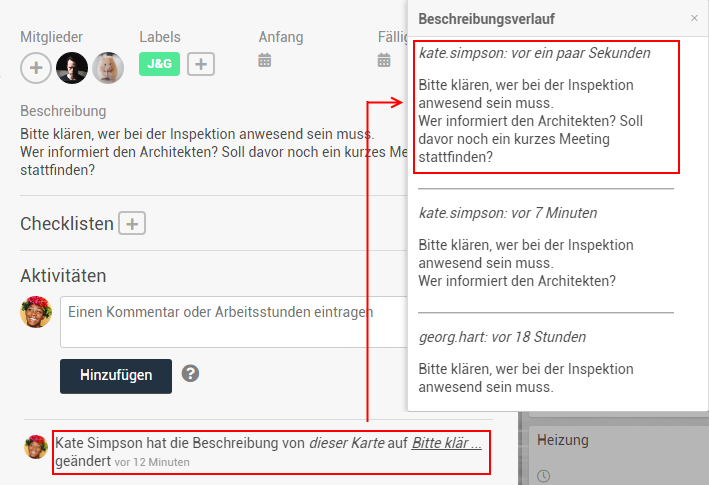
Details
- When the description of a card is changed, an activity is displayed in the Activities tab of the card.
- By clicking the link in the activity, the description history can be viewed:
Custom Fields
Information
- In this area, the custom fields of the card are displayed, if available.
- Custom fields first need to be created by a board admin via the board menu or by the project admin in the Projects panel.
- Further information on the various custom fields can also be found here.
Checklists
Information
- On cards, checklists can be created, to which checklist items can be added.
Procedure
- Open board → Select list → Open detail view of the card
- In the detail view of the card, in the Checklists area, click on the .
- Enter a title for the checklist.
- Click Save or press Enter.
- Now, checklist items can be added to the checklist directly.
- Enter a title for the checklist item.
- Click Save or press Enter.
- To add another checklist, click on the next to the Checklist heading again.
Details
- Later, checklist items can be added via Add Item.
- Checklists and checklist items can be moved on the card via Drag&Drop.
- Checklist items can be marked as completed by activating the checkbox.
- The completion status of the items is displayed on the preview of the card:
Example
 - 1 of 4 items completed
 - All 4 items completed
Attachments
Information
- Attachments can be added to cards and are accessible for every board member.
Procedure
- Open board → Select list → Open detail view of the card
- In the detail view of the card, in the Attachments area, click on the .
- Files can be added in various ways:
- by browsing for files on the computer
- via the clipboard (Copy&Paste)
- via Drag&Drop
- via linking from OneDrive
- This function needs to be set up by a global administrator first. More Information
Details
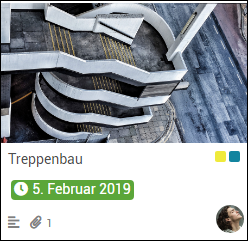
- In the detail view of the card in the area Attachments, there are links to download or delete the files or to add/remove them as cover. Further attachments can be added as well.
- When a file is added as cover, it is displayed in the preview of the card.
Card with image as cover
Notes
- In the file names of attachments, the special characters
<>:"/\|?*are not permitted. - If needed, global admins can configure a maximum allowed size per attachment in the Administration panel.
Tab Area of the Card
Open board → Select list → Open detail view of the card
Information
- The tab area in the lower area of the detail view of the card contains 2 or 3 tabs. The third tab is only displayed if the time recording is activated on the board of the card.
- Comments
- Activities
- Time Recording
- Behind the tab title, the number of elements within the corresponding tab of the opened card is displayed in brackets.
Notes
- By default, the Comments tab is displayed first and is activated when opening a card.
- If needed, users can define the Activities tab to be displayed first in the User Settings → Board Settings .
- The Time Recording tab is only displayed if the time recording is allowed on the board of the card.
Comments Tab
Information
- In the Comments tab, the comments which have been added to the card are displayed.
- Furthermore, new comments can be added to the card.
Add comment
- Open board → Select list → Open detail view of the card → Comments tab
- Click into the text field.
- Enter the text and click Add or confirm by pressing CTRL/SHIFT + Enter.
- The comment is added below the text field.
Mention in a comment
- To address another board member in a comment directly, a mention with
@usernamecan be added. - The user needs to be member of the board.
- When a user is mentioned, he/she will receive a notification in PLANTA pulse.
Details
- Comments
- can be edited via the link Edit and deleted via the link Delete.
- If comment editing has been disabled in the Administration panel, comments can maybe only be edited/deleted for a certain time after their creation or not at all.
- are displayed on the preview of the card as follows:
 (= The card contains a comment)
- can be edited via the link Edit and deleted via the link Delete.
Activities Tab
Open board → Select list → Open detail view of the card → Activities tab
Information
- In the Activities tab, all activities regarding the card are displayed.
Time Recording Tab
Open board → Select list → Open detail view of the card → Time Recording tab
Information
- In the Time Recording tab in the detail view of a card, new hours worked can be recorded and recorded hours worked can be viewed.
Procedure
Notes
- In PLANTA pulse, hours worked can be recorded either directly on cards on a board or in the Time Recording panel.
- The Time Recording tab is only displayed if the time recording is allowed on the board of the card.
- The time recording can be disabled for individual boards via the board menu → Disable Time Recording.
- In the Administration panel → Settings tab → Time Recording Settings, time recording can be disabled on unsynchronized boards if PLANTA Hybrid is used.
-
Page: